
Strawberry Earthquake Cake: A Deliciously Unique Dessert
Are you ready to shake up your dessert game with something uniquely delightful and bursting with flavor? Look no further than the Strawberry Earthquake Cake, a recipe that combines the sweet freshness of strawberries with the irresistible texture of a rich, gooey cake. This treat is not only perfect for any occasion but also simple to make, ensuring a dessert that’s as fun to prepare as it is to eat.
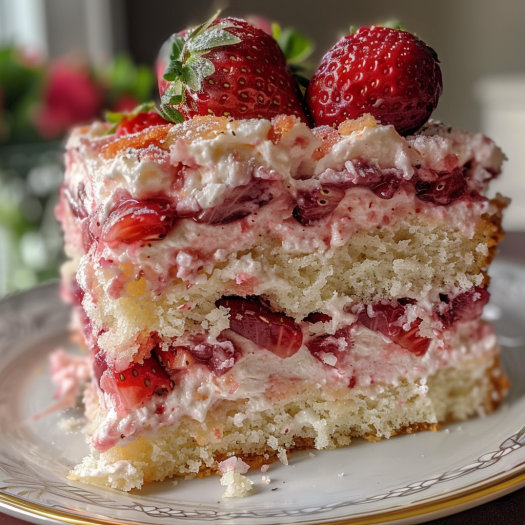
What is a Strawberry Earthquake Cake?
The Strawberry Earthquake Cake is a variation of the classic earthquake cake, which is known for its characteristic cracks and crevices that form as it bakes. This version incorporates strawberries into the mix, resulting in a vibrant, flavorful, and eye-catching dessert. The “earthquake” effect is created by the combination of ingredients that shift and settle during the baking process, creating a beautifully imperfect appearance with every slice.
Ingredients You’ll Need
To make this delightful cake, you will need the following ingredients:
- 1 box of white cake mix: The base of your cake, providing a neutral canvas for your flavors.
- 1 cup of chopped fresh strawberries: For that burst of fresh fruit flavor.
- 1 package (8 oz) of cream cheese, softened: Adds creaminess and depth.
- 1/2 cup of butter, melted: Enhances the richness of the cake.
- 4 cups of powdered sugar: For the sweet, smooth texture in the filling.
- 1 teaspoon of vanilla extract: A dash of vanilla enhances all the other flavors.
- 1/2 cup of coconut flakes (optional): Adds a bit of tropical texture.
- 1/2 cup of chocolate chips (optional): For a hint of chocolatey goodness.
- Confectioners’ sugar for dusting (optional): For a sweet, decorative finish.
Step-by-Step Instructions
- Preheat your oven to 350°F (175°C). Grease a 9×13 inch baking pan or line it with parchment paper.
- Prepare the cake mix according to the package instructions. Pour the batter into the prepared baking pan.
- Mix the filling: In a medium bowl, combine the softened cream cheese, melted butter, powdered sugar, and vanilla extract. Beat until smooth and creamy.
- Add strawberries and extras: Fold the chopped strawberries into the cream cheese mixture. If using, add the coconut flakes and chocolate chips.
- Create the earthquake effect: Drop spoonfuls of the strawberry cream cheese mixture onto the cake batter. Use a knife to swirl the mixture into the batter, creating a marbled effect.
- Bake: Place the cake in the oven and bake for 35-45 minutes, or until the cake is set and the edges begin to pull away from the pan. The center should be slightly wobbly as it will set as it cools.
- Cool and serve: Allow the cake to cool in the pan for at least 20 minutes before slicing. Dust with confectioners’ sugar if desired before serving.
Why Try This Cake?
The Strawberry Earthquake Cake is not just a dessert; it’s an experience. Its moist, creamy texture combined with the freshness of strawberries and the optional crunch of coconut or chocolate chips makes it a hit at any gathering. It’s also a versatile recipe, allowing for various substitutions and additions based on your taste preferences or dietary needs.
This cake is perfect for spring and summer when strawberries are at their peak, making it an excellent choice for picnics, family gatherings, or a decadent treat after a meal.
In Conclusion
The Strawberry Earthquake Cake is a must-try for anyone who loves desserts that are not only delicious but also visually appealing and easy to make. It’s a fantastic way to enjoy the fresh flavors of strawberries in a rich, indulgent cake that’s sure to impress. Give it a try, and you might just find your new favorite dessert!
Serving and Storage Tips for Strawberry Earthquake Cake
After you’ve baked the delicious Strawberry Earthquake Cake, ensuring it is served and stored properly will help maintain its freshness and flavor. Here are some practical tips for serving and storing your cake, keeping it delightful for every bite.
Serving Tips:
- Serve at Room Temperature: For the best texture and flavor, allow the Strawberry Earthquake Cake to come to room temperature before serving. This will help soften the cream cheese swirls and make the cake more enjoyable.
- Add a Garnish: To elevate your presentation, consider adding a light dusting of powdered sugar, a drizzle of strawberry syrup, or even a dollop of whipped cream just before serving. Fresh strawberry slices also make a beautiful and tasty garnish.
- Pair with Ice Cream: For an extra indulgent treat, serve a warm slice of cake with a scoop of vanilla or strawberry ice cream. The contrast between the warm cake and the cold ice cream is heavenly.
- Coffee or Tea Pairing: This cake pairs wonderfully with coffee or tea. The robust flavors of coffee or the lightness of tea complement the rich and fruity notes of the cake, making for a perfect afternoon treat.
Storage Tips:
- Cool Completely Before Storing: Ensure that the cake has cooled completely to room temperature before storing. This prevents condensation from forming inside the container, which could make the cake soggy.
- Refrigerate for Longevity: Because the Strawberry Earthquake Cake contains cream cheese, it’s best to store it in the refrigerator. Place it in an airtight container or wrap it tightly with plastic wrap to keep it fresh. Properly stored, the cake will last for up to 5 days.
- Keep It Airtight: Whether you’re storing the cake in the refrigerator or at room temperature, ensure it’s in an airtight container. This prevents it from absorbing odors from other foods and keeps it moist.
- Freezing for Extended Storage: If you have leftovers that you cannot consume within a few days, freezing is a good option. Wrap individual slices or the entire cake tightly with plastic wrap, then with aluminum foil to protect against freezer burn. Stored this way, the cake can be frozen for up to 3 months. Thaw overnight in the refrigerator before serving.
- Refresh When Serving from Storage: If the cake has been in the fridge or freezer, you can refresh it in a 300°F oven for about 10 minutes. This helps bring back some of the cake’s original texture and warmth, making it almost as good as when it was freshly baked.
By following these serving and storage tips, your Strawberry Earthquake Cake will remain as delectable as the day you made it, making every slice a delight to savor. Whether enjoying it at a family dinner, a special occasion, or as a sweet treat through the week, these tips ensure your cake remains a highlight.
1. Can I use frozen strawberries instead of fresh in the Strawberry Earthquake Cake?
Yes, you can use frozen strawberries instead of fresh ones. However, it is important to thaw the strawberries completely and drain any excess liquid before using them. This helps prevent the cake from becoming too soggy. Pat the strawberries dry with a paper towel after thawing to remove additional moisture.
2. What can I do to prevent the cream cheese filling from sinking to the bottom?
To prevent the cream cheese filling from sinking into the cake, you can try a couple of techniques. First, make sure the cream cheese mixture is thick enough—if it’s too runny, consider adding a bit more powdered sugar to thicken it. Secondly, lightly swirl the cream cheese mixture with the cake batter using a knife or a toothpick, rather than mixing it deeply into the batter. This helps keep the filling more distributed.
3. Can this cake be made gluten-free?
Absolutely! To make a gluten-free Strawberry Earthquake Cake, simply substitute the regular cake mix with your favorite gluten-free cake mix. Ensure that all other ingredients, like the cream cheese and chocolate chips, are certified gluten-free. Always check the labels if you’re serving guests with gluten sensitivities.
4. How do I know when the Strawberry Earthquake Cake is done baking?
Strawberry Earthquake Cake is done when the edges start to pull away from the sides of the pan and the top is set and slightly golden. The center should appear mostly set but may still wobble slightly when the pan is gently shaken; it will continue to set as it cools. Inserting a toothpick near the edge should come out mostly clean, while a toothpick in the center may come out with a few moist crumbs or a bit of the cream cheese filling.
Print
Strawberry Earthquake Cake
- Prep Time: 15 minutes
- Cook Time: 50 minutes
- Total Time: 1 hour 5 minutes
- Yield: 12 servings 1x
- Category: Dessert
- Method: Baking
- Cuisine: American
Description
This delightful dessert combines the sweetness of strawberries with a creamy cheesecake swirl, all atop a moist cake base. The “earthquake” effect comes from the marbled appearance created by swirling the cheesecake mixture into the cake batter.
Ingredients
-
For the Cake:
- 1 box (15.25 ounces) strawberry cake mix
- 3 large eggs
- 1 cup water
- 1/2 cup (113 g) vegetable oil
-
For the Cheesecake Swirl:
- 8 ounces (226 g) cream cheese, softened
- 1/2 cup (113 g) unsalted butter, melted
- 2 1/2 cups (312.5 g) powdered sugar
- 1 teaspoon vanilla extract
- 1/4 teaspoon kosher salt
- 1 cup (166 g) diced fresh strawberries
-
For the Topping:
- 2 cups (364 g) white chocolate chips
Instructions
-
Prepare the Cake:
- Preheat your oven to 350°F (175°C). Grease a 9×13-inch baking dish.
- In a large bowl, combine the strawberry cake mix, eggs, water, and vegetable oil. Mix until smooth.
- Pour the batter into the prepared baking dish.
-
Prepare the Cheesecake Swirl:
- In a separate bowl, beat together the softened cream cheese, melted butter, powdered sugar, vanilla extract, and kosher salt until smooth.
- Gently fold in the diced fresh strawberries.
-
Assemble the Cake:
- Drop spoonfuls of the cheesecake mixture over the cake batter.
- Using a knife, gently swirl the cheesecake mixture into the cake batter to create a marbled effect.
-
Add the Topping:
- Sprinkle the white chocolate chips evenly over the top.
-
Bake:
- Place the baking dish in the preheated oven and bake for 50-55 minutes, or until a toothpick inserted into the center comes out clean.
-
Serve:
- Allow the cake to cool before slicing and serving.
Notes
- Variations: Feel free to substitute the strawberry cake mix with other flavors, such as vanilla or chocolate, and adjust the fruit and chocolate chips accordingly.
- Storage: Store any leftovers in an airtight container in the refrigerator for up to 3 days.