
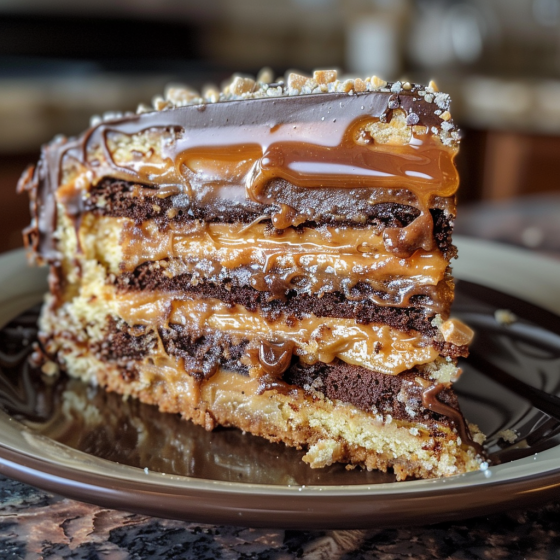
When it comes to desserts that offer the best of both worlds, nothing quite matches the decadence of a Sweet & Salty Millionaire’s Layer Cake. This luxurious cake is a perfect symphony of rich, buttery flavors combined with the delightful contrast of sweet caramel and a hint of sea salt. Ideal for celebrations, family gatherings, or simply as a treat to elevate your weekend, this recipe promises to impress anyone who takes a bite. Follow this step-by-step guide to create a masterpiece that looks as exquisite as it tastes.
Ingredients:
For the Cake:
- 1 cup unsalted butter, softened
- 1 cup granulated sugar
- 4 large eggs
- 2 cups all-purpose flour
- 1 tablespoon baking powder
- 1/2 teaspoon salt
- 1/2 cup whole milk
For the Caramel Layer:
- 1 cup brown sugar
- 1/2 cup heavy cream
- 4 tablespoons unsalted butter
- 1 teaspoon vanilla extract
- 1/2 teaspoon sea salt
For the Chocolate Ganache:
- 1 cup heavy cream
- 2 cups semi-sweet chocolate chips
For the Topping:
- Sea salt flakes, for sprinkling
- Optional: crushed pretzels or toffee bits for added texture
Instructions:
Step 1: Prepare the Cake
- Preheat your oven to 350°F (175°C). Grease and flour three 8-inch round cake pans.
- In a large mixing bowl, cream together the softened butter and granulated sugar until light and fluffy.
- Add eggs one at a time, beating well after each addition.
- In a separate bowl, sift together the flour, baking powder, and salt.
- Gradually add the dry ingredients to the creamed mixture alternately with milk, starting and ending with the flour mixture. Mix until just combined.
- Divide the batter evenly among the prepared pans and smooth the tops.
- Bake for 25-30 minutes or until a toothpick inserted into the center comes out clean.
- Allow the cakes to cool in the pans for 10 minutes, then turn out onto wire racks to cool completely.
Step 2: Make the Caramel Layer
- In a saucepan over medium heat, combine brown sugar, heavy cream, and butter. Bring to a boil, stirring constantly.
- Lower the heat and simmer for about 5 minutes, until the mixture thickens slightly.
- Remove from heat, stir in vanilla extract and sea salt. Let cool to room temperature.
Step 3: Chocolate Ganache
- Heat the heavy cream in a saucepan over medium heat until it just begins to boil.
- Remove from heat and pour over the chocolate chips in a bowl. Let sit for 5 minutes.
- Stir until smooth and glossy. Allow the ganache to cool and thicken slightly.
Step 4: Assemble the Cake
- Place one cake layer on your serving plate and spread half of the caramel over the top.
- Add the second layer of cake and spread the remaining caramel.
- Top with the final cake layer and pour the chocolate ganache over the top, allowing some to drip down the sides.
- Sprinkle with sea salt flakes and, if desired, add crushed pretzels or toffee bits for crunch.
Tips for Perfect Execution:
- Ensure all ingredients, especially butter and eggs, are at room temperature to achieve a smooth, even batter.
- When making the caramel, constant stirring is crucial to avoid burning.
- Allow the ganache to cool slightly before pouring to ensure it sets beautifully atop the cake.
This Sweet & Salty Millionaire’s Layer Cake not only balances the richness of chocolate and caramel with the sharpness of salt but also presents a show-stopping centerpiece for any dining table. Whether you’re a seasoned baker or a novice looking to try something new, this recipe is bound to become a favorite, making you feel like a true pastry chef in your home kitchen. Enjoy the process and the delicious outcome!
Serving and Storage Tips for Sweet & Salty Millionaire’s Layer Cake
Creating the perfect Sweet & Salty Millionaire’s Layer Cake is an achievement in itself, but ensuring it tastes as good as it looks throughout its lifespan is equally important. Here are some essential tips on serving and storing your cake to maintain its decadent quality and irresistible appeal.
Serving Tips:
- Bring to Room Temperature: For the best flavor and texture, bring the cake to room temperature before serving if it has been refrigerated. This allows the caramel and chocolate layers to soften, making the cake easier to cut and more enjoyable to eat.
- The Perfect Cut: Use a sharp, thin-bladed knife to cut the cake. For clean slices, dip the knife in hot water and wipe it dry between each cut. This technique melts through the chocolate and caramel layers smoothly, giving you pristine slices.
- Pairing: Enhance the eating experience by pairing the cake with complementary beverages. A glass of cold milk, a cup of strong coffee, or even a dessert wine like a tawny port can balance the sweetness and richness of the cake.
Storage Tips:
- Short-Term Storage: If you plan to consume the cake within a few days, cover it with a cake dome or an inverted bowl to protect it from air exposure. Store it in a cool, dry place. The caramel and chocolate ganache set better at room temperature, maintaining the cake’s moisture and texture.
- Refrigerating Your Cake: For storing the cake longer than a few days, refrigeration is necessary. Cover the cake tightly with plastic wrap or store it in an airtight container to prevent it from absorbing other flavors and odors from the refrigerator. This method can keep your cake fresh for up to a week.
- Freezing for Longevity: If you need to store the cake for an extended period, freezing is a viable option. Freeze individual slices on a baking sheet before wrapping them in plastic wrap and then in aluminum foil. This method prevents freezer burn and keeps the cake fresh for up to 3 months. Thaw the slices in the refrigerator overnight before bringing them to room temperature for serving.
- Refreshing a Stored Cake: Sometimes, refrigerated or frozen cakes can lose a bit of their luster. To refresh a cake that has been stored, you can briefly warm slices in the microwave for a few seconds. This can help revive the gooeyness of the caramel and the softness of the cake, making it feel freshly baked.
By following these serving and storage tips, you can ensure that every slice of your Sweet & Salty Millionaire’s Layer Cake is as delicious as the first. Whether serving it at a large gathering or enjoying a slice as an indulgent treat, proper care will make your culinary creation a continued delight.
1. Can I make the cake layers ahead of time?
Absolutely! The cake layers can be baked ahead of time, which is particularly helpful when planning for special occasions. Once the layers have cooled completely, wrap each layer individually in plastic wrap and store them at room temperature if using within 24 hours. For longer storage, you can freeze the wrapped layers for up to a month. Thaw them overnight at room temperature before assembling.
2. What can I use if I don’t have sea salt flakes?
If sea salt flakes aren’t available, you can use any coarse salt as a substitute. However, be cautious with the quantity since regular coarse salt might be denser than flaky sea salt. Start with a smaller amount, taste, and adjust if necessary. The goal is to enhance the flavors without making the cake overly salty.
3. Is there a substitute for heavy cream in the ganache and caramel?
For the ganache, a good substitute for heavy cream is full-fat coconut milk, which provides a similar thickness and richness. For the caramel, condensed milk can be used instead of heavy cream. Keep in mind that using condensed milk will make the caramel sweeter and slightly thicker, so you might want to adjust the sugar accordingly.
4. How do I ensure my caramel doesn’t crystallize?
Crystallization can be a common issue when making caramel. To prevent this, avoid stirring the caramel once it starts boiling. Instead, gently swirl the pan to mix. Additionally, you can brush down the sides of the pan with a wet pastry brush to dissolve any sugar crystals that form. This helps maintain a smooth texture in your caramel.