
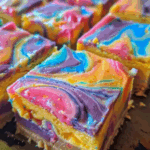
Are you looking to add a splash of color and a burst of flavor to your dessert table? Rainbow Cheesecake Swirl Bars are the perfect treat to brighten up any gathering or to just treat yourself after a long day. These vibrant, eye-catching bars combine the creamy richness of classic cheesecake with playful swirls of rainbow colors, making them as fun to look at as they are to eat. Below, you’ll find a simple step-by-step recipe to make these delightful desserts at home.
Ingredients:
- For the crust:
- 2 cups of graham cracker crumbs
- 8 tablespoons (1 stick) unsalted butter, melted
- 1/4 cup granulated sugar
- For the cheesecake:
- 4 packages (8 ounces each) cream cheese, softened
- 1 cup granulated sugar
- 1 teaspoon vanilla extract
- 4 large eggs
- 2 tablespoons all-purpose flour
- Food coloring (red, orange, yellow, green, blue, and purple)
Instructions:

- Preheat and Prepare:
Begin by preheating your oven to 350°F (175°C). Line a 9×13-inch baking pan with parchment paper, allowing some to overhang for easy removal of the bars after baking. - Make the Crust:
In a medium bowl, combine the graham cracker crumbs, melted butter, and 1/4 cup sugar. Stir until the mixture resembles wet sand. Press this mixture firmly into the bottom of the prepared pan, creating an even layer. Bake in the preheated oven for 10 minutes, then remove and set aside to cool. - Cheesecake Mixture:
In a large mixing bowl, beat the softened cream cheese with 1 cup sugar and vanilla extract until smooth and creamy. Add eggs one at a time, beating well after each addition. Sprinkle in the flour and mix until just combined. - Color the Cheesecake:
Divide the cheesecake mixture into six bowls. Add a few drops of a different food coloring to each bowl (red, orange, yellow, green, blue, and purple), and mix until the colors are vibrant. - Swirl the Colors:
Drop spoonfuls of the colored cheesecake mixtures over the pre-baked crust, alternating colors and distributing them evenly. Once all the mixture has been used, use a skewer or the tip of a knife to gently swirl the colors together to create a marbled effect. - Bake:
Bake in the preheated oven for 35-40 minutes, or until the edges are set but the center is still slightly jiggly. Avoid overbaking to ensure that the bars stay creamy. - Cool and Chill:
Allow the bars to cool at room temperature on a wire rack. Once cooled, refrigerate for at least 3 hours, or overnight, which allows the flavors to meld and the bars to firm up for easier slicing. - Serve:
Lift the bars out of the pan using the overhanging parchment paper. Slice into squares and serve. Enjoy the creamy, tangy flavor of the cheesecake contrasted with the sweet, crumbly crust and the joyous, colorful swirls that make these bars a delightful treat.
Tips for Perfect Rainbow Cheesecake Swirl Bars:
- Smooth Cheesecake: Ensure your cream cheese is at room temperature before mixing to avoid lumps.
- Vibrant Colors: Use gel food coloring for more intense and vibrant colors without altering the texture of the cheesecake mixture.
- Swirling Technique: Don’t overmix when swirling the colors to avoid muddying them, aim for just a few strokes.
Rainbow Cheesecake Swirl Bars are not just a treat for the palate but also a feast for the eyes. Whether it’s for a special occasion, a festive party, or just because, these bars are sure to impress. Enjoy the process of creating these beautiful, delicious treats and the smiles they bring to everyone’s faces!
Serving and Storage Tips for Rainbow Cheesecake Swirl Bars
Rainbow Cheesecake Swirl Bars are as delightful to serve as they are delicious to eat. To make the most out of your dessert and ensure it stays fresh, follow these practical serving and storage tips:
Serving Tips:
- Temperature: Cheesecake is best enjoyed when slightly chilled. Remove the bars from the refrigerator about 10-15 minutes before you plan to serve them. This slight tempering brings out the flavors and softens the texture for the perfect creamy bite.
- Cutting: For clean, sharp cuts, use a sharp knife and wipe it clean with a damp cloth between each cut. This helps prevent the colors from blending into one another and keeps each piece looking vibrant and distinct.
- Presentation: Serve each piece on individual small plates or napkins. You can garnish with a small dollop of whipped cream or a sprinkle of rainbow sprinkles for an extra festive touch.
- Accompaniments: Pair the cheesecake bars with a light beverage that complements their richness. A cup of coffee, tea, or even a glass of sparkling water with lemon can balance the sweetness beautifully.
Storage Tips:
- Refrigeration: Keep any uneaten cheesecake bars in the refrigerator. Cover them loosely with plastic wrap or place them in an airtight container. Properly stored, they will last for up to 5 days. The refrigeration not only keeps them fresh but also maintains the firmness of the cheesecake, making them easier to handle.
- Freezing: For longer storage, Rainbow Cheesecake Swirl Bars can be frozen. Place the slices on a baking sheet not touching each other and freeze until solid. Once frozen, wrap each bar individually in plastic wrap followed by aluminum foil. Store the wrapped bars in a freezer-safe zip-lock bag or container. They can be kept frozen for up to 2 months. To serve, thaw the bars in the refrigerator overnight.
- Avoiding Condensation: When thawing frozen cheesecake bars, keep them wrapped until they reach refrigerator temperature. This helps prevent condensation from forming on the surface, keeping the top layer and swirls looking pristine.
- Quick Chill: If you need to cool the cheesecake quickly after baking (and have space in your freezer), place the pan in the freezer for about 30 minutes to an hour before transferring it to the refrigerator. This can help set the cheesecake more quickly and reduce waiting time.
By following these serving and storage tips, you can ensure that your Rainbow Cheesecake Swirl Bars are not only a vibrant centerpiece at your event but also a delightfully preserved treat that can be enjoyed to its fullest over time. Whether serving immediately after chilling or enjoying a leftover piece days later, these tips will help maintain the dessert’s optimal texture and taste.
1. Can I use low-fat cream cheese for this recipe?
Yes, you can use low-fat cream cheese to make Rainbow Cheesecake Swirl Bars, though the texture and flavor will slightly differ from using full-fat cream cheese. Low-fat cream cheese can make the cheesecake less creamy and more firm, but it is a good option if you’re looking to reduce the calorie count. Be sure to mix it thoroughly to ensure the mixture is smooth and free of lumps.
2. What can I use instead of graham cracker crumbs for the crust?
If you’re looking to change up the crust or need an alternative due to dietary restrictions, there are several options. Digestive biscuits are a great alternative and have a similar texture and taste. For a gluten-free option, you can use gluten-free cookies or almond flour mixed with melted butter and a little sugar. Oreo cookie crumbs (without the filling) can also be used for a chocolatey crust.
3. How do I prevent cracks in my cheesecake bars?
Cracks in cheesecake often occur due to overbaking or sudden temperature changes. To prevent this, make sure to bake your cheesecake just until the edges are set and the center is still slightly jiggly. Avoid opening the oven door frequently as this can cause temperature fluctuations. After baking, cool the cheesecake gradually in the oven with the door slightly ajar for about an hour before removing it to cool completely on a rack.
4. Can I make these cheesecake bars ahead of time?
Absolutely! Rainbow Cheesecake Swirl Bars are a great make-ahead dessert. You can prepare and bake the bars up to two days in advance. Just keep them refrigerated in an airtight container until you are ready to serve. They also freeze well if you need to make them further in advance, following the freezing instructions provided in the storage tips to enjoy them later. This makes them perfect for parties, holidays, or any event where you want a stunning dessert ready to go.
Rainbow Cheesecake Swirl Bars
- Prep Time: 20 minutes
- Cook Time: 40 minutes
- Total Time: 1 hour
- Yield: 16 bars 1x
- Category: Dessert
- Method: Baking
- Cuisine: American
- Diet: Vegetarian
Description
Colorful and fun rainbow cheesecake swirl bars with a creamy texture and a graham cracker crust, perfect for parties or special occasions.
Ingredients
- 1 1/2 cups graham cracker crumbs
- 1/4 cup granulated sugar
- 1/2 cup unsalted butter, melted
- 16 oz cream cheese, softened
- 2/3 cup granulated sugar
- 2 large eggs
- 1 tsp vanilla extract
- 1/2 cup sour cream
- Food coloring (red, orange, yellow, green, blue, and purple)
Instructions
- Preheat oven to 325°F (163°C). Line a 9×9-inch baking pan with parchment paper.
- In a bowl, mix graham cracker crumbs, 1/4 cup sugar, and melted butter. Press into the bottom of the prepared pan. Bake for 8 minutes and let cool.
- In a large bowl, beat cream cheese until smooth. Add 2/3 cup sugar and mix until combined.
- Add eggs, one at a time, mixing well after each. Stir in vanilla extract and sour cream.
- Divide the cheesecake batter into six bowls. Tint each bowl with a different food coloring.
- Drop spoonfuls of each color over the crust, alternating to create a rainbow effect. Use a toothpick or knife to swirl the colors together.
- Bake for 35–40 minutes or until the center is just set. Cool completely at room temperature, then refrigerate for at least 4 hours or overnight.
- Cut into bars and serve chilled.
Notes
- Use gel food coloring for more vibrant hues.
- Make sure cream cheese is fully softened to avoid lumps.
- Chill thoroughly before cutting for clean slices.
Nutrition
- Serving Size: 1 bar
- Calories: 210
- Sugar: 14g
- Sodium: 160mg
- Fat: 14g
- Saturated Fat: 8g
- Unsaturated Fat: 4g
- Trans Fat: 0g
- Carbohydrates: 18g
- Fiber: 0g
- Protein: 3g
- Cholesterol: 45mg