
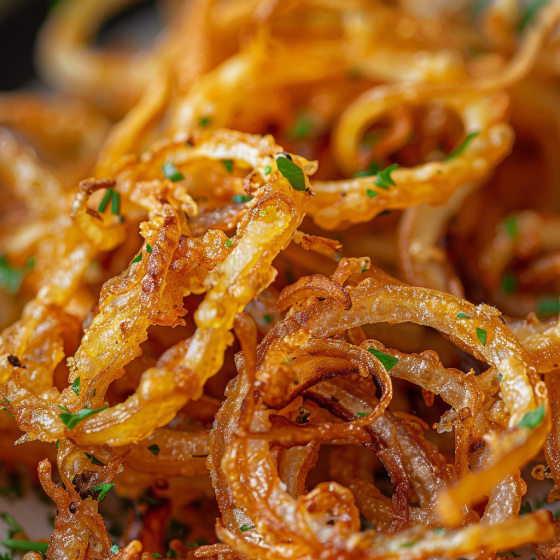
Are you in the mood for a savory snack that’s both simple to make and irresistibly delicious? Look no further than crispy onion strings! These golden, thin slices of onion fried to perfection are a versatile treat that can elevate burgers, salads, or be enjoyed all on their own. Let’s dive into how you can create this crunchy delight at home, complete with tips for achieving the perfect texture and flavor.
What You Need to Make Crispy Onion Strings
To get started, you’ll need the following ingredients:
- Large onions: 2, preferably sweet or yellow onions.
- All-purpose flour: 1 cup to coat the onions and ensure crispiness.
- Garlic powder: 1 teaspoon for a hint of savory flavor.
- Paprika: 1 teaspoon to add color and a subtle spice.
- Salt: ½ teaspoon, or to taste.
- Buttermilk: 1 cup to soak the onions, helping the flour mixture stick.
- Vegetable oil: For frying, enough to fill your pan or fryer about 2 inches deep.
Step-by-Step Instructions
- Prepare the Onions: Begin by peeling the onions and slicing them very thinly. A mandoline slicer is ideal for getting consistently thin, even slices, which is key to perfect onion strings.
- Soak the Onions: Place the sliced onions in a large bowl and pour the buttermilk over them. Let them soak for at least an hour. This step is crucial as it softens the onions and helps the coating adhere better.
- Heat the Oil: While the onions are soaking, you can begin to heat your oil in a deep fryer or a deep skillet. Aim for a temperature of 375°F (190°C) — using a thermometer to check the temperature ensures safety and the best results.
- Mix Dry Ingredients: In a separate bowl, mix together the flour, garlic powder, paprika, and salt.
- Coat the Onions: Drain the onions from the buttermilk and toss them in the flour mixture until they are well-coated.
- Fry the Onions: Fry the coated onions in batches, being careful not to overcrowd the pan. This prevents them from sticking together and helps achieve a more even fry. They should take about 2-3 minutes to turn golden brown and crispy.
- Drain and Serve: Once fried, transfer the onion strings to a plate lined with paper towels to drain excess oil. Serve them hot for the best texture and flavor.
Tips for Perfect Onion Strings
- Slice Evenly: Consistent thickness is key to ensuring all your onion strings cook at the same rate.
- Monitor Oil Temperature: Keep the oil hot, but not smoking. If the temperature drops too low, the onions will absorb more oil and become soggy.
- Season Immediately: Sprinkle a little more salt or your choice of seasoning as soon as the onions come out of the fryer for extra flavor.
Serving Suggestions
Crispy onion strings are incredibly versatile. They make an excellent topping for burgers or pulled pork sandwiches. You can also serve them as a snack with a side of your favorite dipping sauces, such as spicy ketchup, ranch dressing, or a creamy aioli.
Conclusion
Crispy onion strings are not just easy to make but are also a crowd-pleaser that adds a crunchy, flavorful element to any dish. With these simple steps and helpful tips, you’ll be able to whip up a batch of perfectly crispy onion strings that your friends and family will love. Whether as a garnish or a standalone snack, these onion strings are sure to impress!
Remember, the key to the best crispy onion strings lies in the preparation and frying technique, ensuring every bite is as satisfying as the last. Enjoy your cooking adventure with this simple yet delightful recipe!
Serving and Storage Tips for Crispy Onion Strings
Crispy onion strings are a delicious and versatile snack, but to keep them at their best, it’s important to follow a few serving and storage tips. Here’s how you can ensure your onion strings remain crispy and tasty whether served immediately or stored for later use.
Serving Tips
- Serve Immediately: Onion strings are best enjoyed fresh out of the fryer while they’re still hot and crispy. This is when their texture and flavor are at their peak.
- Keep Warm: If you need to prepare onion strings in advance of serving, keep them warm in a low oven. Set your oven to around 200°F (about 95°C) and place the fried onion strings on a wire rack over a baking sheet. This allows air to circulate around them, keeping them crisp.
- Presentation: Serve onion strings in a basket or on a platter lined with a paper napkin to absorb any excess oil. Sprinkling them lightly with fine sea salt or your favorite seasoning blend right after frying will enhance their flavor.
Storage Tips
- Cooling Down: Before storing any leftover onion strings, let them cool down completely at room temperature. Do not cover them while they cool as condensation can make them soggy.
- Short-Term Storage: If you have leftovers that you plan to eat within a day, store them at room temperature in an airtight container. You can line the container with paper towels to absorb any residual oil and keep the onion strings dry.
- Reheating: To bring back the crispiness of onion strings, reheat them in the oven or toaster oven. Spread them out on a baking sheet in a single layer and heat at 350°F (about 175°C) until they are hot and crispy again, usually for about 5-10 minutes.
- Long-Term Storage: Although best enjoyed fresh, you can freeze onion strings for longer storage. Freeze them in a single layer on a baking sheet, then transfer them to a freezer-safe bag or container. When ready to use, reheat them directly from frozen in a 350°F (175°C) oven until warm and crispy.
- Avoid the Microwave: Reheating onion strings in the microwave can make them soft and chewy instead of crisp. Always opt for the oven or toaster oven for reheating to maintain their texture.
By following these serving and storage tips, you can enjoy your crispy onion strings at their best, whether they’re freshly made or saved for later. Enjoy their delightful crunch and savory flavor anytime!
1. What kind of onions are best for making onion strings?
Sweet onions and yellow onions are the most popular choices for making onion strings due to their flavor profiles. Sweet onions, like Vidalia or Walla Walla, tend to be milder and sweeter, which can be a delightful contrast to the salty, crispy coating. Yellow onions offer a more robust flavor that pairs well with the savory seasonings used in the batter. Red onions can also be used for a sharper taste.
2. Can I make onion strings without a deep fryer?
Absolutely! While a deep fryer can provide a consistent temperature that is ideal for frying, you can easily use a deep, heavy skillet or a Dutch oven on your stovetop. Fill it with enough oil to submerge the onion slices (typically about 2 inches of oil) and use a kitchen thermometer to maintain the oil temperature at around 375°F (190°C). This method is just as effective as using a deep fryer.
3. How can I prevent my onion strings from becoming soggy?
There are several key steps to ensure your onion strings stay crispy:
- Drain Well: After frying, immediately transfer the onion strings to a plate lined with paper towels to absorb excess oil.
- Don’t Overcrowd: Fry the onion strings in small batches to prevent them from sticking together and to ensure they fry evenly.
- Maintain Oil Temperature: Keep the oil consistently hot. If the temperature drops too low, the onions will absorb more oil and turn soggy.
- Store Properly: If not serving immediately, keep them warm in a low oven on a wire rack over a baking sheet until ready to serve.
4. Are there any healthier alternatives to frying onion strings?
For a healthier alternative, you can bake onion strings in the oven. Although they won’t be exactly the same as the fried version, they can still be tasty. To bake:
- Preheat your oven to 450°F (232°C).
- Prepare the onions as described but spray them lightly with a cooking spray or brush them with a small amount of oil before baking.
- Spread them in a single layer on a wire rack placed over a baking sheet.
- Bake until they are crispy and golden brown, about 15-20 minutes, flipping halfway through.