
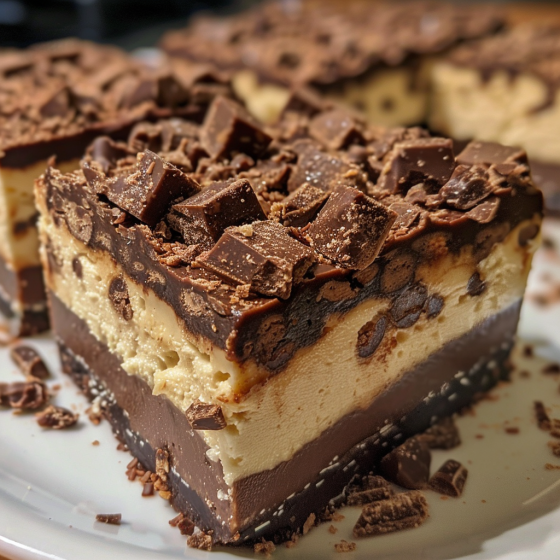
Craving something sweet but not in the mood to fire up the oven? No-bake desserts are the perfect solution for easy, impressive treats without the hassle of baking. Among the plethora of no-bake recipes, the No-Bake Buckeye Cheesecake Bars stand out as a crowd-pleaser. Combining the irresistible flavors of peanut butter and chocolate in a creamy, decadent layer of cheesecake, these bars are a guaranteed hit for any occasion. Let’s dive into how you can whip up this delightful dessert in no time!
What Are Buckeye Cheesecake Bars?
Originating from the popular Buckeye candies native to Ohio, known for their smooth peanut butter centers dipped in rich chocolate, these cheesecake bars transform the classic candy into a luscious layered dessert. The best part? No oven is required, making this recipe perfect for warm days or when you need a quick dessert without the wait.
Ingredients:
To make these No-Bake Buckeye Cheesecake Bars, you’ll need the following ingredients:
- For the Crust:
- 1 1/2 cups graham cracker crumbs
- 1/4 cup sugar
- 6 tablespoons unsalted butter, melted
- For the Cheesecake Filling:
- 16 oz cream cheese, softened
- 1 cup powdered sugar
- 1 teaspoon vanilla extract
- 1 cup creamy peanut butter
- 1 cup heavy cream
- For the Chocolate Topping:
- 1 cup semi-sweet chocolate chips
- 1/2 cup heavy cream
Instructions:
Step 1: Prepare the Crust
- In a medium bowl, combine the graham cracker crumbs, sugar, and melted butter until well mixed.
- Press the mixture into the bottom of an 8×8 inch square baking dish, firmly packing it to create an even layer.
- Refrigerate the crust while you prepare the filling to help it set.
Step 2: Make the Cheesecake Filling
- In a large mixing bowl, use an electric mixer to beat the cream cheese until smooth and creamy.
- Gradually add the powdered sugar and vanilla extract, continuing to beat until well incorporated.
- Add the peanut butter and mix until the mixture is smooth.
- In a separate bowl, whip the heavy cream until stiff peaks form.
- Gently fold the whipped cream into the peanut butter mixture until no streaks remain.
- Spread the filling evenly over the prepared crust and smooth the top with a spatula.
Step 3: Add the Chocolate Topping
- In a small saucepan, heat the heavy cream just until it begins to simmer, then pour it over the chocolate chips in a bowl.
- Let sit for 1-2 minutes, then stir until the chocolate is completely melted and the mixture is smooth.
- Pour the chocolate over the cheesecake layer, spreading to cover completely.
Step 4: Chill and Serve
- Refrigerate the bars for at least 4 hours, or until set.
- Slice into squares and serve chilled for a delightful treat.
Why You’ll Love These No-Bake Buckeye Cheesecake Bars
- No Oven Needed: Perfect for hot days or when you want to keep the kitchen cool.
- Easy to Make: Simple steps and common ingredients make this recipe accessible for any home cook.
- Deliciously Rich: The combination of creamy cheesecake, peanut butter, and chocolate makes for an indulgent dessert.
- Perfect for Any Occasion: Whether it’s a family gathering, holiday, or a simple treat, these cheesecake bars are always a hit.
Conclusion
No-Bake Buckeye Cheesecake Bars are a delicious twist on traditional cheesecakes and Buckeye candies. They offer the ultimate combination of flavors with minimal effort, making them an ideal choice for dessert lovers seeking convenience and taste in one go. Try making these bars today and watch them become a new favorite in your dessert repertoire!
Serving and Storage Tips for No-Bake Buckeye Cheesecake Bars
Serving Tips:
- Cutting Bars: To achieve clean cuts, use a sharp knife and wipe the blade with a warm, damp cloth between each cut. This method ensures that the layers stay distinct and the presentation is neat.
- Temperature: Serve the cheesecake bars chilled. Removing them from the refrigerator just before serving maintains their firmness and enhances the creamy texture, making them more enjoyable.
- Garnish Options: For an added touch, consider sprinkling crushed peanuts or a light dusting of cocoa powder over the top of the bars before serving. This not only enhances the flavor but also adds a visually appealing contrast.
- Size of Servings: Depending on your preference or the occasion, you can cut the bars into smaller bite-sized pieces for a large gathering or larger squares for more indulgent servings.
Storage Tips:
- Refrigeration: Always store the cheesecake bars in the refrigerator. Place them in an airtight container to keep them fresh. Properly stored, these bars can last up to 5 days in the refrigerator.
- Layering: If you need to stack the bars in a container, place a sheet of parchment paper or wax paper between layers to prevent them from sticking together and to protect the chocolate topping from being marred.
- Freezing: For longer storage, No-Bake Buckeye Cheesecake Bars can be frozen. Wrap individual bars in plastic wrap and then place them in a sealed container or a freezer-safe zip-lock bag. They can be stored in the freezer for up to 3 months. When you’re ready to enjoy them, thaw the bars in the refrigerator overnight.
- Thawing: To serve frozen bars, it’s best to plan ahead. Transfer the desired number of bars from the freezer to the refrigerator and let them thaw overnight. This gradual thawing helps maintain the texture and flavor of the cheesecake.
By following these serving and storage tips, your No-Bake Buckeye Cheesecake Bars will remain delicious and presentable, making them a delightful treat to enjoy whenever the mood strikes!
1. Can I use natural peanut butter in this recipe?
Yes, you can use natural peanut butter in these No-Bake Buckeye Cheesecake Bars. However, keep in mind that natural peanut butter tends to be less stable due to its oil separation, which might affect the consistency of your filling. For best results, stir the natural peanut butter well before using to ensure it is thoroughly mixed and consider reducing the amount of liquid in the recipe slightly to compensate for the extra oil.
2. How can I make these cheesecake bars vegan?
To make vegan No-Bake Buckeye Cheesecake Bars, substitute the cream cheese with a plant-based cream cheese alternative and use a dairy-free whipped cream option. For the chocolate topping, ensure that your chocolate chips are vegan (dark chocolate is often a safe choice). Instead of heavy cream in the chocolate topping, use coconut cream or another dairy-free heavy cream substitute. Always check the labels to make sure all ingredients meet vegan standards.
3. What alternatives can I use for the graham cracker crust?
If you want to try something different or have dietary restrictions, there are several alternatives for the graham cracker crust. You can use crushed Oreos, vanilla wafers, or any other cookie that complements the flavors of peanut butter and chocolate. For a gluten-free option, use gluten-free cookies or almond flour mixed with a bit of sugar and butter to achieve a similar crust consistency.
4. How can I prevent the cheesecake layer from being too soft?
If you find that your cheesecake layer is too soft after chilling, there are a few ways to improve its firmness:
- Ensure that the cream cheese is fully softened before mixing to avoid lumps that can affect how the mixture sets.
- Increase the amount of powdered sugar slightly, as it helps to thicken the mixture.
- Make sure to whip the heavy cream to stiff peaks before folding it into the peanut butter mixture; this will help the structure of the cheesecake layer.
- Let the bars chill in the refrigerator for longer, preferably overnight, to fully set.
No-Bake Buckeye Cheesecake Bars
- Prep Time: 20 minutes
- Cook Time: 4 hours
- Total Time: 4 hours 20 minutes
- Yield: 12–16 bars 1x
- Category: Desserts
- Method: No-Bake
- Cuisine: American
Description
These No-Bake Buckeye Cheesecake Bars combine the rich, nutty flavors of peanut butter and chocolate in a creamy, indulgent dessert. Inspired by the classic Buckeye candy, this easy recipe requires no oven, making it perfect for any occasion!
Ingredients
For the Crust:
- 2 cups chocolate graham cracker crumbs (or crushed chocolate cookies)
- 1/2 cup unsalted butter (melted)
For the Peanut Butter Cheesecake Layer:
- 16 oz cream cheese (softened)
- 1 cup creamy peanut butter
- 3/4 cup powdered sugar
- 1 teaspoon vanilla extract
- 1 cup heavy whipping cream
For the Chocolate Ganache:
- 1 1/2 cups semisweet chocolate chips
- 3/4 cup heavy cream
Instructions
Prepare the Crust:
- Combine crust ingredients:
- In a medium bowl, mix the chocolate graham cracker crumbs with melted butter until the mixture resembles wet sand.
- Press into the pan:
- Line a 9×9-inch square baking pan with parchment paper. Firmly press the crumb mixture into the bottom of the pan to form an even crust. Chill in the refrigerator while preparing the filling.
Make the Peanut Butter Cheesecake Layer:
3. Whip the cream:
- In a large bowl, whip the heavy whipping cream until stiff peaks form. Set aside.
- Mix the cream cheese and peanut butter:
- In another large bowl, beat the cream cheese, peanut butter, powdered sugar, and vanilla extract until smooth and creamy.
- Fold in the whipped cream:
- Gently fold the whipped cream into the peanut butter mixture until fully combined.
- Layer the filling:
- Spread the peanut butter cheesecake mixture evenly over the chilled crust. Smooth the top with a spatula and return to the refrigerator.
Make the Chocolate Ganache:
7. Heat the cream:
- In a microwave-safe bowl, heat the heavy cream until hot but not boiling (about 1–2 minutes).
- Melt the chocolate:
- Pour the hot cream over the chocolate chips. Let sit for 2 minutes, then stir until smooth and glossy.
- Spread the ganache:
- Pour the ganache over the peanut butter layer, spreading evenly to cover.
Chill and Serve:
10. Chill:
– Refrigerate the bars for at least 4 hours, or until fully set.
11. Slice and serve:
– Use the parchment paper to lift the bars out of the pan. Slice into squares and serve chilled.
Notes
- Storage: Store the bars in an airtight container in the refrigerator for up to 5 days.
- Freezing option: Freeze for up to 2 months; thaw in the refrigerator before serving.
- Decorate: Garnish with chopped peanuts, a drizzle of melted peanut butter, or shaved chocolate for added flair.