
Introduction
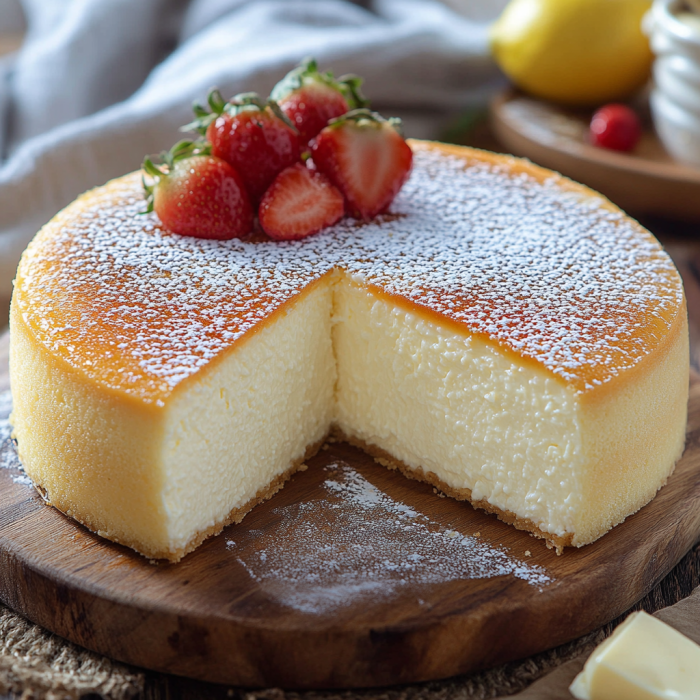
Japanese cheesecake, also known as soufflé cheesecake or cotton cheesecake, has taken the world by storm with its airy texture and delicate flavor. Unlike traditional cheesecakes, this Japanese version is light and fluffy, making it a perfect treat for any occasion. If you’re looking to impress your friends and family with a dessert that’s both elegant and easy to make, look no further! Here’s everything you need to know to make the perfect Japanese cheesecake.
Ingredients
To create this fluffy masterpiece, gather the following ingredients:
- Cream Cheese: 200 grams (softened)
- Eggs: 3 large (separated)
- Granulated Sugar: 100 grams
- Milk: 80 ml
- Unsalted Butter: 60 grams
- Cake Flour: 60 grams
- Cornstarch: 20 grams
- Vanilla Extract: 1 teaspoon
- Lemon Juice: 1 tablespoon
- Powdered Sugar: For dusting (optional)
Instructions

- Preparation:
- Preheat your oven to 160°C (320°F).
- Line the base of an 8-inch round cake pan with parchment paper and wrap the outside of the pan with aluminum foil to prevent water from seeping in.
- Cream Cheese Mixture:
- In a medium bowl, combine the cream cheese and butter. Microwave in short intervals, stirring in between, until melted and smooth. Allow to cool slightly.
- Mix in the milk, then add the egg yolks one at a time, beating well after each addition. Stir in the vanilla extract and lemon juice.
- Dry Ingredients:
- Sift the cake flour and cornstarch together, then fold them into the cream cheese mixture until well combined.
- Egg Whites:
- In a separate clean, dry bowl, whisk the egg whites until foamy. Gradually add the granulated sugar, continuing to beat until stiff peaks form.
- Gently fold the egg whites into the cream cheese mixture in three additions. Be careful not to deflate the batter too much.
- Baking:
- Pour the batter into the prepared cake pan. Smooth the top with a spatula.
- Place the cake pan into a larger baking dish and add hot water to the larger dish to create a water bath. This helps prevent cracks and ensures even baking.
- Bake for 50-60 minutes, or until the cheesecake is set and a toothpick inserted into the center comes out clean. The top should be lightly golden.
- Cooling:
- Turn off the oven and crack the oven door slightly. Let the cheesecake cool in the oven for 1 hour.
- Remove the cheesecake from the oven and water bath, then let it cool completely at room temperature. Chill in the refrigerator for at least 4 hours, preferably overnight.
- Serving:
- Dust the top with powdered sugar if desired. Slice and serve chilled for the best texture and flavor.
Tips for Success
- Room Temperature Ingredients: Ensure your cream cheese and butter are at room temperature for a smoother batter.
- Fold Gently: When incorporating the egg whites into the batter, fold gently to maintain the airy texture.
- Water Bath: The water bath helps to cook the cheesecake evenly and prevent cracking.
Conclusion
Japanese cheesecake is a delightful twist on the classic dessert, offering a light and fluffy texture that’s simply irresistible. With this recipe, you can recreate this beloved treat right in your own kitchen. Whether you’re hosting a special occasion or simply indulging in a sweet craving, this Japanese cheesecake will surely be a hit. Enjoy every airy bite of this delectable dessert!
Serving and Storage Tips for Japanese Cheesecake
Serving Tips
- Chill Before Serving: For the best texture and flavor, chill the cheesecake in the refrigerator for at least 4 hours or overnight. This allows it to fully set and enhances its light, airy texture.
- Serve Chilled: Japanese cheesecake is typically enjoyed cold. Remove it from the fridge shortly before serving and let it sit at room temperature for about 10-15 minutes to take the chill off if desired.
- Dust with Powdered Sugar: Before serving, you can dust the top of the cheesecake with a light layer of powdered sugar for a touch of elegance. A sifted sprinkle adds a visually appealing finish and a hint of sweetness.
- Use a Sharp Knife: For clean slices, use a sharp knife. Dip the knife in hot water and wipe it clean between cuts to ensure smooth, neat slices.
- Garnish Options: Consider adding fresh fruit like berries, a drizzle of fruit sauce, or a dollop of whipped cream for additional flavor and presentation.
Storage Tips
- Refrigeration: Store Japanese cheesecake in an airtight container in the refrigerator. It will keep well for up to 5 days. Make sure the cheesecake is covered to prevent it from absorbing any odors from other foods in the fridge.
- Freezing: If you need to store the cheesecake for a longer period, you can freeze it. Wrap the cheesecake tightly in plastic wrap and aluminum foil to prevent freezer burn. It can be frozen for up to 2 months.
- Thawing: When ready to enjoy, transfer the cheesecake from the freezer to the refrigerator and let it thaw overnight. Avoid thawing at room temperature as it can affect the texture.
- Avoid Over-Storing: Japanese cheesecake is best enjoyed fresh, so try to avoid making it too far in advance. Freezing and thawing may slightly alter the texture, though it should still be enjoyable.
By following these serving and storage tips, you’ll ensure that your Japanese cheesecake maintains its deliciously fluffy and light texture, making each bite as delightful as the first. Enjoy your dessert!
1. Why is my Japanese cheesecake not as fluffy as expected?
A common reason for a less-than-fluffy Japanese cheesecake is overmixing or deflating the egg whites. Ensure you fold the egg whites into the batter gently, and be careful not to overmix. Additionally, using room-temperature ingredients and properly incorporating the flour and cornstarch can help achieve the desired light texture.
2. Can I use a different type of cheese for Japanese cheesecake?
For the best results, use cream cheese as specified in the recipe. Other cheeses may alter the texture and flavor of the cheesecake. If you prefer a different cheese, ensure it’s a soft, mild cheese that melts smoothly. Cream cheese is preferred for its smooth consistency and neutral flavor, which is ideal for Japanese cheesecake.
3. How can I prevent cracks on the surface of my cheesecake?
To prevent cracks, bake the cheesecake in a water bath. This technique helps regulate the temperature and moisture around the cake, reducing the risk of cracking. Additionally, avoid opening the oven door frequently during baking, as sudden temperature changes can cause cracks.
4. Can I make Japanese cheesecake ahead of time?
Yes, you can make Japanese cheesecake ahead of time. It stores well in the refrigerator for up to 5 days. If you need to keep it for a longer period, you can freeze it. Wrap the cheesecake tightly in plastic wrap and aluminum foil and freeze for up to 2 months. Thaw it in the refrigerator overnight before serving to maintain the best texture.
Print
Japanese Cheesecake
- Prep Time: 20 minutes
- Chill Time: 1 hour
- Cook Time: 20 minutes
- Total Time: 1 hour 40 minutes
- Yield: 8 servings 1x
- Category: Dessert
- Method: Baking
- Cuisine: Japanese
Description
Japanese Cheesecake, also known as soufflé cheesecake, is a delightful fusion of airy soufflé and rich cheesecake, resulting in a light, fluffy, and less sweet dessert compared to traditional cheesecakes. Its unique texture and subtle sweetness have made it a favorite among dessert enthusiasts worldwide.
Ingredients
For the Cream Cheese Mixture:
- 10 ounces (approximately 285 grams) cream cheese, softened
- 2 tablespoons unsalted butter
- 1/2 cup whole milk
- 1/2 cup granulated sugar
- 6 large egg yolks
- 2/3 cup cake flour
- 2 tablespoons cornstarch
- 1 tablespoon lemon juice
- 1 teaspoon lemon zest
- 1/2 teaspoon vanilla extract
For the Meringue:
- 6 large egg whites
- 1/4 teaspoon cream of tartar
- 1/2 cup granulated sugar
Instructions
-
Prepare the Pan:
- Preheat your oven to 320°F (160°C).
- Grease a 9-inch round cake pan and line the bottom with parchment paper.
- Wrap the outside of the pan with aluminum foil to prevent water from seeping in during the water bath.
-
Make the Cream Cheese Mixture:
- In a heatproof bowl, combine the softened cream cheese, butter, and milk. Place the bowl over a pot of simmering water (double boiler) and whisk until the mixture is smooth and combined.
- Remove from heat and let it cool slightly.
- Add the granulated sugar to the cream cheese mixture and whisk until fully incorporated.
- Add the egg yolks one at a time, whisking well after each addition.
- Sift in the cake flour and cornstarch, and whisk until the batter is smooth.
- Stir in the lemon juice, lemon zest, and vanilla extract.
-
Prepare the Meringue:
- In a clean, dry bowl, beat the egg whites with an electric mixer until frothy.
- Add the cream of tartar and continue beating until soft peaks form.
- Gradually add the granulated sugar, a little at a time, and beat until stiff peaks form.
-
Combine and Bake:
- Gently fold the meringue into the cream cheese mixture in three additions, ensuring it’s well combined without deflating the batter.
- Pour the batter into the prepared cake pan and tap it lightly on the counter to release any air bubbles.
- Place the cake pan into a larger baking dish and pour hot water into the larger dish until it reaches halfway up the sides of the cake pan (water bath).
- Bake in the preheated oven for 25 minutes at 320°F (160°C), then reduce the temperature to 280°F (140°C) and bake for an additional 55 minutes, or until the cake is set and golden brown on top.
-
Cool and Serve:
- Turn off the oven and leave the cake inside with the door slightly open for about 15 minutes to prevent sudden temperature changes.
- Remove the cake from the oven and water bath, and let it cool completely in the pan.
- Once cooled, remove the cake from the pan, peel off the parchment paper, and transfer it to a serving plate.
- Dust the top with powdered sugar before serving, if desired.
Notes
- Egg Whites: Ensure no traces of egg yolk are in the egg whites, and the mixing bowl is free from oil or water to achieve a successful meringue.
- Water Bath: Baking the cheesecake in a water bath helps maintain a moist environment, preventing cracks and ensuring an even, gentle bake.
- Cooling: Gradual cooling prevents the cheesecake from deflating or cracking.