
Indian Chicken Biryani stands as a culinary emblem, symbolizing the rich tapestry of flavors and traditions found in Indian cuisine. This flavorful and aromatic dish is not just a meal, it’s a festive celebration of spices, rice, and chicken, cooked to perfection. In this guide, we’ll take you through the steps to create an authentic Indian Chicken Biryani right in your own kitchen, complete with tips and tricks to ensure it turns out perfectly every time.
What is Chicken Biryani?
Chicken Biryani is a highly seasoned rice dish made with marinated chicken, basmati rice, and a potent blend of herbs and spices. Originating from the Indian subcontinent, biryani is a staple at significant events and celebrations but is also enjoyed as a hearty family meal. The secret to its delectable taste lies in the layers of flavor, from the marinated meat to the saffron-infused rice.
Ingredients Needed for Chicken Biryani
To prepare chicken biryani, you need the following ingredients:
- Chicken: 1 kg, bone-in, skinless pieces
- Basmati Rice: 500 grams, washed and soaked for at least 30 minutes
- Onions: 3 large, thinly sliced
- Tomatoes: 2 large, chopped
- Yogurt: 1 cup, whipped
- Ginger-Garlic Paste: 2 tablespoons
- Green Chilies: 4-5, slit
- Mint Leaves: A handful, chopped
- Cilantro (Coriander) Leaves: A handful, chopped
- Lemon Juice: 2 tablespoons
- Saffron: A few strands, soaked in warm milk
- Ghee or Oil: For cooking
- Spices:
- Cumin Seeds: 1 teaspoon
- Bay Leaves: 2
- Cinnamon Stick: 1 inch
- Cloves: 4-5
- Cardamom Pods: 4-5
- Turmeric Powder: 1/2 teaspoon
- Red Chili Powder: 1 teaspoon
- Biryani Masala: 2 tablespoons
Step-by-Step Guide to Making Chicken Biryani
- Marinate the Chicken: Combine yogurt, ginger-garlic paste, red chili powder, turmeric, lemon juice, half the chopped mint and cilantro, green chilies, and salt. Add the chicken pieces to the marinade and let it sit for at least an hour, or overnight for best results.
- Prepare the Rice: Bring a large pot of water to a boil, add spices (cumin, bay leaves, cinnamon, cloves, cardamom), and season with salt. Add the soaked and drained basmati rice to the boiling water. Cook until the rice is about 70% done. Drain and set aside.
- Fry the Onions: In a deep pan or pot, heat oil or ghee. Add the sliced onions and fry until golden brown. Remove half for garnishing later.
- Cook the Chicken: In the same pan, add the marinated chicken and cook until the oil begins to separate from the spices. Add tomatoes and cook until soft.
- Layer the Biryani: Over the cooked chicken, spread the partially cooked rice in an even layer. Sprinkle saffron-infused milk, fried onions, and the remaining mint and cilantro over the top. Drizzle a little more ghee if desired.
- Cook on Dum (Steam): Cover the pot with a tight-fitting lid or seal it with dough. Cook on a very low heat for about 25-30 minutes to allow the flavors to meld and the rice to finish cooking.
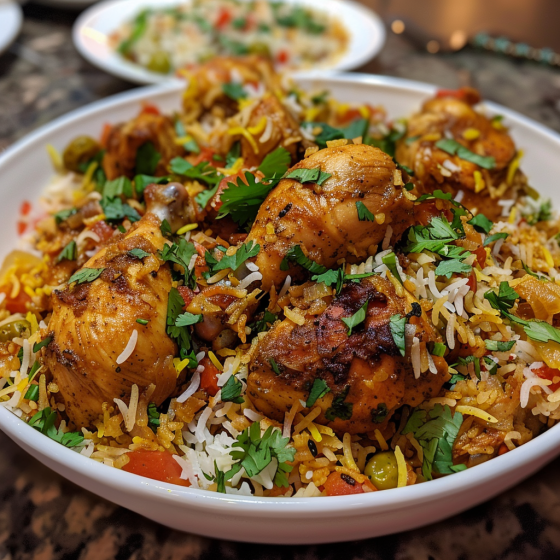
- Serve: Let the biryani rest for at least 10 minutes after cooking. Serve hot, garnished with the reserved browned onions and accompanied by raita or mirch ka salan.
Tips for Perfect Biryani Every Time
- Rice to Water Ratio: Ensuring you have the right amount of water when parboiling rice is crucial. The rice should be cooked to 70% doneness, as it will cook further when steamed with the chicken.
- Marination Time: The longer you marinate the chicken, the more flavorful it will be.
- Layering: Proper layering is key to an authentic taste and aroma. Ensure even layers of rice and chicken for optimal flavor distribution.
- Sealing the Pot: Sealing the pot properly ensures that the steam and flavors are locked in, which is vital for that authentic dum cooking method.
Now that you’re equipped with the know-how to make authentic Indian Chicken Biryani, you’re ready to turn any dining occasion into a celebration. So why not invite family and friends over and impress them with your culinary skills? Enjoy the rich flavors and festive spirit of this timeless Indian dish.
Serving and Storage Tips for Indian Chicken Biryani
Serving Indian Chicken Biryani
When it comes to serving Indian Chicken Biryani, presentation and accompaniments play a significant role in enhancing the dining experience. Here are some tips to serve Chicken Biryani like a pro:
- Garnishing: Right before serving, garnish your biryani with the reserved fried onions, some fresh cilantro, and mint leaves. This not only adds to the visual appeal but also introduces a fresh aroma right before eating.
- Accompaniments: Serve Chicken Biryani with side dishes that complement its rich and spicy flavor. Traditional options include raita (a yogurt-based condiment made with cucumber, carrots, or boondi), Mirch ka Salan (a spicy pepper curry), or a simple sliced cucumber and tomato salad.
- Portioning: Biryani is best served on individual plates or in a large serving dish where guests can help themselves. Ensure each portion has a good mix of rice, chicken, and the garnishes.
- Beverages: Pair Chicken Biryani with refreshing beverages such as mint lassi, rose sherbet, or simply a chilled glass of water to balance the spices.
Storing Chicken Biryani
Proper storage is crucial to maintaining the flavor and safety of leftover Chicken Biryani. Here’s how to store it correctly:
- Cooling Down: Allow the Biryani to cool to room temperature before storing. Do not leave it out for more than 2 hours as bacteria can grow rapidly at room temperature.
- Refrigeration: Transfer the biryani to airtight containers and refrigerate. Properly stored, Chicken Biryani can last for 3 to 4 days in the refrigerator.
- Freezing: For longer storage, you can freeze Chicken Biryani. Place it in freezer-safe containers or heavy-duty freezer bags. Frozen biryani can last for up to 1-2 months. However, be mindful that the texture of the rice may change slightly upon thawing and reheating.
Reheating Chicken Biryani
To retain the moisture and flavors of Chicken Biryani when reheating, follow these guidelines:
- Microwave: Sprinkle some water over the biryani before covering it with a microwave-safe lid or a wet paper towel. Heat on medium power in intervals, stirring occasionally to distribute the heat evenly.
- Oven: Preheat your oven to 300°F (150°C). Place the biryani in an oven-safe dish, sprinkle some water, and cover tightly with foil. Reheat for 15-20 minutes or until heated through.
- Stovetop: Reheat in a skillet over low heat. Add a few tablespoons of water or broth to prevent the rice from drying out. Cover and heat, stirring occasionally until completely warmed through.
By following these serving and storage tips, you can enjoy your Indian Chicken Biryani at its best, whether freshly made or from leftovers.
1. What kind of rice is best for making Chicken Biryani?
For authentic Chicken Biryani, basmati rice is the preferred choice due to its long, slender grains, fragrant aroma, and the ability to remain separate when cooked. It absorbs the flavors well, making it ideal for biryani. However, other long-grain rice varieties like Jasmine rice can also be used as a substitute, although the texture and flavor will vary slightly.
2. Can I make Chicken Biryani using boneless chicken?
Yes, you can make Chicken Biryani using boneless chicken. While traditional biryani is typically made with bone-in pieces, boneless chicken will cook faster and might be preferred for its convenience and ease of eating. When using boneless chicken, reduce the cooking time slightly to avoid overcooking the chicken, which can make it tough and dry.
3. How can I prevent my biryani from becoming too mushy?
To prevent your biryani from becoming mushy, there are several steps you can follow:
- Ensure Proper Rice Preparation: Soak the basmati rice for at least 30 minutes before cooking to ensure it cooks evenly and expands without breaking. Be sure to drain it thoroughly before cooking to remove excess water.
- Monitor the Cooking Process: Cook the rice until it is about 70% done before layering it with the chicken. It will continue to cook in the steam (Dum) process, achieving the perfect texture without becoming mushy.
- Avoid Excessive Stirring: Once the biryani is layered, avoid stirring it. Stirring can break the grains of rice and result in a mushy texture.
4. What is the difference between biryani and pulao?
Biryani and pulao (or pilaf) are both rice-based dishes from the Indian subcontinent but differ mainly in their preparation methods and complexity:
- Preparation: Biryani is prepared using the layering technique, where cooked or semi-cooked rice and meat are layered and then cooked together by steaming (known as Dum). This allows for a mingling of flavors as the dish slow cooks in its own steam. Pulao is usually a one-pot dish where all ingredients are cooked together.
- Spices and Flavoring: Biryani is typically more aromatic and spiced compared to pulao, incorporating a wider range of spices and a more intense marination of the meat.
- Texture and Moisture: Biryani tends to be drier and fluffier, while pulao is often a bit moist and soft due to the cooking technique.