

Decorated Focaccia Bread is a feast for both the eyes and the taste buds. This Italian flatbread is known for its airy texture and crispy crust, but with the addition of colorful vegetables and herbs arranged into beautiful patterns, it becomes an edible work of art. Perfect for dinner parties, holiday gatherings, or simply to impress at the table, this bread is as fun to make as it is to eat.
Why You’ll Love This Recipe
- Combines creativity with cooking
- Soft, fluffy interior with a golden, crispy crust
- Customizable with seasonal vegetables and herbs
- Great centerpiece or appetizer for gatherings
- Beginner-friendly with easy-to-follow steps
ingredients
(Tip: You’ll find the full list of ingredients and measurements in the recipe card below.)
For the focaccia dough:
- All-purpose flour
- Instant yeast
- Warm water
- Olive oil
- Sugar
- Salt
For decoration:
- Cherry tomatoes
- Bell peppers (various colors)
- Red onion
- Olives
- Fresh herbs (rosemary, thyme, parsley, basil)
- Green onions or chives
- Sea salt
- Olive oil (for drizzling)
directions

- Make the dough: In a large bowl, combine warm water, yeast, sugar, and a portion of the flour. Let it sit for 10 minutes until foamy. Stir in the remaining flour, salt, and olive oil. Knead until smooth and elastic, about 8–10 minutes.
- First rise: Place dough in an oiled bowl, cover, and let rise in a warm spot for 1 to 1.5 hours or until doubled in size.
- Prepare the pan: Oil a baking sheet or 9×13-inch pan generously with olive oil. Press the dough into the pan, stretching to fill the edges. Cover and let rise again for 30–40 minutes.
- Preheat oven to 425°F (220°C).
- Decorate: Use sliced vegetables and herbs to create floral or landscape designs on the dough. Press them gently into the surface. Drizzle with olive oil and sprinkle with sea salt.
- Bake for 20–25 minutes until golden brown and crisp on the edges. Let cool slightly before serving.
Servings and timing
- Servings: 8–10
- Prep time: 20 minutes
- Rising time: 1.5 to 2 hours
- Bake time: 25 minutes
- Total time: About 2.5 hours
Variations
- Cheesy version: Add shredded parmesan or mozzarella before baking
- Spicy kick: Include sliced jalapeños or crushed red pepper
- Whole wheat: Substitute half the flour with whole wheat flour
- Sweet touch: Use fruits like figs and add a honey drizzle after baking
storage/reheating
- Storage: Store at room temperature in an airtight container for up to 2 days
- Refrigeration: Keeps up to 5 days; reheat to refresh texture
- Reheating: Warm in a 350°F oven for 5–10 minutes or toast slices in a pan
- Freezing: Freeze for up to 1 month; thaw and reheat before serving
FAQs
Can I use store-bought dough?
Yes, you can use pre-made pizza or bread dough to save time.
What vegetables work best for decorating?
Colorful, firm vegetables like bell peppers, onions, tomatoes, radishes, and olives hold up well during baking.
Can I make the dough in advance?
Yes, you can refrigerate the dough overnight after the first rise. Let it come to room temperature before decorating and baking.
How do I keep the decorations from burning?
Brush delicate toppings with olive oil and keep them partially embedded in the dough to protect them.
Is focaccia supposed to be thick or thin?
Focaccia is typically about 1 to 1.5 inches thick, but you can stretch the dough thinner for a crispier texture.
Can I make it gluten-free?
Yes, use a high-quality gluten-free flour blend designed for yeast breads.
What herbs are best for focaccia?
Fresh rosemary, thyme, parsley, and basil are flavorful and visually appealing.
Can I serve this bread cold?
Yes, it’s delicious at room temperature, though it’s best slightly warm.
Is it okay to skip the second rise?
The second rise helps develop a lighter, airier texture, so it’s recommended.
Can I make mini versions?
Absolutely—shape into small rounds or use muffin tins for individual servings.
Conclusion
Decorated Focaccia Bread is where artistry meets baking. Whether you’re crafting a garden scene with fresh herbs and vegetables or creating a colorful, abstract pattern, this bread makes a stunning addition to any meal. It’s an easy, rewarding bake that encourages creativity and delivers on taste—perfect for sharing and showing off.
Print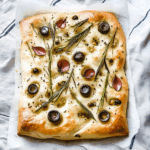
Decorated Focaccia Bread Recipe
- Prep Time: 20 minutes
- Cook Time: 25 minutes
- Total Time: 2 hours 15 minutes
- Yield: 1 large focaccia (about 12 slices) 1x
- Category: Bread
- Method: Baking
- Cuisine: Italian
- Diet: Vegan
Description
Decorated Focaccia Bread is a visually stunning and delicious Italian flatbread adorned with fresh herbs, vegetables, and olives to create edible artwork on a fluffy, golden crust.
Ingredients
- 4 cups all-purpose flour
- 2 1/4 teaspoons active dry yeast (1 packet)
- 1 1/2 teaspoons salt
- 1 1/2 cups warm water
- 1/4 cup olive oil (plus more for drizzling)
- Assorted vegetables and herbs for decoration (cherry tomatoes, red onion, bell peppers, olives, rosemary, basil, chives)
- Flaky sea salt for topping
Instructions
- In a large bowl, combine warm water and yeast. Let sit for 5–10 minutes until foamy.
- Add flour, salt, and olive oil. Mix until a sticky dough forms.
- Cover and let rise for 1–2 hours, until doubled in size.
- Grease a baking sheet or pan with olive oil. Press dough into the pan evenly.
- Cover and let rise again for 20–30 minutes.
- Preheat oven to 425°F (220°C).
- Use vegetables and herbs to create decorative patterns on the dough (flowers, gardens, etc.).
- Drizzle with olive oil and sprinkle with flaky sea salt.
- Bake for 20–25 minutes, until golden brown.
- Cool slightly before slicing and serving.
Notes
- Use a silicone brush to apply oil to delicate veggie designs before baking.
- Get creative with themes—floral, landscape, or abstract patterns.
- Store leftovers in an airtight container for up to 2 days.
Nutrition
- Serving Size: 1 slice
- Calories: 210
- Sugar: 1g
- Sodium: 310mg
- Fat: 7g
- Saturated Fat: 1g
- Unsaturated Fat: 6g
- Trans Fat: 0g
- Carbohydrates: 32g
- Fiber: 1g
- Protein: 5g
- Cholesterol: 0mg