
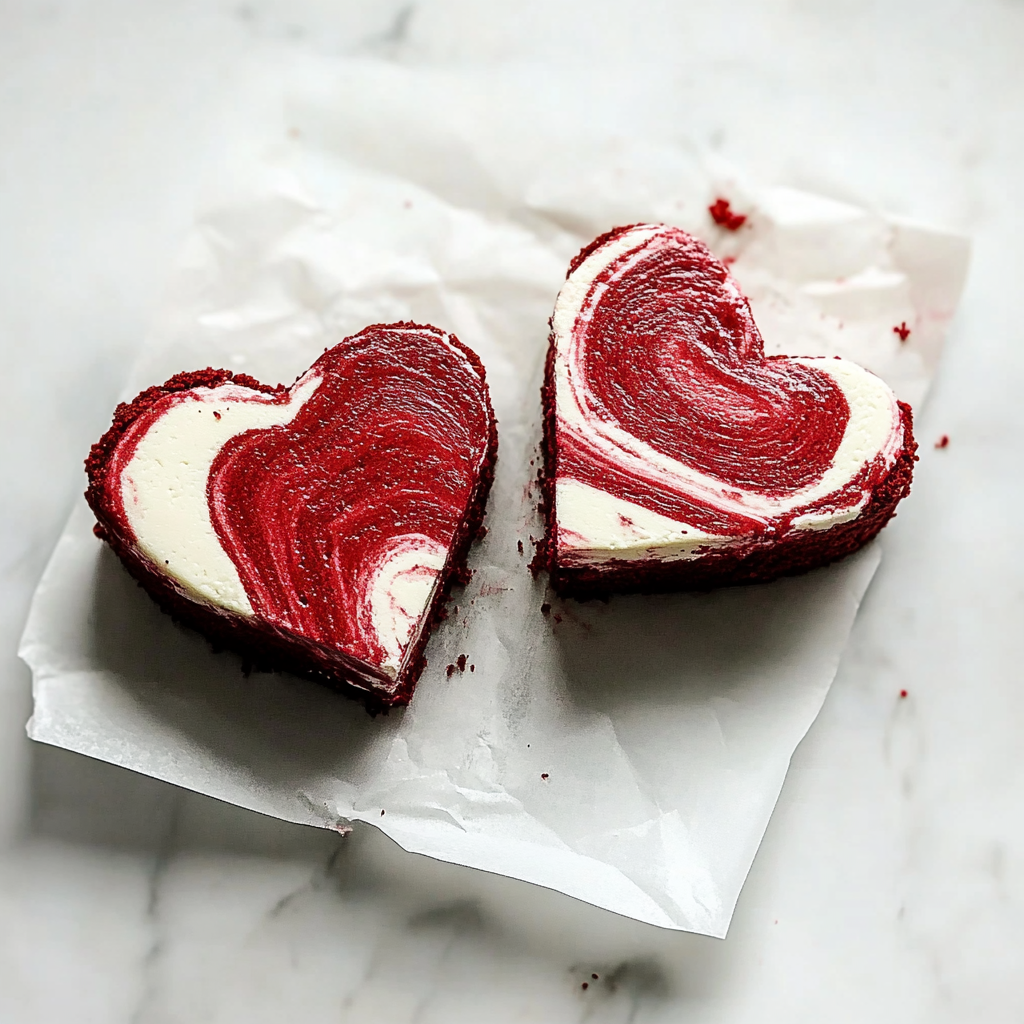
Heart-Shaped Red Velvet Cheesecake is a stunning dessert that combines the rich, slightly chocolatey flavor of red velvet with the creamy decadence of a classic cheesecake. Perfect for Valentine’s Day, anniversaries, or romantic celebrations, this eye-catching treat is as delicious as it is beautiful.
Why You’ll Love This Recipe
- Unique combination of red velvet cake and creamy cheesecake
- Perfect for special occasions and celebrations
- Can be made ahead for easy entertaining
- Fun and festive heart shape for a beautiful presentation
- Rich, smooth texture that melts in your mouth
Ingredients
(Tip: You’ll find the full list of ingredients and measurements in the recipe card below.)
For the crust:
- 1 1/2 cups chocolate cookie crumbs or graham cracker crumbs
- 5 tablespoons unsalted butter, melted
For the cheesecake:
- 24 oz cream cheese, softened
- 1 cup granulated sugar
- 1/4 cup sour cream
- 1/4 cup buttermilk
- 2 tablespoons unsweetened cocoa powder
- 1 tablespoon red food coloring (gel preferred)
- 2 teaspoons vanilla extract
- 1 teaspoon white vinegar
- 3 large eggs
Optional topping:
- Whipped cream
- Fresh strawberries or raspberries
Directions

- Preheat oven to 325°F (163°C). Grease a heart-shaped springform pan or line the bottom with parchment paper.
- Prepare the crust: Combine the cookie crumbs and melted butter. Press firmly into the bottom of the prepared pan. Bake for 8–10 minutes, then let cool.
- Make the cheesecake filling: In a large bowl, beat the cream cheese until smooth. Add the sugar and beat until combined. Mix in sour cream, buttermilk, cocoa powder, food coloring, vanilla, and vinegar.
- Add eggs: Add eggs one at a time, beating at low speed after each addition just until blended. Do not overmix.
- Assemble: Pour the cheesecake filling over the cooled crust and smooth the top.
- Bake: Place the cheesecake pan in a larger pan and add hot water halfway up the sides (water bath method). Bake for 50–60 minutes or until the center is set but still slightly jiggly.
- Cool and chill: Turn off the oven, crack the door, and let the cheesecake cool inside for 1 hour. Then refrigerate for at least 4 hours or overnight.
- Decorate and serve: Top with whipped cream and fresh berries before serving, if desired.
Servings and timing
- Servings: 8–10 slices
- Prep time: 20 minutes
- Bake time: 50–60 minutes
- Cooling and chilling time: 5–6 hours total
- Total time: About 7 hours
Variations
- Use a red velvet cake layer on the bottom instead of a crumb crust for a cake-cheesecake combo
- Make mini heart cheesecakes using heart-shaped silicone molds
- Add a white chocolate ganache topping for extra richness
- Substitute Oreo cookies for the crust for more chocolate flavor
- Swirl some plain cheesecake batter into the red velvet batter for a marbled effect
Storage/Reheating
- Store cheesecake covered in the refrigerator for up to 5 days
- Freeze individual slices wrapped tightly in plastic wrap and foil for up to 2 months
- Thaw frozen slices overnight in the refrigerator before serving
- Serve chilled; no reheating is needed
FAQs
Do I have to use a heart-shaped pan?
No, you can use a regular round springform pan and cut out heart shapes after chilling if you like.
Can I make this cheesecake without a water bath?
Yes, but a water bath helps prevent cracks and results in a creamier texture. You can skip it but bake at a lower temperature and watch closely.
How do I get a vibrant red color?
Use gel food coloring instead of liquid for a more vivid color without thinning the batter.
What’s the purpose of vinegar in red velvet cheesecake?
It enhances the cocoa flavor and helps maintain the bright red color.
How do I know when the cheesecake is done?
The edges should be set, and the center should still have a slight wobble. It will firm up more as it cools.
Can I add a different topping?
Yes, chocolate ganache, cream cheese frosting, or berry compote would all be delicious.
Can I make it gluten-free?
Yes, just use gluten-free cookies or graham crackers for the crust.
What if my cheesecake cracks?
No worries! You can easily cover any cracks with whipped cream or toppings.
Can I make this ahead of time?
Absolutely. This cheesecake is best when made a day in advance to allow the flavors to develop.
Why is my cheesecake dense instead of creamy?
Overmixing the batter can incorporate too much air, causing a dense texture. Mix gently and at low speed once you add the eggs.
Conclusion
Heart-Shaped Red Velvet Cheesecake is the ultimate treat for celebrating love and indulgence. With its rich, creamy texture, beautiful presentation, and irresistible flavor, this dessert is sure to steal the show at your next special occasion. Whether you’re baking for someone special or treating yourself, this cheesecake is a true expression of sweetness and care.
Print
Heart-Shaped Red Velvet Cheesecake
- Prep Time: 25 minutes
- Cook Time: 50 minutes
- Total Time: 1 hour 15 minutes (plus chilling time)
- Yield: 8 servings 1x
- Category: Dessert
- Method: Baking
- Cuisine: American
- Diet: Vegetarian
Description
A romantic and indulgent Heart-Shaped Red Velvet Cheesecake, featuring a luscious red velvet base swirled with rich, creamy cheesecake, perfect for Valentine’s Day or special celebrations.
Ingredients
- 1 1/2 cups chocolate cookie crumbs
- 1/4 cup unsalted butter, melted
- 2 (8 oz) packages cream cheese, softened
- 2/3 cup granulated sugar
- 2 large eggs
- 1/3 cup sour cream
- 1/4 cup buttermilk
- 2 tablespoons unsweetened cocoa powder
- 1 teaspoon vanilla extract
- 1 tablespoon red food coloring
- 1 teaspoon white vinegar
- Pinch of salt
- Optional: whipped cream and fresh berries for topping
Instructions
- Preheat oven to 325°F (163°C). Grease a heart-shaped springform pan or line the bottom with parchment paper.
- In a bowl, mix chocolate cookie crumbs and melted butter. Press the mixture firmly into the bottom of the pan to form the crust. Set aside.
- In a large bowl, beat cream cheese and sugar until smooth and fluffy.
- Add eggs one at a time, mixing well after each addition. Then add sour cream, buttermilk, cocoa powder, vanilla, red food coloring, vinegar, and salt. Mix until fully combined and smooth.
- Pour the filling over the crust and smooth the top.
- Bake for 45–50 minutes, or until the center is just set and slightly jiggly.
- Turn off the oven, crack the door open, and let the cheesecake cool inside for 1 hour.
- Refrigerate the cheesecake for at least 4 hours or overnight to set.
- Before serving, top with whipped cream and fresh berries if desired.
Notes
- Use a water bath during baking to prevent cracking.
- Let ingredients come to room temperature for a smoother batter.
- The heart shape can also be created with a stencil or mold if a heart pan isn’t available.
Nutrition
- Serving Size: 1 slice
- Calories: 410
- Sugar: 28g
- Sodium: 310mg
- Fat: 28g
- Saturated Fat: 16g
- Unsaturated Fat: 10g
- Trans Fat: 0g
- Carbohydrates: 32g
- Fiber: 1g
- Protein: 6g
- Cholesterol: 110mg