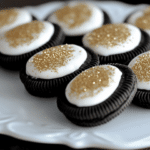
Gold Glitter Dipped Peanut Butter Oreos are a dazzling and delicious treat that combines creamy peanut butter, crunchy Oreos, and a touch of glamour with edible gold glitter. These no-bake confections are quick to make, eye-catching, and perfect for parties, gifting, or adding sparkle to your holiday dessert table.
Why You’ll Love This Recipe
- Quick and Easy: No baking required, just assemble and decorate.
- Glamorous Presentation: The gold glitter makes these treats look luxurious and festive.
- Customizable: Use your favorite Oreo flavors or swap peanut butter for other fillings.
- Perfect for Gifting: Wrap them in decorative boxes or bags for a thoughtful homemade gift.
- Crowd-Pleaser: A hit with kids and adults alike.
Ingredients
(Tip: You’ll find the full list of ingredients and measurements in the recipe card below.)
- Oreos (classic or flavored)
- Creamy peanut butter
- White or milk chocolate chips (for dipping)
- Edible gold glitter or luster dust
- Optional: Sprinkles or drizzled chocolate for extra decoration
Directions
- Prepare the Filling:
Twist apart each Oreo and spread a generous layer of peanut butter on one half. Reassemble the Oreos, pressing gently to secure the filling. - Melt the Chocolate:
In a microwave-safe bowl, melt the chocolate chips in 30-second intervals, stirring between each interval, until smooth. - Dip the Oreos:
Using a fork or dipping tool, dip each Oreo into the melted chocolate, ensuring it’s fully coated. Tap off any excess chocolate and place the dipped Oreo on a parchment-lined baking sheet. - Decorate with Gold Glitter:
Before the chocolate sets, sprinkle the dipped Oreos with edible gold glitter or luster dust. For a more precise application, use a small brush to apply the glitter. - Set the Chocolate:
Let the Oreos sit at room temperature or refrigerate for 15–20 minutes until the chocolate hardens. - Serve or Store:
Transfer the finished Oreos to a serving platter or store them in an airtight container.
Servings and Timing
- Servings: Makes about 20 dipped Oreos
- Prep Time: 15 minutes
- Chill Time: 20 minutes
- Total Time: 35 minutes
Variations
- Flavor Swaps: Use flavored Oreos like golden Oreos, mint, or red velvet for a unique twist.
- Different Filling: Substitute peanut butter with Nutella, cookie butter, or a flavored cream cheese.
- Dark Chocolate Option: Dip the Oreos in dark chocolate for a richer flavor.
- Extra Decorations: Add a drizzle of contrasting chocolate or sprinkle crushed nuts on top.
- Themed Colors: Use colored edible glitter to match specific holiday or party themes.
Storage/Reheating
- Storage: Store in an airtight container at room temperature for up to 5 days or in the refrigerator for up to 2 weeks.
- Freezing: Freeze dipped Oreos in a zip-top bag for up to 3 months. Thaw in the refrigerator before serving.
- Reheating: If the chocolate coating softens, keep the Oreos chilled until serving.
FAQs
1. Can I use other types of cookies?
Yes, sandwich cookies like Nutter Butters or homemade cookies also work well.
2. How do I prevent the chocolate from clumping during melting?
Ensure your bowl and utensils are dry, as even a drop of water can cause chocolate to seize.
3. Where can I find edible gold glitter?
Edible gold glitter is available at baking supply stores or online. Make sure it’s labeled as food-safe.
4. Can I use candy melts instead of chocolate?
Yes, candy melts are a great alternative and often easier to work with.
5. How do I apply the glitter evenly?
Use a small food-safe brush to apply luster dust or sprinkle glitter while the chocolate is still wet.
6. Can I make these ahead of time?
Yes, they can be made a few days in advance and stored in an airtight container.
7. Are these treats suitable for gifting?
Absolutely! Package them in decorative boxes or cellophane bags tied with ribbons for a festive touch.
8. How do I make them nut-free?
Use a nut-free filling like cookie butter or omit the filling entirely.
9. What if I don’t have parchment paper?
Use a silicone baking mat or lightly greased foil as a substitute.
10. Can I add a surprise filling?
Yes, add a small piece of caramel or marshmallow along with the peanut butter for extra indulgence.
Conclusion
Gold Glitter Dipped Peanut Butter Oreos are a simple yet stunning dessert that’s as delicious as it is dazzling. With their creamy peanut butter center, rich chocolate coating, and sparkly gold finish, these treats are perfect for holiday celebrations, parties, or thoughtful gifts. Quick to make and endlessly customizable, they’re sure to be a hit with everyone!
Print
Gold Glitter Dipped Peanut Butter Oreos
- Prep Time: 10 minutes
- Cook Time: 25 minutes
- Total Time: 35 minutes
- Yield: 24 cookies 1x
- Category: Desserts, No-Bake Treats, Holiday Recipes
- Method: No-Bake, Dipping
- Cuisine: American
Description
These Gold Glitter Dipped Peanut Butter Oreos are a stunning and delicious treat! Classic Oreos are sandwiched with creamy peanut butter, dipped in chocolate, and finished with edible gold glitter for a festive and elegant twist. Perfect for parties, gift boxes, or a glamorous dessert table.
Ingredients
- 24 Oreo cookies
- 1 cup (250 g) creamy peanut butter
- 2 cups (350 g) white or dark chocolate chips (or candy melts)
- 1 tbsp coconut oil or vegetable shortening (optional, for smoother melting)
- Edible gold glitter or luster dust
Instructions
1. Prepare the Oreos:
- Carefully twist apart each Oreo cookie. Spread about 1 teaspoon of peanut butter onto the cream side of one half and press the other half back on top to reform the sandwich. Repeat with all cookies.
2. Melt the chocolate:
- In a microwave-safe bowl, combine the chocolate chips and coconut oil (if using). Microwave in 20–30 second intervals, stirring between each, until the chocolate is fully melted and smooth.
3. Dip the Oreos:
- Using a fork or dipping tool, dip each peanut butter-filled Oreo into the melted chocolate, ensuring it is fully coated. Tap off any excess chocolate and place the coated Oreo on a parchment-lined baking sheet.
4. Add the glitter:
- While the chocolate is still wet, sprinkle edible gold glitter or lightly brush luster dust onto the dipped Oreos for a sparkling finish.
5. Chill and set:
- Place the baking sheet in the refrigerator for 15–20 minutes, or until the chocolate is completely set.
6. Serve or gift:
- Arrange the Oreos on a festive platter or package them in gift boxes for a stunning holiday treat.
Notes
- Substitute white chocolate with milk or dark chocolate, or use colored candy melts to match a theme.
- For extra flair, drizzle additional chocolate over the dipped Oreos in a contrasting color before adding the glitter.
- Store the dipped Oreos in an airtight container at room temperature for up to 1 week or in the refrigerator for up to 2 weeks.


