
Introduction:
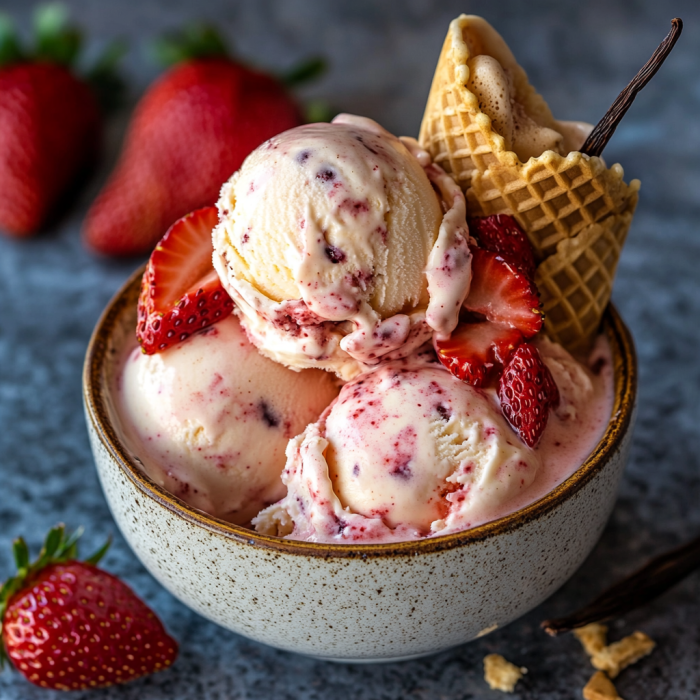
Summer isn’t complete without the perfect scoop of ice cream, and nothing beats the classic combination of strawberries and vanilla bean. Strawberry Vanilla Bean Ice Cream is a rich, creamy treat that combines the fresh, fruity flavor of ripe strawberries with the aromatic essence of vanilla bean. This homemade ice cream recipe is not only delicious but also simple to prepare, making it a great choice for family gatherings, parties, or a sweet indulgence on a warm day.
Why Strawberry Vanilla Bean Ice Cream?
Strawberry Vanilla Bean Ice Cream is a timeless favorite that appeals to all ages. Here’s why it stands out:
- Fresh and Fruity: The natural sweetness of strawberries provides a vibrant, fruity flavor that perfectly complements the creamy vanilla bean base.
- Classic Flavor Profile: Vanilla bean adds a touch of elegance and depth to the ice cream, making it a sophisticated yet approachable dessert.
- Homemade Goodness: Making ice cream at home allows you to control the ingredients, ensuring a pure and delightful treat free from artificial additives.
Ingredients:
To create the perfect Strawberry Vanilla Bean Ice Cream, you’ll need:
- 2 cups fresh strawberries, hulled and sliced
- 1 cup granulated sugar, divided
- 1 cup heavy cream
- 1 cup whole milk
- 1 vanilla bean
- 1 teaspoon vanilla extract
- Pinch of salt
Instructions:

- Prepare the Strawberries:
- Place the sliced strawberries in a bowl. Add 1/2 cup of granulated sugar and gently toss to coat.
- Let the strawberries macerate for about 30 minutes to an hour, allowing the sugar to draw out the fruit’s natural juices and enhance its flavor.
- Make the Vanilla Bean Mixture:
- Split the vanilla bean lengthwise with a knife. Scrape the seeds into a saucepan, then add the vanilla bean pod.
- In the saucepan, combine the remaining 1/2 cup of granulated sugar, heavy cream, and whole milk. Heat over medium heat until the mixture is hot but not boiling, stirring occasionally to dissolve the sugar.
- Combine and Chill:
- Remove the saucepan from the heat and discard the vanilla bean pod. Stir in the vanilla extract and a pinch of salt.
- Allow the mixture to cool to room temperature. Once cooled, refrigerate for at least 2 hours, or until completely chilled.
- Blend and Churn:
- Once chilled, transfer the strawberry mixture to a blender or food processor and puree until smooth.
- Combine the strawberry puree with the chilled vanilla mixture, stirring to blend thoroughly.
- Churn the Ice Cream:
- Pour the combined mixture into an ice cream maker and churn according to the manufacturer’s instructions, usually for about 20-25 minutes, or until it reaches a soft-serve consistency.
- Freeze and Serve:
- Transfer the churned ice cream to a lidded container and freeze for at least 2 hours, or until firm.
- Scoop and serve your homemade Strawberry Vanilla Bean Ice Cream, enjoying the creamy texture and fresh flavor.
Tips for Success:
- Use Fresh Ingredients: Opt for ripe, juicy strawberries for the best flavor. The quality of your ingredients will directly impact the taste of your ice cream.
- Chill the Mixture: Ensuring your mixture is well-chilled before churning helps the ice cream achieve a smoother texture.
- Adjust Sweetness: Feel free to adjust the amount of sugar based on the sweetness of your strawberries and personal preference.
Conclusion:
Strawberry Vanilla Bean Ice Cream is a delightful treat that combines classic flavors with a homemade touch. With its smooth texture and vibrant strawberry flavor, it’s sure to be a hit with everyone who tries it. Perfect for any occasion, this recipe is a wonderful way to enjoy a refreshing and satisfying dessert. Enjoy your homemade ice cream and savor the sweet taste of summer!
Serving and Storage Tips for Strawberry Vanilla Bean Ice Cream
Serving Tips:
- Pre-Chill the Scoop:
- For easier scooping, chill your ice cream scoop in warm water before using it. This helps prevent the ice cream from sticking to the scoop and creates smooth, rounded scoops.
- Serve at the Right Temperature:
- Let the ice cream sit at room temperature for about 5-10 minutes before serving. This softens the ice cream slightly, making it easier to scoop and enhancing its creamy texture.
- Garnish Creatively:
- Enhance your presentation with fresh strawberry slices, a sprinkle of mint leaves, or a drizzle of strawberry sauce. Adding a few crushed graham crackers or a dollop of whipped cream can also elevate the dessert.
- Pair with Other Desserts:
- Strawberry Vanilla Bean Ice Cream pairs wonderfully with pie, cake, or waffles. Serve it alongside a slice of warm apple pie or atop a piece of rich chocolate cake for a decadent treat.
Storage Tips:
- Proper Container:
- Store your ice cream in an airtight container to prevent freezer burn and maintain its creamy texture. A container with a tight-fitting lid or a layer of plastic wrap pressed against the surface of the ice cream can help protect it from freezer odors and ice crystals.
- Freezer Temperature:
- Keep your freezer at a consistent temperature of 0°F (-18°C) or lower. This ensures that the ice cream remains firm and prevents it from becoming too hard or developing ice crystals.
- Avoid Frequent Thawing and Refreezing:
- Minimize the number of times you take the ice cream in and out of the freezer. Frequent temperature changes can cause the ice cream to become icy and lose its smooth texture.
- Storage Duration:
- Homemade ice cream is best enjoyed within 2-3 weeks of making it for optimal freshness and flavor. Over time, even well-stored ice cream can lose its quality and texture.
- Revive Texture if Needed:
- If your ice cream becomes too hard after being stored, let it sit at room temperature for a few minutes to soften slightly before serving. You can also give it a quick stir to help restore its creamy consistency.
By following these serving and storage tips, you can ensure that your Strawberry Vanilla Bean Ice Cream remains a delightful and refreshing treat every time you enjoy it.
1. Can I use frozen strawberries instead of fresh?
Yes, you can use frozen strawberries if fresh ones are not available. Just be sure to thaw them completely before using. You may need to adjust the amount of sugar based on the sweetness of the frozen strawberries. Puree the thawed strawberries as you would with fresh ones, and proceed with the recipe as directed.
2. How can I make this recipe dairy-free or vegan?
To make a dairy-free or vegan version of Strawberry Vanilla Bean Ice Cream, substitute the heavy cream and whole milk with coconut milk, almond milk, or any other plant-based milk. Use a dairy-free cream alternative, such as coconut cream, for added richness. Ensure that the vanilla extract is pure and free from dairy. The texture may be slightly different, but it will still be delicious.
3. Can I make this ice cream without an ice cream maker?
Yes, you can make Strawberry Vanilla Bean Ice Cream without an ice cream maker. After mixing the ingredients, pour the mixture into a freezer-safe container and place it in the freezer. Every 30 minutes, stir the mixture with a fork to break up ice crystals and ensure a smoother texture. Repeat this process for about 2-3 hours, or until the ice cream reaches a soft-serve consistency.
4. How can I prevent ice crystals from forming in my homemade ice cream?
To minimize ice crystals, ensure that your ice cream mixture is well-chilled before churning. Ice crystals form when the ice cream freezes too slowly, so an ice cream maker helps churn air into the mixture while freezing it. If you’re not using an ice cream maker, stirring the mixture every 30 minutes during freezing can help break up ice crystals and maintain a smoother texture. Additionally, storing the ice cream in an airtight container helps reduce ice crystal formation.