
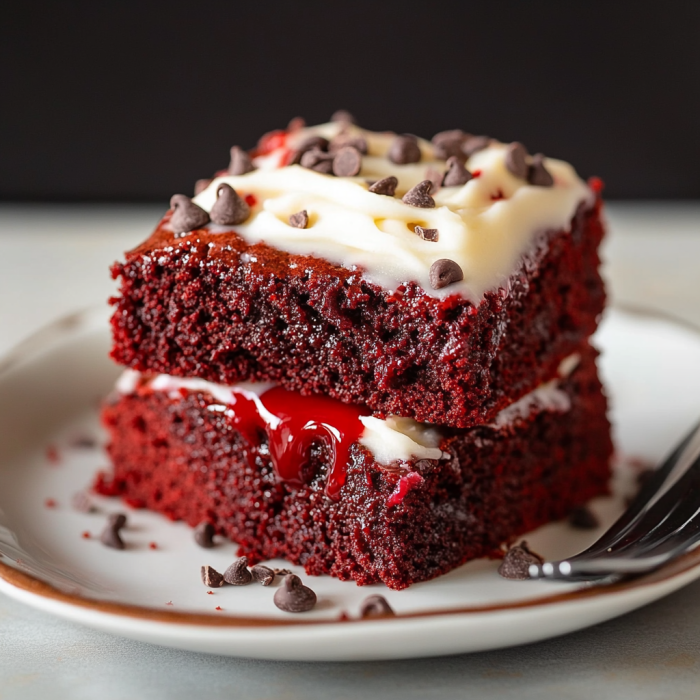
Are you craving a decadent dessert that combines the rich flavors of red velvet cake with the fudgy goodness of brownies? Look no further than these Red Velvet Brownies! Perfect for any occasion, these brownies offer a luxurious treat with a striking red color and a hint of cocoa that will impress your family and friends. Read on to discover how to make this delightful dessert and why it’s the perfect addition to your baking repertoire.
Why You’ll Love Red Velvet Brownies
Red Velvet Brownies are an irresistible fusion of two beloved desserts: red velvet cake and classic brownies. Here’s why they’re a must-try:
- Unique Flavor Profile: The combination of cocoa powder and buttermilk gives these brownies a distinct red velvet flavor that’s both tangy and sweet.
- Eye-Catching Appearance: The vibrant red color makes these brownies a showstopper on any dessert table, perfect for holidays, special occasions, or just because.
- Fudgy Texture: With a rich, fudgy consistency, these brownies offer a satisfying bite that’s moist and delicious.
Ingredients for Red Velvet Brownies
To make these scrumptious Red Velvet Brownies, you’ll need the following ingredients:
- 1 cup (225g) unsalted butter, plus extra for greasing
- 1 cup (200g) granulated sugar
- 1 cup (200g) packed brown sugar
- 2 large eggs
- 1 tablespoon red food coloring (gel or liquid)
- 2 teaspoons vanilla extract
- 1 tablespoon cocoa powder
- 1 ½ cups (190g) all-purpose flour
- ½ teaspoon baking powder
- ½ teaspoon salt
- 1 cup (170g) semi-sweet chocolate chips (optional)
Instructions

1. Preheat the Oven
Start by preheating your oven to 350°F (175°C). Grease a 9×13-inch baking pan and line it with parchment paper for easy removal of the brownies.
2. Prepare the Batter
In a medium saucepan, melt the butter over low heat. Once melted, remove from heat and stir in both the granulated and brown sugars until combined. Beat in the eggs, one at a time, ensuring each is fully incorporated before adding the next.
Add the red food coloring and vanilla extract to the mixture, stirring well to combine. In a separate bowl, whisk together the cocoa powder, flour, baking powder, and salt. Gradually add the dry ingredients to the wet ingredients, mixing until just combined. If using chocolate chips, fold them into the batter at this stage.
3. Bake the Brownies
Pour the batter into the prepared baking pan, spreading it evenly with a spatula. Bake in the preheated oven for 25-30 minutes, or until a toothpick inserted into the center comes out with just a few moist crumbs. Avoid overbaking, as this can make the brownies dry.
4. Cool and Serve
Allow the brownies to cool completely in the pan on a wire rack before cutting into squares. Enjoy these Red Velvet Brownies as a standalone treat or pair them with a scoop of vanilla ice cream for an extra indulgent dessert.
Tips for Perfect Red Velvet Brownies
- Use Gel Food Coloring: For the most vibrant red color, opt for gel food coloring rather than liquid, as it provides a richer hue without affecting the batter’s consistency.
- Check for Doneness: Since ovens vary, start checking for doneness a few minutes before the recommended baking time to prevent overcooking.
- Cool Completely: Allow the brownies to cool completely before cutting to ensure clean, neat slices.
Final Thoughts
Red Velvet Brownies are a fantastic way to elevate your baking game with a dessert that’s both beautiful and delicious. Whether you’re celebrating a special occasion or simply want to treat yourself, these brownies are sure to be a hit. Don’t forget to share your baking success and spread the joy of this delightful recipe!
Serving and Storage Tips for Red Velvet Brownies
To ensure your Red Velvet Brownies remain as delightful as when you first baked them, follow these serving and storage tips:
Serving Tips
- Cut Into Squares: Once the brownies have cooled completely, cut them into neat squares or rectangles. This makes for easy serving and ensures even distribution of the fudgy texture.
- Add a Topping: For an extra touch of indulgence, consider topping your brownies with a dollop of whipped cream, a drizzle of cream cheese frosting, or a sprinkle of powdered sugar.
- Pair with Ice Cream: Serve your Red Velvet Brownies with a scoop of vanilla or cream cheese ice cream for a delicious dessert combo. The creamy ice cream complements the rich, fudgy brownies perfectly.
- Garnish with Fresh Berries: Fresh raspberries or strawberries can add a burst of flavor and a beautiful contrast to the vibrant red of the brownies.
- Serve Warm: For a gooey treat, gently warm the brownies in the microwave for a few seconds before serving. This enhances their fudgy texture and makes them extra comforting.
Storage Tips
- Room Temperature: Store your Red Velvet Brownies in an airtight container at room temperature for up to 4-5 days. This helps maintain their soft and fudgy texture.
- Refrigeration: If you prefer your brownies chilled, you can store them in the refrigerator for up to 1 week. Just make sure they are well-wrapped or in an airtight container to prevent them from drying out.
- Freezing: To extend their shelf life, freeze your brownies for up to 3 months. Wrap them individually in plastic wrap or place them in a freezer-safe container. When ready to enjoy, thaw them at room temperature for a few hours or heat them gently in the microwave.
- Avoid Overcrowding: When storing brownies, avoid stacking them directly on top of each other to prevent them from sticking together. Use parchment paper between layers if necessary.
- Keep Away from Strong Odors: Store brownies away from strong-smelling foods or substances to prevent them from absorbing any unwanted odors.
By following these serving and storage tips, you can enjoy your Red Velvet Brownies at their best, whether you’re savoring them fresh or saving them for later.
1. Can I use a different type of food coloring for these brownies?
Yes, you can use different types of food coloring for Red Velvet Brownies. Gel food coloring is preferred because it provides a vibrant red hue without altering the batter’s consistency. If you’re using liquid food coloring, you may need to adjust the quantity slightly to achieve the desired color.
2. Can I substitute ingredients in this recipe for a different flavor or dietary need?
Absolutely! You can make several substitutions to cater to different preferences or dietary needs:
- Butter: Substitute with coconut oil or a plant-based butter for a dairy-free option.
- Flour: Use gluten-free flour blends if you need a gluten-free version.
- Eggs: Replace eggs with flax eggs or chia eggs for a vegan option.
- Sugar: Coconut sugar or maple syrup can be used as alternatives to granulated sugar, but they may affect the texture and flavor slightly.
3. How do I know when the brownies are done baking?
To check if your Red Velvet Brownies are done, insert a toothpick or cake tester into the center of the brownies. They are ready when the toothpick comes out with just a few moist crumbs. Avoid overbaking, as this can make the brownies dry. The edges should look set and the center should appear slightly underbaked.
4. Can I add mix-ins or toppings to the Red Velvet Brownies?
Yes, you can customize your brownies with mix-ins or toppings. Consider adding:
- Chocolate Chips: Fold in semi-sweet or white chocolate chips for extra richness.
- Nuts: Walnuts or pecans can add a delightful crunch.
- Swirls: Create a marble effect by swirling in cream cheese or a ganache before baking.
- Sprinkles: Add festive sprinkles on top before baking for a fun touch.
Red Velvet Brownies
- Prep Time: 15 minutes
- Cook Time: 30 minutes
- Total Time: 45 minutes
- Yield: 9–12 brownies 1x
- Category: Dessert
- Method: Baking
- Cuisine: American
- Diet: Vegetarian
Description
Red Velvet Brownies are rich, fudgy treats with the classic flavor and vibrant color of red velvet cake, topped with or without cream cheese frosting. Perfect for holidays, parties, or any sweet craving.
Ingredients
- 1/2 cup unsalted butter, melted
- 1 cup granulated sugar
- 2 large eggs
- 1 tsp vanilla extract
- 1 tbsp red food coloring
- 1/3 cup unsweetened cocoa powder
- 1/2 tsp white vinegar
- 3/4 cup all-purpose flour
- 1/4 tsp salt
- Optional: 1/2 cup white chocolate chips or cream cheese frosting for topping
Instructions
- Preheat oven to 350°F (175°C). Line an 8×8-inch baking pan with parchment paper or grease lightly.
- In a mixing bowl, whisk melted butter and sugar until smooth. Add eggs, vanilla, and red food coloring, mixing until combined.
- Stir in cocoa powder, vinegar, flour, and salt until just incorporated. Do not overmix. Fold in white chocolate chips if using.
- Pour batter into prepared pan and smooth the top.
- Bake for 25–30 minutes, or until a toothpick inserted in the center comes out with a few moist crumbs.
- Cool completely in the pan before slicing. Frost with cream cheese frosting if desired.
Notes
- For deeper chocolate flavor, add an extra tablespoon of cocoa powder.
- Use gel food coloring for a more vibrant red.
- Store in an airtight container for up to 4 days or refrigerate if frosted.
Nutrition
- Serving Size: 1 brownie
- Calories: 220
- Sugar: 20g
- Sodium: 95mg
- Fat: 11g
- Saturated Fat: 6g
- Unsaturated Fat: 4g
- Trans Fat: 0g
- Carbohydrates: 29g
- Fiber: 1g
- Protein: 3g
- Cholesterol: 50mg