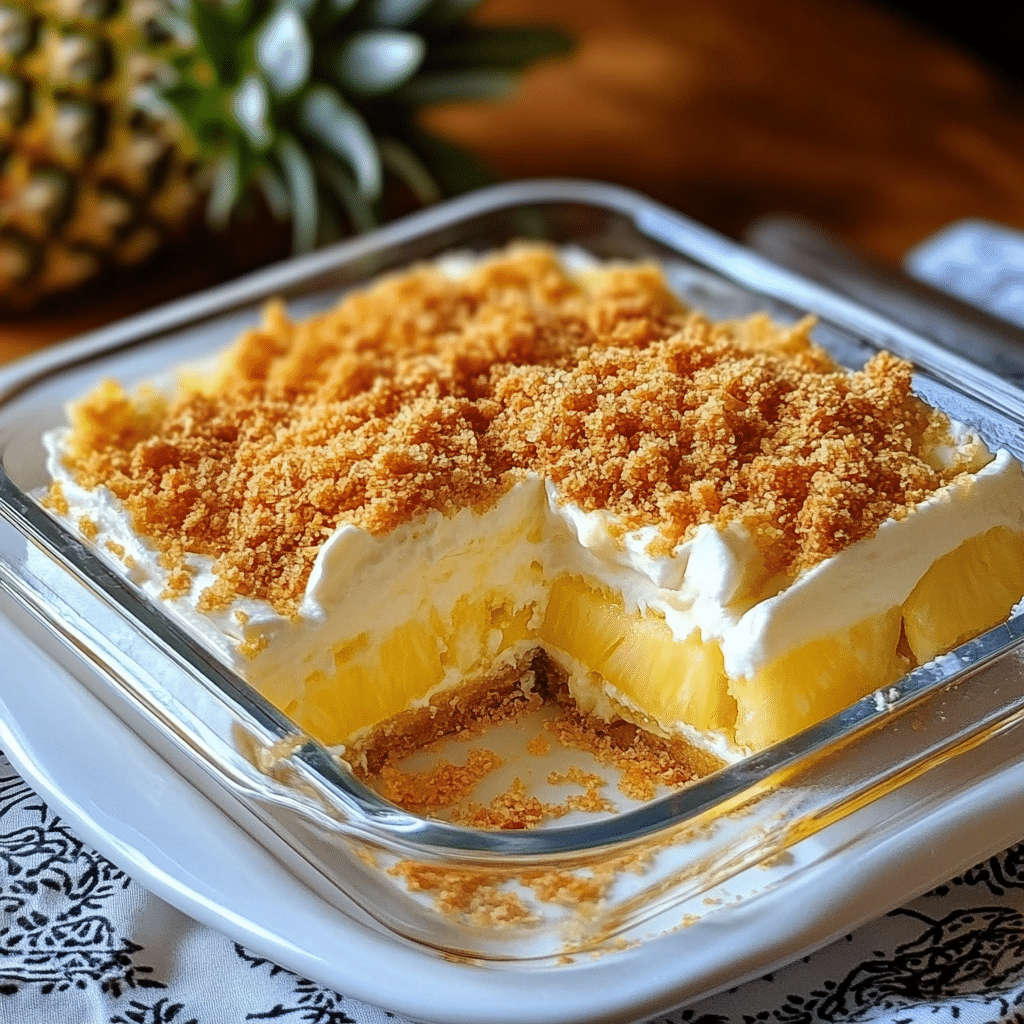
If you’re craving a refreshing, creamy dessert that combines the tanginess of pineapple with a dreamy, creamy filling, the Pineapple Dream Dessert is the perfect treat. This no-bake dessert features layers of sweet, crushed pineapple, velvety cream cheese filling, and a buttery graham cracker crust. Perfect for warm days or as a tropical-inspired treat, this dessert is easy to make and loved by all!
Why You’ll Love Pineapple Dream Dessert
This dessert is ideal for gatherings, BBQs, or as a sweet indulgence any time of the year. It’s light, fruity, and has a creamy consistency that pairs perfectly with the slight crunch of the graham cracker crust.
Ingredients for Pineapple Dream Dessert
Here’s what you’ll need to make this luscious dessert:
Crust
- 1 ½ cups graham cracker crumbs
- ½ cup unsalted butter, melted
Filling
- 1 (8 oz) package cream cheese, softened
- ½ cup unsalted butter, softened
- 1 ½ cups powdered sugar
- 1 (20 oz) can crushed pineapple, well-drained
Topping
- 1 cup whipped topping or whipped cream
- Optional: extra graham cracker crumbs for garnish
Instructions
Step 1: Prepare the Crust
- In a mixing bowl, combine graham cracker crumbs with melted butter until the mixture resembles wet sand.
- Press the crust mixture firmly into the bottom of a 9×9-inch baking dish to form an even layer.
- Place the dish in the refrigerator to set while you prepare the filling.
Step 2: Make the Creamy Filling
- In a medium bowl, beat the softened cream cheese and softened butter until smooth and creamy.
- Gradually add the powdered sugar and continue beating until fully combined.
- Fold in the drained crushed pineapple until evenly distributed.
Step 3: Assemble the Dessert
- Spread the cream cheese and pineapple filling evenly over the chilled crust.
- Top with a layer of whipped topping or whipped cream, smoothing it out with a spatula.
- For a touch of extra flavor and texture, sprinkle additional graham cracker crumbs on top.
Step 4: Chill and Serve
- Refrigerate the dessert for at least 3 hours, or until set.
- Cut into squares and serve cold. Enjoy the delightful blend of flavors!
Tips for Making the Best Pineapple Dream Dessert
- Draining the Pineapple: Make sure to drain the crushed pineapple thoroughly. Excess liquid can make the filling too soft.
- Chill Time: Allowing the dessert to chill is essential. It helps the layers firm up for easy slicing and enhances the overall flavor.
- Serving Size: This recipe serves about 9–12 portions depending on the size of the slices.
Variations to Try
- Coconut Topping: For a more tropical twist, sprinkle some shredded coconut on top.
- Nuts: Add a handful of chopped pecans or walnuts to the topping for a crunchy contrast.
- Chocolate Drizzle: A light drizzle of chocolate sauce on top adds a rich, decadent layer to the dessert.
Why Pineapple Dream Dessert is Perfect for Any Occasion
This dessert brings a sunny, tropical flair that’s perfect for summer parties, holidays, or even just a cozy night in. Its light, fluffy layers are incredibly satisfying without being too heavy, making it a favorite for guests of all ages.
Serving and Storage Tips for Pineapple Dream Dessert
Serving Tips
- Chill Before Serving: For the best texture and flavor, make sure to refrigerate the dessert for at least 3 hours, or overnight if possible. This allows the layers to set and makes slicing easier.
- Use a Sharp Knife: When slicing, use a sharp knife to cut through the crust cleanly. Wiping the knife between cuts will help create neat, presentable squares.
- Garnish for Extra Flair: Add a sprinkle of extra graham cracker crumbs, a few fresh pineapple slices, or even a light dusting of powdered sugar just before serving for a polished look.
- Serve Chilled: This dessert tastes best when served straight from the fridge, as it keeps the filling firm and creamy. If serving outdoors or in warm weather, keep the dessert cool until just before serving.
Storage Tips
- Refrigerate: Cover the dessert tightly with plastic wrap or foil, or transfer it to an airtight container. It will keep well in the refrigerator for up to 3 days.
- Freezing Option: Pineapple Dream Dessert can be frozen if you want to prepare it far in advance. Wrap it tightly in plastic wrap, then cover it with foil to prevent freezer burn. Freeze for up to 1 month.
- Thawing: Thaw overnight in the refrigerator before serving. While the texture of the whipped topping may change slightly, the dessert will still be delicious.
- Individual Portions: If you have leftovers, consider cutting the dessert into individual portions before refrigerating or freezing. This makes it easy to grab a single serving without disturbing the rest.
These tips will help you keep your Pineapple Dream Dessert fresh and ensure each bite is as delicious as the first!
1. Can I use frozen whipped topping instead of fresh whipped cream?
Yes, frozen whipped topping (like Cool Whip) works perfectly in this recipe and helps the dessert set well. Just make sure it’s thawed before spreading it over the filling.
2. Can I make this dessert gluten-free?
Absolutely! To make it gluten-free, simply substitute the graham cracker crumbs with gluten-free graham crackers or cookies. The rest of the ingredients are naturally gluten-free.
3. What can I use as a substitute for graham crackers?
If graham crackers aren’t available, crushed vanilla wafers, digestive biscuits, or shortbread cookies are great substitutes. Just be sure to keep the same crumb-to-butter ratio for the crust.
4. How do I prevent a soggy crust?
Make sure to fully drain the crushed pineapple before adding it to the filling. Press the crust firmly into the dish, and refrigerate the dessert for several hours or overnight to allow the crust to set properly.

Pineapple Dream Dessert
- Prep Time: 20 minutes
- Cook Time: 4 hours
- Total Time: 4 hours 20 minutes
- Yield: 12 squares 1x
- Category: Dessert, No-Bake
- Method: No-Bake
- Cuisine: American
Description
Pineapple Dream Dessert is a creamy, no-bake treat that combines a buttery graham cracker crust with a rich cream cheese and pineapple filling, topped with a fluffy whipped cream layer. This easy-to-make, refreshing dessert is perfect for summer gatherings, potlucks, or anytime you’re craving a tropical treat with a touch of nostalgia.
Ingredients
For the Crust:
- 2 cups graham cracker crumbs
- 1/2 cup unsalted butter, melted
- 1/4 cup granulated sugar
For the Filling:
- 8 oz cream cheese, softened
- 1/2 cup unsalted butter, softened
- 2 cups powdered sugar
- 1 (20 oz) can crushed pineapple, drained well
For the Topping:
- 1 cup whipped topping (like Cool Whip) or homemade whipped cream
- 1/4 cup toasted coconut flakes (optional, for garnish)
Instructions
- Prepare the Crust: In a medium bowl, combine graham cracker crumbs, melted butter, and granulated sugar. Mix until well combined. Press the mixture firmly into the bottom of a 9×13-inch baking dish. Place in the refrigerator to set while you prepare the filling.
- Make the Filling: In a large mixing bowl, beat the softened cream cheese and butter until smooth and creamy. Gradually add powdered sugar, mixing until light and fluffy. Fold in the drained crushed pineapple until evenly distributed.
- Assemble the Layers: Spread the cream cheese and pineapple mixture evenly over the graham cracker crust.
- Top with Whipped Topping: Gently spread the whipped topping over the pineapple layer until smooth. Sprinkle toasted coconut flakes on top, if desired.
- Chill: Refrigerate for at least 4 hours, or overnight, to allow the layers to set and flavors to meld.
- Serve: Slice into squares and serve chilled. Enjoy!
Notes
- Ensure the pineapple is well-drained to prevent the dessert from becoming too watery.
- For added flavor, you can add a few tablespoons of pineapple juice to the filling, but make sure to balance the texture.
- Store leftovers in an airtight container in the refrigerator for up to 3 days.

