

Mini Red Velvet Cheesecakes are a stunning and decadent dessert perfect for holidays, parties, or a romantic date night. These bite-sized treats combine the rich flavors of red velvet cake with a smooth, creamy cheesecake layer, all topped with a swirl of whipped cream for an elegant finish. They’re easy to make and guaranteed to impress!
Ingredients
For the Red Velvet Base:
- 1/2 cup all-purpose flour
- 1 tablespoon unsweetened cocoa powder
- 1/4 teaspoon baking soda
- 1/8 teaspoon salt
- 1/4 cup unsalted butter, softened
- 1/2 cup granulated sugar
- 1 large egg
- 1 teaspoon vanilla extract
- 1/4 cup buttermilk
- 1 teaspoon red food coloring
For the Cheesecake Filling:
- 8 oz cream cheese, softened
- 1/4 cup granulated sugar
- 1 large egg
- 1 teaspoon vanilla extract
For the Topping:
- 1/2 cup heavy whipping cream
- 2 tablespoons powdered sugar
- 1/2 teaspoon vanilla extract
- Red velvet cake crumbs (optional, for garnish)
Instructions

Step 1: Prepare the Red Velvet Base
- Preheat your oven to 350°F (175°C) and line a 12-cup muffin pan with paper liners.
- In a small bowl, whisk together the flour, cocoa powder, baking soda, and salt. Set aside.
- In a large bowl, beat the softened butter and sugar until light and fluffy. Add the egg and vanilla extract, mixing until smooth.
- Add the dry ingredients to the wet ingredients, alternating with the buttermilk. Stir in the red food coloring until the batter is evenly colored.
- Spoon about 1 tablespoon of red velvet batter into each muffin cup, spreading it evenly to form the base.
Step 2: Make the Cheesecake Filling
- In a medium bowl, beat the softened cream cheese and sugar until smooth and creamy.
- Add the egg and vanilla extract, mixing just until combined (do not overmix).
- Spoon the cheesecake mixture evenly over the red velvet bases in the muffin cups, filling them almost to the top.
Step 3: Bake and Cool
- Bake in the preheated oven for 18–20 minutes, or until the cheesecake centers are set but slightly jiggly.
- Remove the muffin pan from the oven and allow the cheesecakes to cool to room temperature.
- Refrigerate the mini cheesecakes for at least 2 hours to firm up before serving.
Step 4: Whipped Cream Topping
- In a cold mixing bowl, beat the heavy whipping cream, powdered sugar, and vanilla extract until stiff peaks form.
- Transfer the whipped cream to a piping bag fitted with a star tip and pipe a swirl of whipped cream onto each mini cheesecake.
- Garnish with red velvet cake crumbs for an extra pop of color, if desired.
Serving and Storage Tips
- Serving: Serve the mini cheesecakes chilled for the best flavor and texture. They’re perfect on their own or paired with a cup of coffee or tea.
- Storage: Store in an airtight container in the refrigerator for up to 4 days.
- Freezing: You can freeze the mini cheesecakes (without whipped cream) for up to 2 months. Thaw them in the refrigerator overnight and add the whipped cream before serving.
1. Can I make these cheesecakes without red food coloring?
Yes, you can omit the red food coloring, but they won’t have the signature red velvet color. The flavor will remain the same.
2. How do I prevent cracks in the cheesecake?
To avoid cracks, do not overmix the cheesecake batter, and bake at the correct temperature. Slight jiggle in the center is normal when baking cheesecake.
3. Can I make these in a mini muffin pan?
Yes! Use mini muffin liners and reduce the baking time to 10–12 minutes. You’ll get adorable bite-sized cheesecakes.
4. Can I use store-bought whipped cream?
Absolutely. Store-bought whipped cream can be used for convenience, but homemade whipped cream offers better flavor and texture.
Print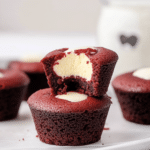
Mini Red Velvet Cheesecake
- Prep Time: 15 minutes
- Chill Time: 2–3 hours
- Cook Time: 20 minutes
- Total Time: 2 hours 35 minutes
- Yield: 12 mini cheesecakes 1x
- Category: Dessert
- Method: Baked
- Cuisine: American
Description
These Mini Red Velvet Cheesecakes are the perfect bite-sized dessert with a smooth, velvety texture and a vibrant red hue. A crunchy Oreo crust complements the rich, creamy cheesecake filling, topped with a dollop of whipped cream for an elegant finish. Perfect for holidays, parties, or special occasions!
Ingredients
For the crust:
- 12 Oreo cookies (filling removed), crushed into fine crumbs
- 3 tablespoons unsalted butter, melted
For the cheesecake filling:
- 8 oz (225 g) cream cheese, softened
- 1/3 cup (65 g) granulated sugar
- 1 large egg, at room temperature
- 1 teaspoon vanilla extract
- 2 tablespoons sour cream
- 1 tablespoon unsweetened cocoa powder
- 1 teaspoon red food coloring (gel or liquid, adjust as needed)
For the topping:
- Whipped cream or cream cheese frosting
- Chocolate shavings or red sprinkles (optional, for garnish)
Instructions
- Preheat the oven:
- Preheat your oven to 325°F (160°C). Line a 12-cup muffin tin with paper liners.
- Make the crust:
- In a bowl, combine the Oreo cookie crumbs and melted butter until evenly moistened.
- Press about 1 tablespoon of the mixture into the bottom of each muffin liner. Use the back of a spoon or your fingers to pack it down firmly.
- Bake the crusts for 5 minutes. Remove and let cool while preparing the filling.
- Prepare the cheesecake filling:
- In a large mixing bowl, beat the softened cream cheese with an electric mixer until smooth and creamy (about 2 minutes).
- Add the granulated sugar and beat until fully incorporated.
- Mix in the egg, vanilla extract, and sour cream until just combined.
- Sift in the cocoa powder and add the red food coloring, mixing until the batter is smooth and vibrant red.
- Fill the liners:
- Spoon the red velvet cheesecake batter evenly over the cooled crusts, filling each liner about 3/4 full. Smooth the tops with the back of a spoon.
- Bake:
- Bake for 18–20 minutes, or until the centers are set and no longer jiggly. Avoid overbaking.
- Remove from the oven and let the cheesecakes cool in the pan for 10 minutes. Transfer to a wire rack to cool completely.
- Chill:
- Refrigerate the mini cheesecakes for at least 2 hours (or overnight) to firm up.
- Decorate and serve:
- Top each mini cheesecake with whipped cream or a small swirl of cream cheese frosting. Garnish with chocolate shavings, red sprinkles, or a dusting of cocoa powder for a festive touch.
Notes
- Make-ahead: These mini cheesecakes can be made 1–2 days ahead and stored in the refrigerator.
- Crust variation: Use graham cracker crumbs instead of Oreos for a different flavor.
- Freezing: Store plain mini cheesecakes (without toppings) in the freezer for up to 2 months. Thaw in the refrigerator before serving.