

A sourdough starter is a natural, fermented culture of flour and water that captures wild yeast and bacteria from the environment. Once it’s active, this bubbly mixture will help you bake flavorful, crusty sourdough bread without needing commercial yeast. Creating your own starter takes patience, but the reward is homemade bread with rich depth and natural tanginess.
Why You’ll Love This Recipe
- No commercial yeast required – Uses wild, natural yeast from the environment.
- Deep, tangy flavor – Adds a complex, rich taste to bread and other baked goods.
- Minimal ingredients – Just flour and water!
- Endless baking possibilities – Use it for bread, pancakes, pizza dough, and more.
- Long-lasting – When properly maintained, your starter can last for years.
Ingredients
(Tip: You’ll find the full list of ingredients and measurements in the recipe card below.)
- Unbleached all-purpose flour or whole wheat flour
- Filtered or dechlorinated water (room temperature)
Directions

Day 1: Start the Starter
- Mix ingredients:
- Combine ½ cup of flour and ¼ cup of water in a clean glass jar or bowl. Stir until smooth and there are no dry spots.
- Cover loosely:
- Cover the jar with a breathable cloth, coffee filter, or loose lid to allow airflow while keeping dust out.
- Rest:
- Leave the jar at room temperature (around 70°F–75°F or 21°C–24°C) for 24 hours.
Day 2: Check for Bubbles
- Observe:
- You might see small bubbles forming—this is a sign of yeast activity.
- Feed the starter:
- Add ½ cup of flour and ¼ cup of water to the mixture. Stir well and cover again.
Days 3–6: Continue Feeding
- Daily feedings:
- Discard half of the starter (about ½ cup).
- Add ½ cup of flour and ¼ cup of water. Stir until smooth.
- Look for signs of activity:
- By day 4 or 5, the starter should have bubbles, a noticeable rise, and a slightly tangy smell.
Day 7: Ready to Use
- Final check:
- The starter should double in size within 4–6 hours of feeding and have a pleasant, yeasty aroma.
- Ready to bake:
- If it’s bubbly, airy, and has a mild sour smell, your starter is ready to be used in recipes.
Servings and Timing
- Yield: About 1 cup of starter (enough for 1–2 loaves of bread)
- Prep Time: 10 minutes daily
- Total Time: 7 days (can vary depending on the temperature and environment)
Variations
- Whole Wheat Starter: Use whole wheat flour for the entire process for a heartier, more active starter.
- Rye Flour Starter: Rye flour can help speed up fermentation and develop a stronger sour flavor.
- Gluten-Free Starter: Substitute gluten-free flour to create a gluten-free sourdough starter.
Storage/Reheating
- Short-Term Storage: Keep your starter at room temperature if you bake daily, feeding it once every 24 hours.
- Long-Term Storage: Store in the refrigerator if you bake less frequently and feed it once a week.
- Reactivating a Starter: If refrigerated, bring it to room temperature, discard half, and feed as usual 1–2 times before using.
FAQs
What if I don’t see bubbles after a few days?
Try placing your starter in a warmer area and using whole wheat or rye flour to boost fermentation.
Why do I have to discard part of the starter?
Discarding prevents the starter from becoming too large and keeps the yeast balanced and healthy.
Can I use tap water?
If your tap water contains chlorine, it’s best to use filtered or dechlorinated water, as chlorine can inhibit yeast growth.
How do I know if my starter has gone bad?
A pink or orange color, foul smell, or visible mold means the starter should be discarded and restarted.
How often should I feed my sourdough starter?
Feed daily at room temperature or weekly if stored in the refrigerator.
Can I use my starter before day 7?
You can try using it earlier if it’s bubbly, doubles in size, and smells pleasantly sour.
What is the liquid on top of my starter?
This liquid, called “hooch,” indicates your starter is hungry. Stir it back in or pour it off before feeding.
Can I freeze my sourdough starter?
Yes, freeze a portion of your starter in an airtight container for up to 6 months. Thaw and feed it to reactivate.
How long does a sourdough starter last?
With regular feeding, a sourdough starter can last indefinitely—some starters are over 100 years old!
What’s the best flour for feeding my starter?
Unbleached all-purpose flour works well, but whole wheat or rye flour can help maintain a more active starter.
Conclusion
Making a sourdough starter from scratch is a rewarding, simple process that connects you to centuries-old bread-making traditions. With just two ingredients and a bit of patience, you’ll have a living culture that can create delicious bread, pancakes, and more. Once established, this starter can last for years and even become a cherished kitchen heirloom!
Print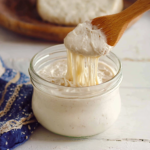
How to Make Sourdough Starter from Scratch
- Prep Time: 5 minutes per day
- Total Time: 7 days (or until bubbly and active)
- Yield: 1 cup 1x
- Category: Baking Basics
- Method: Fermentation
- Cuisine: Global
Description
A sourdough starter is a natural fermentation of flour and water, creating wild yeast and beneficial bacteria. This bubbly, tangy starter is the key to making homemade sourdough bread without commercial yeast. With just two ingredients and a little patience, you’ll have a living culture ready to bake with in about a week.
Ingredients
- 1 cup (120g) whole wheat or all-purpose flour (unbleached preferred)
- 1/2 cup (120ml) filtered or non-chlorinated water
Instructions
Day 1: Start Your Starter
- In a clean glass jar or bowl, mix 1 cup of flour and ½ cup of water until smooth.
- Cover loosely with a breathable lid (cheesecloth, coffee filter, or a jar lid that isn’t sealed tight).
- Let sit at room temperature (around 70°F/21°C) for 24 hours.
Day 2: Check for Activity
- You may see bubbles or a slight rise—this means wild yeast is beginning to grow.
- Discard half of the mixture (about ½ cup).
- Feed with another 1 cup of flour and ½ cup of water. Mix well and cover again.
Days 3–7: Feed and Observe
- Continue the same routine: discard half and feed daily with 1 cup of flour and ½ cup of water.
- By day 4 or 5, you should notice a stronger smell (tangy, slightly fruity) and more bubbles.
- If your starter doubles in size within 4-6 hours of feeding, it’s ready to use!
Day 7+: Ready to Bake
- Your starter is mature when it has doubled in size, is bubbly, and smells pleasantly sour.
- Perform a “float test”: Drop a small spoonful into water—if it floats, it’s ready to bake with.
Notes
- Feeding Ratio: Once established, switch to a 1:1:1 ratio (starter:flour:water by weight) for regular maintenance.
- Storage: Keep at room temperature for daily baking or refrigerate and feed once a week if baking less frequently.
- Troubleshooting: If you see mold or smell anything foul (other than a tangy sour smell), discard and start over.