
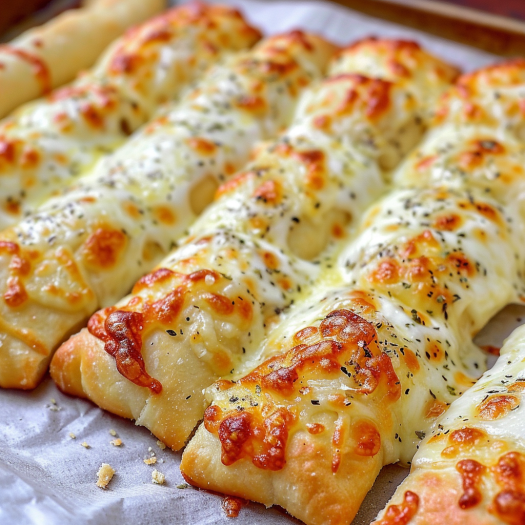
Looking for a delicious, cheesy treat to pair with your favorite dishes or enjoy on its own? This Homemade Cheesy Garlic Breadsticks recipe is exactly what you need. Perfectly crisp on the outside, soft and gooey on the inside, these breadsticks are laden with flavors of garlic and melting cheese, guaranteed to delight your taste buds. Whether you’re planning a family dinner, a cozy night in, or a gathering with friends, these breadsticks are a surefire hit. Let’s dive into how you can make these irresistible delights at home with simple ingredients and easy steps.
Ingredients Needed:
- 1 pound of pizza dough (store-bought or homemade)
- 2 tablespoons of olive oil
- 3 cloves garlic, minced
- 1 teaspoon of Italian seasoning
- 1/4 teaspoon of salt
- 1/4 teaspoon of black pepper
- 1 cup of shredded mozzarella cheese
- 1/4 cup of grated Parmesan cheese
- 2 tablespoons of fresh parsley, chopped (optional for garnish)
- Marinara sauce for dipping (optional)
Step-by-Step Instructions:
1. Preheat Your Oven:
Begin by preheating your oven to 375°F (190°C). This ensures your oven is hot enough to bake the breadsticks to crispy perfection.
2. Prepare the Dough:
Roll out the pizza dough on a lightly floured surface into a rectangle about 1/4 inch thick. Transfer the dough to a parchment-lined baking sheet. This not only prevents sticking but also makes cleanup a breeze.
3. Add the Garlic and Herbs:
In a small bowl, mix together the olive oil, minced garlic, Italian seasoning, salt, and pepper. Brush this mixture evenly over the surface of the dough, distributing the flavors for maximum impact.
4. Sprinkle the Cheeses:
Spread the shredded mozzarella and grated Parmesan evenly over the dough. The cheese will melt into every nook and cranny, creating that irresistible cheesy pull we all love.
5. Bake to Perfection:
Place the baking sheet in the oven and bake for about 15-20 minutes, or until the edges are golden brown and the cheese is bubbly and slightly golden. The aroma of baking bread and melting cheese will be hard to resist!
6. Adding the Finishing Touches:
Once baked, remove the breadsticks from the oven. If desired, sprinkle chopped parsley over the top for a fresh, herby finish.
7. Cut and Serve:
Let the breadsticks cool slightly, then cut them into strips. Serve warm, with marinara sauce on the side for dipping if you like an extra zing.
Why Try This Recipe?
Versatility: These cheesy garlic breadsticks are versatile and can accompany anything from pasta dishes and salads to soups or enjoy them on their own as a savory snack.
Customizable: Easily tweak this recipe to suit your taste preferences. Add different cheeses, sprinkle some chili flakes for a spicy kick, or incorporate fresh herbs for a new dimension of flavor.
Great for All Occasions: Whether it’s a casual movie night or a festive dinner party, these breadsticks fit perfectly into any meal setting.
Kid-Friendly: Kids love cheese and bread, making this recipe a great way to get them involved in the kitchen.
Conclusion
This Homemade Cheesy Garlic Breadsticks recipe is more than just food; it’s comfort in every bite, filled with cheesy goodness and aromatic flavors that bring smiles around the dinner table. It’s quick, easy, and delicious, making it the perfect choice for any day of the week. Give this recipe a try, and let the baking begin!
Serving and Storage Tips for Homemade Cheesy Garlic Breadsticks
Serving Suggestions:
- Fresh and Hot: For the best experience, serve the breadsticks hot right out of the oven when they are most flavorful and the cheese is deliciously melty.
- Accompaniments: Pair these cheesy garlic breadsticks with a side of marinara sauce, ranch dressing, or a creamy garlic dip for added flavor. They also make a great side dish with pasta, soups, and salads.
- Presentation: Serve them on a rustic wooden board or a simple serving platter. Garnishing with a sprinkle of fresh herbs like parsley or basil not only adds color but also a burst of freshness.
Storage Tips:
- Cooling Down: Allow the breadsticks to cool completely before storing to prevent condensation and sogginess.
- Refrigerating: Place the breadsticks in an airtight container or wrap them tightly with aluminum foil or plastic wrap. They will last in the refrigerator for up to 3 days.
- Freezing: For longer storage, freeze the breadsticks. Wrap each breadstick individually in plastic wrap and then place them in a zip-lock freezer bag. They can be stored in the freezer for up to a month. This method helps preserve their taste and texture as much as possible.
- Reheating: To reheat, unwrap the breadsticks and place them on a baking sheet. Reheat in an oven preheated to 350°F for about 5-10 minutes if refrigerated, or 10-15 minutes if frozen. You can also microwave them for a quick reheat, but this may slightly affect their texture, making them a bit chewier.
General Tips:
- Avoid Sogginess: When reheating, you can add a fresh sprinkle of cheese on top to revive their original flavor and texture.
- Batch Cooking: Since these breadsticks freeze well, consider making a double batch. This way, you always have a quick appetizer or snack ready to go.
- Maintain Freshness: Always ensure the container or the wrapping is sealed properly to prevent air from drying out the breadsticks.
By following these serving and storage tips, you can ensure your Homemade Cheesy Garlic Breadsticks are delicious from the first to the last bite, whether served immediately or enjoyed later.
1. Can I use a different type of cheese for the breadsticks?
Absolutely! While mozzarella and Parmesan are popular choices due to their meltability and flavor, you can experiment with other cheeses. Try using cheddar for a sharper taste, provolone for a smoother texture, or a blend of your favorite cheeses. Just keep in mind that some cheeses melt differently and might affect the texture of your breadsticks.
2. What can I do to make the breadsticks gluten-free?
To make gluten-free cheesy garlic breadsticks, you can substitute the regular pizza dough with a gluten-free pizza dough mix available in most grocery stores. Make sure to check the label for any hidden sources of gluten, and follow the package instructions for preparation.
3. How can I make my breadsticks more flavorful?
For an extra boost of flavor, consider adding additional seasonings to the garlic oil mixture. Some great additions include crushed red pepper flakes for heat, dried basil or oregano for an Italian touch, or even a bit of smoked paprika for a smoky undertone. You could also top the breadsticks with minced sun-dried tomatoes or caramelized onions before baking for a unique twist.
4. Are there any tips for making the dough from scratch?
Making your own pizza dough can be very rewarding and allows you to control the ingredients and flavors. Here are a few tips:
- Yeast: Make sure your yeast is active; if it doesn’t foam after mixing with warm water and sugar, it may not be viable.
- Kneading: Knead your dough until it’s smooth and elastic; this develops the gluten, giving the bread its texture.
- Rising: Allow the dough sufficient time to rise, ideally in a warm, draft-free area. A good rise makes the breadsticks lighter and fluffier.
- Flavoring: Infuse the dough with flavor by adding garlic powder, Italian seasoning, or even grated Parmesan cheese to the mix before kneading.
Homemade Cheesy Garlic Breadsticks Recipe
- Prep Time: 15 minutes
- Cook Time: 18 minutes
- Total Time: 1 hour 30 minutes including rising
- Yield: 12 breadsticks 1x
- Category: Side Dish
- Method: Baking
- Cuisine: Italian-American
- Diet: Vegetarian
Description
These Homemade Cheesy Garlic Breadsticks are soft, fluffy, and loaded with garlic butter and melted cheese. They’re the perfect side for pasta, soup, or salad—or a delicious snack on their own.
Ingredients
- 1 cup warm water (110°F/43°C)
- 2 1/4 tsp active dry yeast (1 packet)
- 1 tbsp sugar
- 2 1/2 cups all-purpose flour
- 1 tsp salt
- 2 tbsp olive oil
- 2 tbsp unsalted butter, melted
- 2 cloves garlic, minced
- 1 tsp garlic powder
- 1 1/2 cups shredded mozzarella cheese
- 1/4 cup grated Parmesan cheese
- 1 tbsp chopped fresh parsley (optional, for garnish)
Instructions
- In a bowl, combine warm water, yeast, and sugar. Let sit for 5–10 minutes until foamy.
- Add flour, salt, and olive oil. Mix until dough forms. Knead on a floured surface for 6–8 minutes until smooth and elastic.
- Place dough in a greased bowl, cover, and let rise in a warm place for 1 hour or until doubled in size.
- Preheat oven to 400°F (200°C). Line a baking sheet with parchment paper.
- Roll out dough into a rectangle about 1/2 inch thick and transfer to prepared sheet.
- In a small bowl, combine melted butter, minced garlic, and garlic powder. Brush over dough.
- Sprinkle mozzarella and Parmesan evenly over the top.
- Bake for 15–18 minutes, or until cheese is melted and edges are golden.
- Let cool slightly, then cut into breadsticks. Garnish with chopped parsley if desired.
Notes
- Use Italian seasoning or chili flakes for extra flavor.
- For a shortcut, use store-bought pizza dough.
- Serve with marinara or ranch for dipping.
Nutrition
- Serving Size: 1 breadstick
- Calories: 180
- Sugar: 1g
- Sodium: 240mg
- Fat: 8g
- Saturated Fat: 4g
- Unsaturated Fat: 3g
- Trans Fat: 0g
- Carbohydrates: 21g
- Fiber: 1g
- Protein: 6g
- Cholesterol: 15mg