
Are you craving a dessert that brings the sunny, tropical vibes of Hawaii to your kitchen? Look no further than this irresistible Hawaiian Pineapple Cake! This cake combines the sweet, tangy flavor of pineapple with a moist, fluffy texture, making it the perfect treat for any occasion. Whether you’re hosting a summer barbecue, celebrating a special event, or just in the mood for something delicious, this cake is sure to impress.
Ingredients:
- For the Cake:
- 1 ½ cups all-purpose flour
- 1 cup granulated sugar
- 1 tsp baking powder
- ½ tsp baking soda
- ¼ tsp salt
- ½ cup unsalted butter, softened
- 2 large eggs
- 1 cup crushed pineapple (drained)
- 1 tsp vanilla extract
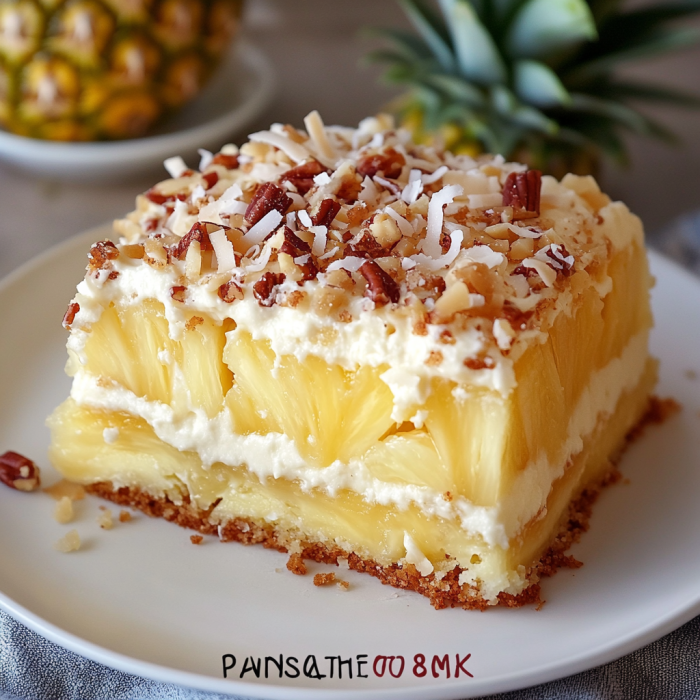
- ½ cup coconut flakes (optional, for added texture)
- For the Frosting:
- ½ cup unsalted butter, softened
- 2 cups powdered sugar
- 2 tbsp pineapple juice
- 1 tsp vanilla extract
- ½ cup crushed pineapple (drained, for garnish)
Instructions:

- Preheat Your Oven:
Preheat your oven to 350°F (175°C). Grease and flour a 9-inch round cake pan or line it with parchment paper. - Prepare the Cake Batter:
In a medium bowl, whisk together the flour, sugar, baking powder, baking soda, and salt. In another bowl, cream the softened butter until light and fluffy. Beat in the eggs one at a time, then add the vanilla extract. - Combine Wet and Dry Ingredients:
Gradually mix the dry ingredients into the butter mixture, alternating with the crushed pineapple. If using, fold in the coconut flakes. The batter should be smooth and well combined. - Bake the Cake:
Pour the batter into the prepared cake pan and smooth the top with a spatula. Bake for 30-35 minutes, or until a toothpick inserted into the center comes out clean. Allow the cake to cool in the pan for 10 minutes before transferring it to a wire rack to cool completely. - Make the Frosting:
While the cake cools, prepare the frosting. Beat the softened butter until creamy. Gradually add the powdered sugar, pineapple juice, and vanilla extract, beating until the frosting is smooth and spreadable. Fold in the crushed pineapple for added texture. - Frost the Cake:
Once the cake is completely cool, spread the frosting evenly over the top and sides of the cake. Garnish with additional coconut flakes or pineapple chunks if desired. - Serve and Enjoy:
Slice the cake and serve it as a delightful end to any meal. This Hawaiian Pineapple Cake pairs wonderfully with a scoop of vanilla ice cream or a dollop of whipped cream.
Tips for the Perfect Hawaiian Pineapple Cake:
- Drain the Pineapple: Make sure to drain the pineapple thoroughly to avoid adding extra moisture to the cake batter.
- Adjust Sweetness: Taste the frosting and adjust the sweetness by adding more powdered sugar or pineapple juice, if needed.
- Storage: Store the cake in an airtight container at room temperature for up to 3 days or refrigerate for longer freshness.
Why You’ll Love This Hawaiian Pineapple Cake
This cake isn’t just a treat for your taste buds; it’s a slice of paradise! The pineapple provides a natural sweetness and moistness that’s hard to beat, while the coconut flakes add a delightful texture. Plus, it’s simple to make and perfect for both casual get-togethers and special celebrations.
Serving and Storage Tips for Hawaiian Pineapple Cake
Serving Tips:
- Chill Before Serving: For the best texture and flavor, chill the cake in the refrigerator for about an hour before serving. This allows the frosting to set and makes slicing easier.
- Garnish: Enhance the presentation by garnishing with extra pineapple chunks, toasted coconut flakes, or even a light drizzle of pineapple syrup. Fresh mint leaves can also add a touch of color and freshness.
- Pairings: Serve the cake with a scoop of vanilla ice cream or a dollop of whipped cream to complement its tropical flavors. A drizzle of caramel or chocolate sauce can also add a decadent touch.
- Presentation: For an elegant touch, use a cake stand or decorative plate. If serving at a party, consider cutting the cake into small squares or slices for easy sharing.
- Room Temperature: Allow the cake to come to room temperature before serving if it has been refrigerated. This will bring out the full flavor and achieve the perfect texture.
Storage Tips:
- Room Temperature: If you plan to enjoy the cake within a few days, you can store it at room temperature in an airtight container. It will stay fresh for up to 3 days.
- Refrigeration: For longer storage, keep the cake in the refrigerator. An airtight container or plastic wrap will help maintain its moisture. The cake will stay fresh for up to a week.
- Freezing: If you want to store the cake for an extended period, freezing is a great option. Wrap the cake tightly in plastic wrap and then in aluminum foil. It can be frozen for up to 2-3 months. To thaw, transfer the cake to the refrigerator for several hours or overnight before serving.
- Frosting Considerations: If freezing, consider freezing the cake without the frosting. Frosting can sometimes become less appealing after freezing. You can frost the cake after thawing it.
- Reheating: If desired, you can warm individual slices in the microwave for a few seconds before serving. This can make the cake taste freshly baked and enhance the flavors.
By following these serving and storage tips, you can ensure that your Hawaiian Pineapple Cake remains delicious and enjoyable, whether it’s just made or has been stored for later.
1. Can I use fresh pineapple instead of canned pineapple for this recipe?
Yes, you can use fresh pineapple instead of canned pineapple. Be sure to finely chop the fresh pineapple and drain it well to remove excess moisture before adding it to the batter. This will help achieve the desired texture and prevent the cake from becoming too wet.
2. How can I make this cake gluten-free?
To make a gluten-free version of Hawaiian Pineapple Cake, substitute the all-purpose flour with a 1:1 gluten-free baking flour blend. Ensure that the baking powder and baking soda used are also gluten-free. The texture might differ slightly, but it will still be delicious!
3. Can I make this cake ahead of time?
Absolutely! You can make the cake ahead of time and store it in an airtight container at room temperature for up to 3 days. For longer storage, refrigerate it for up to a week or freeze it for up to 2-3 months. If freezing, it’s best to frost the cake after thawing.
4. What can I use if I don’t have coconut flakes?
If you don’t have coconut flakes, you can simply omit them or replace them with chopped nuts like almonds or pecans for added texture. Alternatively, you can use additional crushed pineapple or even shredded white chocolate to complement the tropical flavors of the cake.
Print
Hawaiian Pineapple Cake
- Prep Time: 10 minutes
- Cook Time: 30 minutes
- Total Time: 1 hour (including cooling and frosting)
- Yield: 12–16 servings 1x
- Category: Dessert / Cake
- Method: Baking
- Cuisine: American / Hawaiian-inspired
- Diet: Vegetarian
Description
Moist, tender cake bursting with sweet pineapple flavor and hint of coconut—an island-inspired dessert that’s easy to bake and perfect for any occasion.
Ingredients
- 1 box (15.25 oz) yellow cake mix
- 1 (20 oz) can crushed pineapple with juice
- 3 large eggs
- 1/3 cup vegetable oil
- 1/2 cup shredded sweetened coconut (optional)
- 1/2 cup chopped macadamia nuts or pecans (optional)
- For frosting: 8 oz cream cheese, softened; 4 Tbsp unsalted butter, softened; 3 cups powdered sugar; 1 tsp vanilla extract; 2-3 Tbsp pineapple juice
Instructions
- Preheat oven to 350 °F (175 °C). Grease and flour a 9×13-inch baking pan.
- In a large bowl, mix cake mix, eggs, vegetable oil, and crushed pineapple with juice until smooth.
- Fold in coconut and nuts if using, then pour batter into prepared pan.
- Bake 25–30 minutes or until a toothpick inserted in the center comes out clean. Let cake cool completely in pan.
- Meanwhile, beat cream cheese and butter until creamy. Add powdered sugar one cup at a time, then vanilla and pineapple juice; beat until fluffy.
- Spread frosting over cooled cake, then sprinkle the top with additional coconut and nuts if desired.
- Slice into squares and serve. Store covered in the refrigerator for up to 5 days.
Notes
- Stir batter gently to keep cake light and fluffy.
- Drain less pineapple juice for more moisture—reserve juice to adjust frosting consistency.
- Use Greek yogurt instead of sour cream for a tangier frosting variation.
- For a tropical presentation, top slices with maraschino cherries or fresh pineapple chunks.
- Make ahead: bake up to 2 days in advance and frost just before serving.
Nutrition
- Serving Size: 1 slice (1/12 of cake)
- Calories: 360 kcal
- Sugar: 30 g
- Sodium: 300 mg
- Fat: 18 g
- Saturated Fat: 10 g
- Unsaturated Fat: 6 g
- Trans Fat: 0 g
- Carbohydrates: 42 g
- Fiber: 1 g
- Protein: 4 g
- Cholesterol: 55 mg