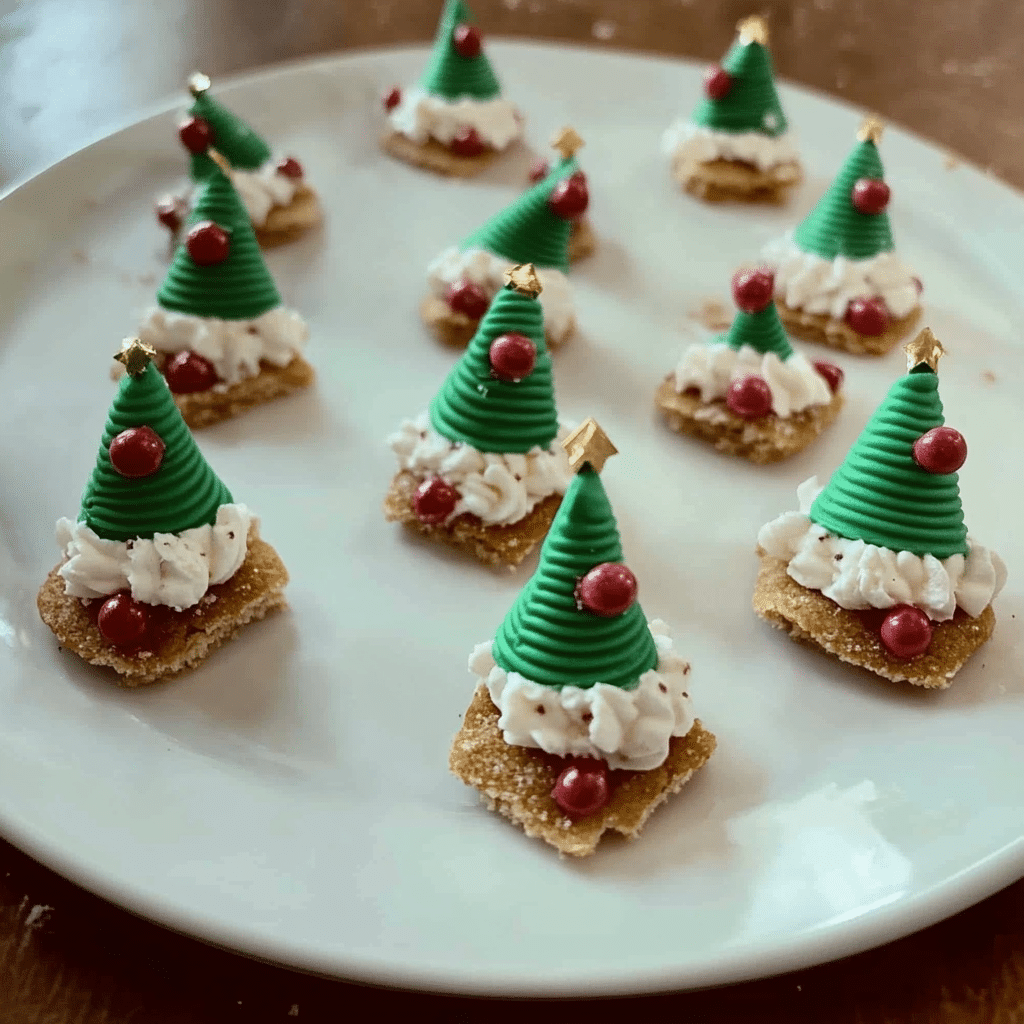
The holiday season is the perfect time to indulge in festive treats, and what could be more fun than creating your very own Elf Hats Holiday Treats? These colorful, adorable confections are not only a joy to make but also a hit at any holiday gathering, bringing smiles to both kids and adults. Packed with flavor and easy to prepare, Elf Hats are the ultimate way to spread holiday cheer in the kitchen.
What Are Elf Hats Holiday Treats?
Elf Hats Holiday Treats are delightful, no-bake sweets that resemble the hats worn by Santa’s helpers. They are typically made with a base of cookies, a sweet topping of frosting or chocolate, and a whimsical garnish that adds a playful touch to the classic holiday flavors. Perfect for holiday parties, classroom treats, or family gatherings, these adorable elf-inspired desserts are sure to become a new tradition.
Ingredients for Elf Hats Holiday Treats
To create these cute Elf Hats, you will need:
- Sugar cookies or shortbread cookies – These provide the sturdy base for the hats. You can use store-bought or homemade cookies.
- Green icing – For the hat portion, a vibrant green color gives the look of a Christmas elf’s signature hat.
- Red candy or gumdrops – For the “pom-pom” at the top of the hat, you’ll want something small, round, and colorful to give it a fun pop.
- White frosting or royal icing – To create a fluffy white trim along the base of the hat and add an extra touch of holiday flair.
- Sprinkles or edible glitter – Optional for a bit of sparkle and shine to make your treats extra festive.
How to Make Elf Hats Holiday Treats
Step 1: Prepare the Base
Start by placing your sugar cookies or shortbread cookies on a flat surface. These will serve as the base of the elf hats. If you’re using store-bought cookies, you can also add a layer of frosting or icing on top to help the decorations stick.
Step 2: Decorate the Hat
Next, use green icing to create a cone-like shape on top of the cookie. Make sure the icing covers the entire top of the cookie and extends downward to form the point of the elf hat. The icing should be thick enough to hold its shape, but you can smooth it out with a spatula or piping bag to get a smooth, clean look.
Step 3: Add the Pom-Pom
Place a red candy or gumdrop on top of the hat. This will act as the pom-pom that gives your elf hats a playful and recognizable finish.
Step 4: Add the Trim
With white frosting or royal icing, pipe a fluffy band around the base of the green icing. You can make the trim wavy for an added touch of dimension or just smooth for a simple, clean look. The white frosting will give the treat a cozy, wintery vibe.
Step 5: Finish with Sparkles
To add some sparkle, lightly dust the elf hats with edible glitter or a few colorful sprinkles. These little details will make your treats even more festive and fun.
Step 6: Let Set and Enjoy!
Once you’ve finished decorating, let the Elf Hats set for about 15-20 minutes to allow the icing to firm up. After that, they’re ready to be served or stored for later enjoyment!
Why Elf Hats Are Perfect for the Holidays
- Fun and Easy to Make: Elf Hats Holiday Treats are incredibly simple to assemble, making them a great choice for holiday baking with kids. No oven required!
- Versatile: You can customize the decorations based on your preferences, such as using different icing colors, candies, or sprinkles.
- Great for Gifting: These cute treats make perfect homemade gifts for friends, neighbors, or coworkers. You can pack them in festive boxes or treat bags for a charming and thoughtful present.
- Eye-Catching: Their vibrant colors and playful design make them stand out at holiday parties or gatherings, adding a festive touch to any table setting.
Elf Hats Holiday Treats: A Crowd Favorite
Whether you’re making them for your family, friends, or coworkers, Elf Hats Holiday Treats are sure to be a hit. Their combination of sweetness, creativity, and festive spirit makes them the perfect holiday treat. So, gather your ingredients, get your kids involved in the fun, and spread holiday cheer one adorable elf hat at a time!
Conclusion
Elf Hats Holiday Treats are a simple, fun, and delicious way to celebrate the season. With their vibrant colors and playful design, these treats will add charm and cheer to your holiday festivities. So, why wait? Start baking these adorable treats today, and make this holiday season even sweeter!
Serving and Storage Tips for Elf Hats Holiday Treats
Serving Tips:
- Perfect for Parties: Elf Hats Holiday Treats are ideal for holiday parties and gatherings. Serve them on a festive platter, or arrange them on a cookie tray with other holiday treats like gingerbread cookies or candy canes for a colorful display.
- Individual Treats: To make serving easier at large gatherings, consider placing each Elf Hat on a small paper or foil cupcake liner. This adds a charming touch and makes them easy to grab without getting frosting on your fingers.
- Pair with Hot Beverages: These festive treats are perfect for pairing with hot cocoa, eggnog, or a warm cup of tea. Their sweet flavor complements the richness of warm holiday drinks.
- Kid-Friendly: These treats are not only fun to make but also perfect for little hands! They’re a great way to get kids involved in the kitchen and are sure to keep them entertained while adding a creative touch to the holiday festivities.
Storage Tips:
- Store in an Airtight Container: To keep your Elf Hats fresh, store them in an airtight container. This will help preserve the flavor of the cookies and prevent the frosting from drying out. They can be kept at room temperature for up to 3-4 days.
- Keep Frosting Soft: If you’ve added a lot of icing, consider placing a piece of wax paper or parchment paper between layers of Elf Hats when stacking them in a container. This will prevent the frosting from sticking and keep the hats looking neat.
- Freezing for Later: If you’d like to make these treats ahead of time, Elf Hats can be frozen. Place them on a baking sheet and freeze them until solid. Then, transfer them to an airtight container or freezer bag for up to 1 month. When ready to serve, let them thaw at room temperature for about 30 minutes before enjoying.
- Avoid Refrigeration: While it might be tempting to refrigerate them, avoid doing so, as the moisture in the fridge can cause the cookies to become soft or the frosting to lose its texture. Room temperature storage is best for maintaining their quality.
By following these simple serving and storage tips, your Elf Hats Holiday Treats will stay fresh and festive, ready to delight guests and loved ones throughout the holiday season!
Q: Can I use a different color of icing for the hats?
A: Absolutely! While green is traditional for Elf Hats, you can use any color of icing you prefer. Red, blue, or even a rainbow of colors would make for fun variations that still maintain the festive spirit of the treat.
Q: How do I make the green icing?
A: To make green icing, simply add a few drops of green food coloring to white frosting or icing. Stir well until you achieve the desired shade. You can also use store-bought green icing to save time.
Q: Can I make Elf Hats without frosting?
A: Yes! If you’re not a fan of frosting, you can substitute it with melted chocolate or a thick glaze to cover the cookie base. You can still add a candy pom-pom and white trim using chocolate or candy melts.
Q: Can I make these treats gluten-free?
A: Yes, you can easily make Elf Hats gluten-free by using gluten-free cookies. Many stores offer gluten-free sugar or shortbread cookies, which will work just as well for this recipe.

Elf Hats Holiday Treats
- Prep Time: 10 minutes
- Cook Time: 1 hour
- Total Time: 1 hour 10 minutes
- Yield: 8 servings 1x
- Category: Dessert, Side Dish
- Method: No-Bake
- Cuisine: American
Description
Watergate Salad is a retro dessert salad made with pistachio pudding, crushed pineapple, mini marshmallows, and whipped topping. This easy, no-bake recipe is creamy, fluffy, and has just the right amount of sweetness, perfect for gatherings and special occasions. Serve it as a side dish or dessert!
Ingredients
- 1 box (3.4 oz) instant pistachio pudding mix
- 1 can (20 oz) crushed pineapple, undrained
- 1 cup mini marshmallows
- 1/2 cup chopped walnuts (optional)
- 1 tub (8 oz) whipped topping (like Cool Whip), thawed
- Maraschino cherries and extra chopped nuts (optional, for garnish)
Instructions
- Combine Ingredients: In a large mixing bowl, stir together the pistachio pudding mix and crushed pineapple (with juice) until well combined.
- Add Marshmallows and Nuts: Gently fold in the mini marshmallows and chopped walnuts, mixing until evenly distributed.
- Fold in Whipped Topping: Add the whipped topping and fold gently until everything is well combined and fluffy. Be careful not to overmix.
- Chill: Cover the bowl and refrigerate for at least 1 hour before serving to allow the flavors to meld.
- Garnish and Serve: Just before serving, garnish with maraschino cherries and a sprinkle of extra nuts, if desired. Serve chilled.
Notes
- For extra flavor, add ½ cup of shredded coconut.
- You can substitute pecans for walnuts or leave the nuts out for a nut-free version.
- This salad can be made up to a day in advance and stored in the refrigerator.

