
Introduction
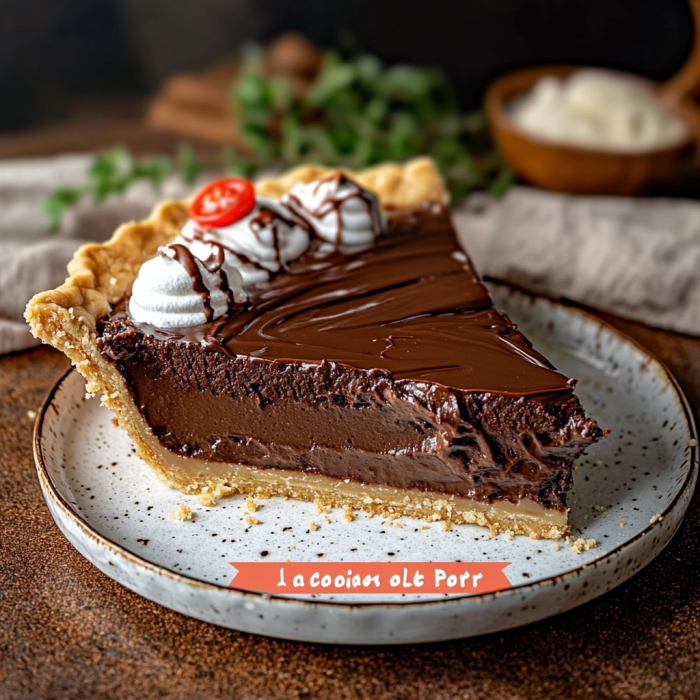
Indulge your sweet tooth with this Easy Chocolate Pie recipe, perfect for chocolate lovers looking for a quick and delicious dessert. This rich, creamy pie combines the smoothness of chocolate with a buttery crust, making it an irresistible treat for any occasion. Whether you’re hosting a dinner party or simply craving something sweet, this chocolate pie is sure to impress. Best of all, it’s easy to make and requires minimal ingredients, making it a go-to recipe for both novice and experienced bakers.
Ingredients
To make this Easy Chocolate Pie, you’ll need the following ingredients:
- 1 pre-made pie crust (graham cracker or pastry)
- 1 cup semi-sweet chocolate chips
- 1/2 cup unsalted butter
- 1 cup granulated sugar
- 3 large eggs
- 1 teaspoon vanilla extract
- 1/4 teaspoon salt
- Whipped cream or chocolate shavings for garnish (optional)
Instructions

Step 1: Preheat Your Oven
Start by preheating your oven to 350°F (175°C). If you’re using a pastry pie crust, you can pre-bake it for 10 minutes to ensure a crispy base.
Step 2: Melt the Chocolate and Butter
In a microwave-safe bowl, combine the chocolate chips and butter. Microwave in 30-second intervals, stirring after each until the mixture is completely melted and smooth. Alternatively, you can melt them together in a double boiler.
Step 3: Mix the Sugar, Eggs, and Vanilla
In a separate large bowl, whisk together the sugar, eggs, vanilla extract, and salt until well combined. The mixture should be smooth and slightly thickened.
Step 4: Combine the Chocolate Mixture
Gradually add the melted chocolate and butter mixture to the egg mixture, stirring constantly to ensure a smooth and even consistency.
Step 5: Pour and Bake
Pour the chocolate filling into the pre-made pie crust, spreading it evenly. Place the pie on the center rack of your preheated oven and bake for 30-35 minutes, or until the filling is set but still slightly jiggly in the center.
Step 6: Cool and Serve
Remove the pie from the oven and let it cool completely on a wire rack. Once cooled, you can garnish the pie with whipped cream, chocolate shavings, or a dusting of powdered sugar for an extra touch of sweetness. Slice and serve!
Tips for the Perfect Chocolate Pie
- Use Quality Chocolate: The flavor of your pie heavily depends on the quality of chocolate you use. Opt for good-quality semi-sweet chocolate chips or bars for the best taste.
- Don’t Overbake: Keep an eye on the pie while it bakes. The center should still have a slight jiggle when you take it out of the oven, as it will continue to set as it cools.
- Garnishing Ideas: Aside from whipped cream, consider topping your pie with fresh berries, a drizzle of caramel sauce, or a sprinkle of sea salt for a gourmet touch.
Conclusion
This Easy Chocolate Pie is a simple yet indulgent dessert that’s sure to satisfy your chocolate cravings. With its rich, velvety filling and buttery crust, it’s a recipe that’s bound to become a favorite in your household. Whether you’re making it for a special occasion or just because, this pie is a guaranteed crowd-pleaser. Give it a try, and enjoy the decadent taste of homemade chocolate pie in just a few easy steps!
Serving and Storage Tips for Easy Chocolate Pie
Serving Tips
- Cool Completely: For the best texture and flavor, let your chocolate pie cool completely before serving. This allows the filling to set properly, making it easier to slice and serve.
- Chill Before Serving: If you prefer a firmer texture, refrigerate the pie for a few hours before serving. This will give the chocolate filling a chance to set even more.
- Garnish: Enhance the presentation and flavor of your pie with optional garnishes:
- Whipped Cream: A dollop of freshly whipped cream adds a light, airy contrast to the rich chocolate filling.
- Chocolate Shavings: Sprinkle chocolate shavings or curls on top for an elegant touch.
- Fresh Berries: Add a few fresh raspberries or strawberries for a burst of color and a hint of tartness.
- Caramel Sauce: Drizzle with caramel sauce for a sweet and buttery flavor combination.
- Serve Chilled or at Room Temperature: The pie can be served chilled for a more firm texture or at room temperature for a softer, creamier consistency.
Storage Tips
- Refrigeration: Store any leftover pie in the refrigerator. Cover it with plastic wrap or aluminum foil to keep it fresh and prevent it from absorbing other odors. The pie will typically last for up to 5 days in the fridge.
- Freezing: If you want to keep the pie for a longer period, you can freeze it. Place the pie (or individual slices) in an airtight container or wrap it tightly in plastic wrap and aluminum foil. It can be frozen for up to 2 months. To thaw, transfer it to the refrigerator for several hours or overnight before serving.
- Reheating: If you prefer your pie slightly warmed, you can reheat it in a preheated oven at 300°F (150°C) for about 10-15 minutes. Avoid using a microwave for reheating as it can affect the texture of the filling.
- Preventing Crust Sogginess: If you’re storing the pie for an extended period, consider freezing it before adding any garnishes. Add toppings like whipped cream or chocolate shavings just before serving to maintain their texture and appearance.
By following these serving and storage tips, you can enjoy your Easy Chocolate Pie at its best, whether you’re savoring a slice right away or enjoying leftovers later.
1. Can I use a different type of chocolate for this pie?
Yes, you can customize the flavor by using different types of chocolate. While semi-sweet chocolate chips are commonly used, you can substitute with milk chocolate for a sweeter pie, or dark chocolate for a richer, more intense flavor. Just ensure the chocolate is of good quality for the best results.
2. Can I make this pie ahead of time?
Absolutely! This pie is perfect for making ahead of time. You can bake it up to 2 days in advance and store it in the refrigerator. If you’re freezing it, it can be kept for up to 2 months. Just remember to thaw it in the refrigerator before serving.
3. Can I use a homemade pie crust instead of a store-bought one?
Yes, a homemade pie crust works great with this recipe. If you prefer to use a homemade crust, simply pre-bake it according to your recipe’s instructions before adding the chocolate filling. This ensures the crust stays crisp and doesn’t become soggy.
4. How do I know when the pie is done baking?
The pie is done when the filling is set around the edges but still slightly jiggly in the center. It will firm up as it cools. Overbaking can lead to a dry filling, so keep a close eye on it during the last few minutes of baking.