
Easter Bunny Sandwiches are an adorable and festive treat perfect for spring celebrations. These cute sandwiches are shaped like bunnies and filled with your favorite ingredients, making them a fun and healthy option for kids and adults alike. Whether served at an Easter brunch, a picnic, or as a fun lunchbox surprise, these sandwiches are sure to bring smiles to everyone at the table.
Why You’ll Love This Recipe
- Fun and festive: Perfect for Easter or spring-themed gatherings.
- Easy to make: Requires simple ingredients and minimal prep.
- Kid-friendly: Great for picky eaters and a creative way to serve sandwiches.
- Customizable: Use any sandwich filling you like.
- Ideal for parties: These cute sandwiches make a great addition to a holiday spread.
Ingredients
(Tip: You’ll find the full list of ingredients and measurements in the recipe card below.)
- 8 slices of bread (white, whole wheat, or your favorite type)
- 4 slices of deli meat (ham, turkey, or chicken)
- 4 slices of cheese (cheddar, Swiss, or your favorite variety)
- 2 tablespoons mayonnaise or cream cheese
- 1 cup shredded lettuce (optional)
- 1 small carrot, thinly sliced (for bunny noses)
- 8 small black olives or raisins (for eyes)
- 1 cucumber or celery stick, cut into thin strips (for whiskers)
Directions

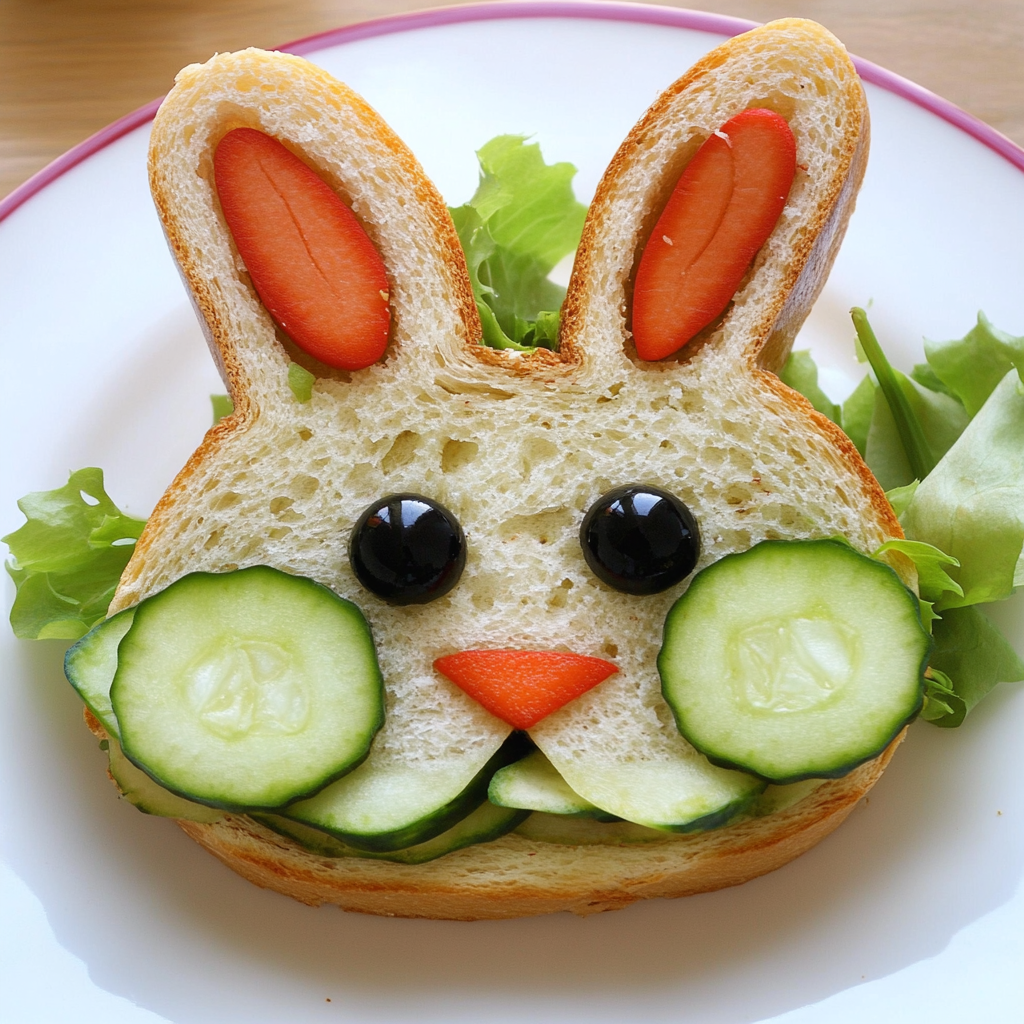
- Prepare the Bread: Use a bunny-shaped cookie cutter to cut out bunny shapes from the bread slices. You should get two bunny shapes per sandwich.
- Assemble the Sandwiches: Spread a thin layer of mayonnaise or cream cheese on each bread slice. Layer deli meat, cheese, and lettuce on half of the bread slices. Top with the remaining bread slices to form sandwiches.
- Decorate the Bunnies:
- Add a small slice of carrot for the bunny’s nose.
- Use black olives or raisins as eyes.
- Insert thin cucumber or celery strips as whiskers.
- Serve: Arrange the bunny sandwiches on a plate and serve immediately. You can add extra veggies or fruit on the side for a balanced snack.
Servings and Timing
- Servings: 4 sandwiches
- Prep Time: 15 minutes
- Cook Time: None
- Total Time: 15 minutes
Variations
- Egg Salad Bunnies: Use egg salad as the filling for a classic springtime flavor.
- PB&J Bunnies: Make sweet bunny sandwiches with peanut butter and jelly for a fun twist.
- Grilled Cheese Bunnies: Grill the sandwiches for a warm, melty treat.
- Vegetarian Option: Use hummus and fresh veggies as the filling.
- Sweet Bunnies: Fill with Nutella and banana slices for a dessert version.
Storage/Reheating
- Storage: These sandwiches are best enjoyed fresh. If needed, store them in an airtight container in the refrigerator for up to 1 day.
- Reheating: Not recommended for cold sandwiches, but grilled versions can be reheated in a skillet or oven until warm.
- Freezing: Not suitable for freezing as the bread may become soggy.
FAQs
Can I make these sandwiches ahead of time?
Yes, you can prepare them a few hours in advance and store them in the refrigerator until ready to serve.
What other fillings can I use?
Tuna salad, chicken salad, or even a classic BLT filling would work well.
How do I keep the bread from getting soggy?
Avoid using too much spread and layer lettuce as a barrier between wet ingredients and the bread.
Can I use different bread types?
Yes, any bread works, including whole wheat, white, or even flatbread.
How do I make the sandwiches more nutritious?
Add thin slices of veggies like cucumbers, tomatoes, or spinach.
What if I don’t have a bunny-shaped cookie cutter?
You can cut out bunny shapes by hand using a small knife or use a round cutter to make simple bunny faces.
Can I use cream cheese to help the decorations stick?
Yes, a small dab of cream cheese can act as “glue” for the eyes, nose, and whiskers.
Are these sandwiches suitable for school lunches?
Absolutely! Just pack them in a lunchbox with an ice pack to keep them fresh.
How do I make mini bunny sandwiches for appetizers?
Use small cookie cutters or slice regular-sized sandwiches into bite-sized pieces.
Can I add spreads like mustard or hummus?
Yes, any spread you enjoy can be added for extra flavor.
Conclusion
Easter Bunny Sandwiches are a delightful way to celebrate the holiday and add a touch of whimsy to your meal. With their cute bunny faces and customizable fillings, they make a charming addition to any Easter brunch, party, or picnic. This easy recipe offers endless possibilities for fillings and decorations, allowing you to get creative and make these sandwiches your own. Give them a try and enjoy a fun and festive treat that’s sure to impress kids and adults alike!
Print
Easter Bunny Sandwiches
- Total Time: 15 minutes
- Yield: 4 servings 1x
- Category: Snack, Lunch
- Method: No-Cook
- Cuisine: Kid-Friendly
Description
These adorable Easter Bunny Sandwiches are perfect for a fun and festive springtime lunch or a kids’ party! Made with simple ingredients, they bring creativity and flavor together with cute bunny-shaped sandwiches filled with your favorite fillings.
Ingredients
- 8 slices of bread (white, wheat, or any preferred type)
- 4 ounces cream cheese, softened (or any spread of choice)
- 4 slices deli turkey, ham, or cheese (optional)
- 1/2 cup shredded lettuce or spinach
- 1/4 cup grated carrots
- 1/4 cup cucumber slices
- 1/4 cup cherry tomatoes, sliced
- 1 tablespoon mayonnaise or mustard (optional)
- 8 raisins or small olives (for eyes)
- 4 baby carrots (for noses)
- 1 cucumber (for bunny ears)
Instructions
-
Prepare the Bread:
Use a bunny-shaped cookie cutter to cut out bunny shapes from the bread slices. You need two bunny-shaped slices per sandwich. -
Add the Spread:
Spread a thin layer of cream cheese (or your chosen spread) on each bread slice. Add mayonnaise or mustard if desired. -
Assemble the Sandwiches:
Layer deli meat or cheese, shredded lettuce, grated carrots, and cucumber slices on one slice of bread. Top with the second bread slice to complete the sandwich. -
Create Bunny Faces:
Use small raisins or olives as eyes by gently pressing them into the bread. Place a small baby carrot as the nose. -
Add the Ears:
Slice cucumber into thin strips to create the bunny ears. Insert them between the bread slices at the top of each sandwich. -
Serve:
Arrange the sandwiches on a plate and serve with fresh fruits or veggies for a delightful presentation.
Notes
- For a sweet twist, use peanut butter and jelly as the filling.
- Get creative with the decorations—use sliced radishes, olives, or peppers for facial features.
- These sandwiches are best made fresh but can be prepared up to 2 hours in advance if kept in the fridge.