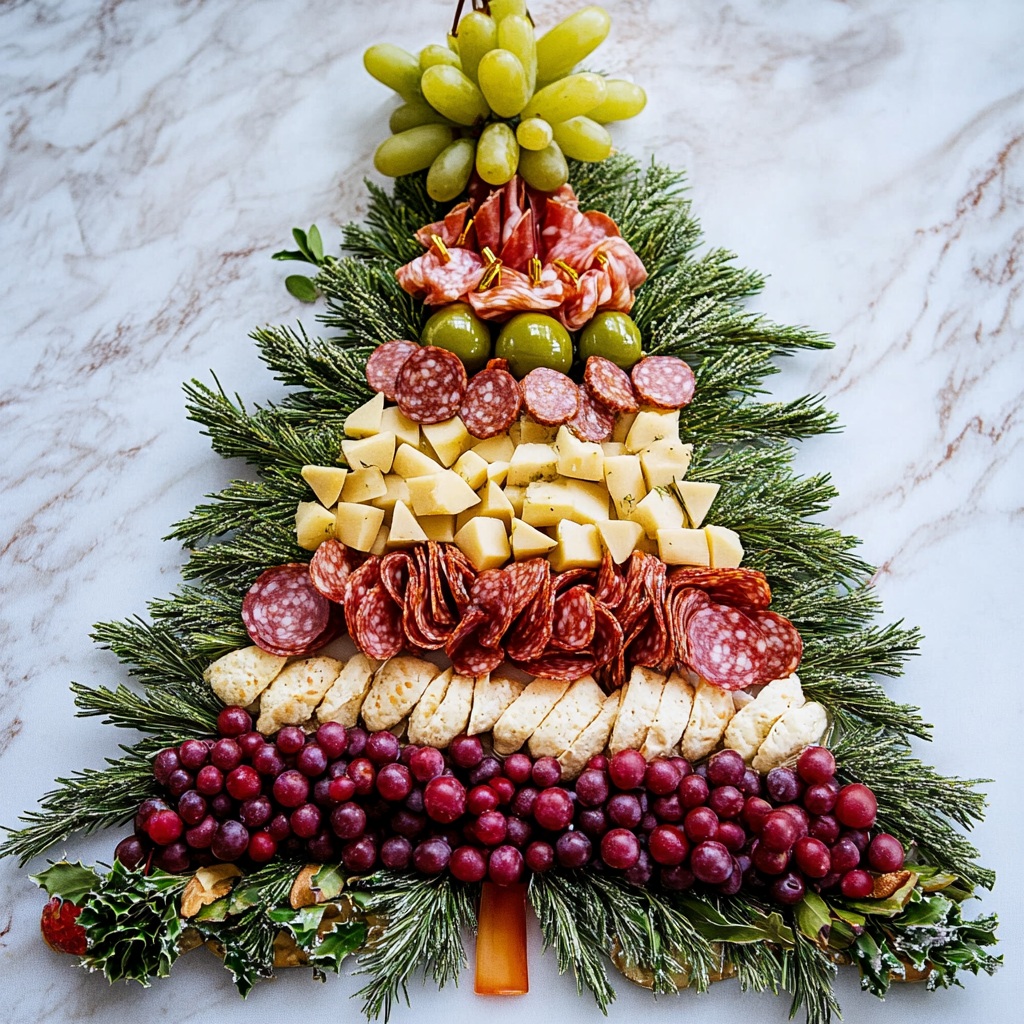
Impress your guests with a stunning Christmas Tree Charcuterie Board this holiday season! This festive board not only looks incredible but also offers a wide selection of meats, cheeses, fruits, and festive decorations, perfect for parties, family gatherings, or even a cozy night in.
Why Choose a Christmas Tree Charcuterie Board?
A charcuterie board shaped like a Christmas tree combines elegance with creativity. It’s ideal for people who want to bring a little holiday cheer to their table without extensive cooking. Plus, you can customize the ingredients to fit different dietary needs and tastes, making it a versatile and crowd-pleasing option.
Ingredients
To create your Christmas Tree Charcuterie Board, you’ll need the following ingredients. Feel free to adjust quantities based on your board’s size or guest count.
- Cheeses: Variety of textures and flavors (e.g., Brie, cheddar, goat cheese, and gouda).
- Cured Meats: Salami, prosciutto, pepperoni, and any other favorites.
- Fruits: Grapes, cranberries, pomegranate seeds, apple slices, and dried apricots.
- Nuts: Almonds, walnuts, or pistachios.
- Crackers & Bread: Assorted crackers, breadsticks, and baguette slices.
- Extras: Fresh rosemary sprigs (for garnish), mini pretzels, olives, honey, or fig jam.
How to Assemble a Christmas Tree Charcuterie Board
- Prepare Your Base: Use a large, rectangular cutting board or tray. You can line it with parchment paper or keep it natural, depending on your preference.
- Shape the Tree:
- Start at the Bottom: Begin with crackers or cheese cubes at the base to form a triangular outline of the tree. Place them in a triangular shape that tapers upward.
- Layer the Ingredients: Build layers using your ingredients, alternating colors and textures to add visual interest. For example, arrange slices of salami in a circular pattern, then add a layer of green grapes, followed by cheese cubes, nuts, and olives.
- Create the Tree’s Star:
- Place a star-shaped slice of cheese at the very top of the tree. If you have a small cookie cutter, cut out a star shape from a cheese block, or use an edible decoration like a gold foil-wrapped chocolate.
- Add Garnishes:
- Tuck in fresh rosemary sprigs around the edges to resemble pine branches. Sprinkle some pomegranate seeds or cranberries for pops of red color and holiday flair.
- Arrange Dipping Sauces:
- Use small bowls to hold honey, mustard, or jam, placing them strategically around the board.
Tips for a Beautiful Christmas Tree Charcuterie Board
- Balance Colors: Use a variety of colors to make the board visually appealing. Fresh herbs, bright fruits, and varied cheese types add festive color.
- Consider Texture: Balance creamy cheeses with crunchy crackers, soft meats, and crisp fruits for a textural variety.
- Be Creative with Shape: Keep the board triangular, but don’t hesitate to adjust the layers if you need more room for specific items.
- Serve Fresh: Prepare your charcuterie board as close to serving time as possible to keep everything fresh.
Pairing Suggestions
To enhance the flavors on your charcuterie board, consider pairing with these holiday-inspired drinks:
- Red and White Wines: Choose a light, fruity red wine like Pinot Noir, or a crisp white wine such as Chardonnay.
- Sparkling Cider or Champagne: Adds a celebratory touch and pairs well with the variety of flavors.
- Holiday Cocktails: Serve with a classic Christmas cocktail like eggnog, mulled wine, or a sparkling cranberry mocktail for non-alcoholic options.
Conclusion
A Christmas Tree Charcuterie Board is a fantastic way to bring festive joy to any gathering with minimal preparation. It’s an eye-catching, delicious, and customizable appetizer that caters to diverse tastes, making it the perfect choice for holiday entertaining. Try creating your own Christmas Tree Charcuterie Board and watch as guests marvel at your festive spread!
Serving and Storage Tips for a Christmas Tree Charcuterie Board
A charcuterie board can be a stunning centerpiece and is best enjoyed fresh. Here’s how to serve it perfectly and store any leftovers:
Serving Tips
- Serve Fresh:
- Assemble the board just before serving to keep fruits, meats, and cheeses fresh and at their best texture. If you’re making it ahead of time, store individual ingredients in airtight containers in the refrigerator, then assemble just before guests arrive.
- Room Temperature:
- Allow cheeses and meats to sit out for 15–30 minutes before serving. This brings out their flavors and makes them easier to eat.
- Add Serving Utensils:
- Include small knives for soft cheeses, spoons for jams and honey, and tongs or picks for olives, fruits, and meats to make serving easy and reduce handling.
- Keep it Chilled for Longer Events:
- For parties that last a few hours, keep the board cool by placing it over an ice pack (hidden beneath the tray) or refrigerate briefly if possible, then bring it back out.
- Replenish as Needed:
- Keep extra crackers, fruits, and cheeses on hand to replenish the board as guests enjoy it, maintaining a full, beautiful look throughout the event.
Storage Tips
- Refrigerate Leftovers:
- After serving, refrigerate any remaining meats, cheeses, fruits, and nuts within two hours to keep them safe and fresh. Use airtight containers or cover the board with plastic wrap before placing it in the refrigerator.
- Separate Storage for Freshness:
- To avoid cross-flavoring, store leftover meats and cheeses separately from fruits, nuts, and crackers. This keeps crackers crisp and flavors distinct.
- Consume Within 2–3 Days:
- Most leftovers, especially cured meats and hard cheeses, can last a couple of days in the fridge. Soft cheeses and fresh fruits should be consumed within one to two days for optimal freshness.
- Freeze if Necessary:
- While fresh fruits and crackers won’t freeze well, hard cheeses and cured meats can be frozen for up to one month. Wrap them tightly in plastic wrap or freezer-safe bags to maintain freshness, then thaw in the refrigerator when ready to enjoy again.
Pro Tip for Repurposing Leftovers
Use any remaining meats and cheeses to create delicious sandwiches or wraps, add them to a salad, or even make a flavorful breakfast omelet!
1. Can I make a Christmas Tree Charcuterie Board in advance?
- Yes! You can prep ingredients like slicing cheeses, fruits, and meats ahead of time and store them in airtight containers in the refrigerator. However, it’s best to assemble the board just before serving to keep everything fresh and prevent crackers from getting soft.
2. What are some good alternatives for people with dietary restrictions?
- For gluten-free guests, offer gluten-free crackers or bread. For vegetarians, skip the meats and add more cheeses, nuts, and plant-based spreads. For dairy-free options, consider plant-based cheeses or dips like hummus and guacamole.
3. How can I keep the charcuterie board fresh during a long event?
- To keep the board fresh, especially for events lasting several hours, refrigerate it briefly if possible or place the tray over a hidden ice pack. You can also set out smaller portions and replenish from the fridge as needed.
4. What should I do with leftovers?
- Store leftover meats, cheeses, and fruits separately in airtight containers in the refrigerator, and consume them within 1-3 days. Leftover hard cheeses and cured meats can also be frozen for up to a month. Reuse leftovers in salads, sandwiches, or breakfast omelets!

Christmas Tree Charcuterie Board
- Total Time: 20-30 minutes
- Yield: 6-10
- Category: Appetizer, Holiday Snack
- Cuisine: American, Grazing Board
Description
This charcuterie board is styled to resemble a Christmas tree, with layers of meats, cheeses, fruits, and garnishes arranged in a triangular tree shape. It’s perfect for grazing and sure to impress your guests!
Ingredients
- Salami (rolled or folded)
- Prosciutto
- Pepperoni slices
- Sliced ham or turkey
Cheeses:
- Cubed cheddar
- Brie or camembert wedges
- Gouda slices
- Blue cheese chunks
- Fresh mozzarella balls
Fruits:
- Grapes (red and green)
- Pomegranate seeds
- Dried apricots
- Fresh cranberries
Crackers & Bread:
- Assorted crackers
- Breadsticks
- Crostini or small baguette slices
Other Garnishes:
- Olives (green and black)
- Cherry tomatoes
- Pickles or cornichons
- Fresh herbs like rosemary sprigs or thyme (to mimic tree branches)
- Star-shaped cookie cutter for cheese or bread (to create a “star” topper)
Instructions
- Prepare Your Board:
- Use a large wooden board or serving tray to build your charcuterie tree.
- Lay down a piece of parchment paper if your board isn’t food-safe.
- Shape the Tree:
- Imagine a triangular tree shape on the board, with the widest part at the bottom and the narrowest at the top.
- Leave space at the bottom for the “tree trunk,” which can be made of breadsticks or stacked crackers.
- Layer the Ingredients:
- Start with one ingredient and make a horizontal line across the bottom of the tree.
- Add each layer above the previous one, narrowing the rows as you move up.
- Alternate between meats, cheeses, and fruits for variety and visual appeal. For example:
- Bottom row: Salami
- Next row: Cubed cheddar
- Next row: Grapes
- Continue until you reach the top.
- Add Garnishes:
- Scatter rosemary sprigs between layers to resemble tree branches.
- Place olives, pomegranate seeds, or cranberries as “ornaments.”
- Use a star-shaped cookie cutter to cut cheese or bread into a star for the top of the tree.
- Tree Trunk:
- Arrange breadsticks or stack crackers vertically at the base of the tree to resemble the trunk.
- Finishing Touches:
- Add a small bowl of dip or honey at the base or sides for dipping options.
- Scatter additional garnishes like fresh herbs or nuts around the board for a polished look.
Notes
- Make It Ahead: Assemble the board a few hours before your party and cover it with plastic wrap to keep it fresh.
- Customizable: Swap ingredients to suit your taste, such as adding chocolate, caramel popcorn, or other festive treats.
- Smaller Version: For smaller gatherings, create mini Christmas tree boards on individual plates.

