
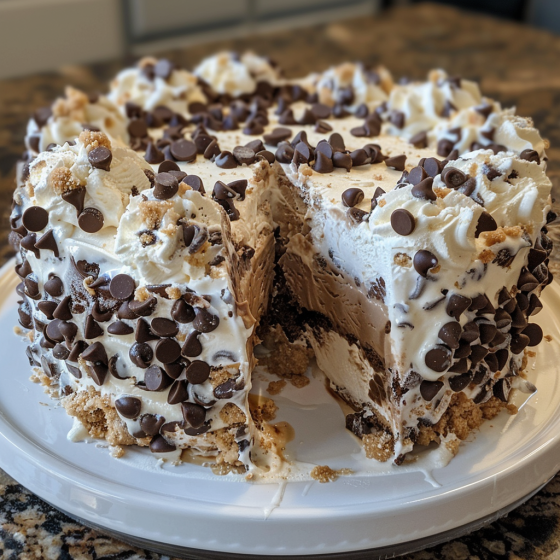
Craving a dessert that combines all your favorite treats in one? Look no further! This Chocolate Chip Cookie Dough Ice Cream Cake is the ultimate indulgence for cookie dough lovers and ice cream aficionados alike. Perfect for birthdays, special occasions, or just a fun weekend project, this recipe is sure to impress. Not only is it stunningly delicious, but it’s also surprisingly easy to make. Follow this step-by-step guide to create a show-stopping dessert that everyone will rave about.
Ingredients You’ll Need:
- For the Cookie Dough:
- 1/2 cup unsalted butter, softened
- 3/4 cup brown sugar, packed
- 1 teaspoon vanilla extract
- 2 tablespoons milk
- 1 cup all-purpose flour (heat-treated to kill bacteria)
- 1/4 teaspoon salt
- 1/2 cup mini chocolate chips
- For the Cake:
- 1 package (about 36 ounces) of chocolate chip cookie dough (store-bought or homemade)
- 1.5 quarts of vanilla ice cream, softened
- 1 cup chocolate fudge sauce
- Additional mini chocolate chips and whipped cream, for garnish
Instructions:
1. Prepare the Cookie Dough:
- In a mixing bowl, cream together the butter and brown sugar until light and fluffy. Mix in vanilla extract and milk.
- Gradually add the flour and salt, mixing until just combined. Stir in the mini chocolate chips.
- Roll into small balls or chunks and set aside.
2. Assemble the Cake Base:
- Preheat your oven to the temperature specified on the cookie dough package (typically around 350°F).
- Press the cookie dough into the bottom of a springform pan, forming an even layer.
- Bake according to package instructions until golden brown (usually about 18-20 minutes).
- Allow the cookie base to cool completely in the pan.
3. Layering the Ice Cream:
- Spread a layer of softened vanilla ice cream over the cooled cookie base. Smooth out with a spatula to ensure an even layer.
- Drizzle chocolate fudge sauce over the ice cream, then sprinkle with cookie dough pieces.
- Freeze the cake for at least 2 hours to set the first layer.
4. Final Assembly:
- Add another layer of softened vanilla ice cream over the set first layer. Smooth out the top.
- Freeze the entire cake for another 4-6 hours, or overnight, until completely firm.
5. Serving the Cake:
- Before serving, remove the cake from the freezer and let it sit at room temperature for about 10 minutes to soften slightly.
- Release and remove the sides of the springform pan.
- Garnish with whipped cream and additional mini chocolate chips if desired.
- Slice and serve immediately.
Tips for the Perfect Ice Cream Cake:
- Heat-Treating Flour: To safely use flour in edible cookie dough, spread it on a baking sheet and bake at 350°F for 5 minutes to kill any harmful bacteria.
- Cookie Dough Consistency: If your cookie dough is too sticky, chill it in the refrigerator for 30 minutes to make it easier to handle.
- Serving: Always give the cake a few minutes to soften before slicing to ensure clean cuts without cracking the ice cream.
Conclusion:
This Chocolate Chip Cookie Dough Ice Cream Cake isn’t just a dessert; it’s an experience. With its irresistible layers of crunchy cookie base, creamy vanilla ice cream, decadent chocolate sauce, and edible cookie dough pieces, this cake promises to be the star of any dining table. So, why wait? Dive into the delightful process of creating this masterpiece and enjoy the applause from your friends and family. Happy baking and enjoy every decadent slice!
Serving and Storage Tips for Chocolate Chip Cookie Dough Ice Cream Cake
Creating the perfect Chocolate Chip Cookie Dough Ice Cream Cake is an accomplishment, but knowing how to serve and store it can make all the difference in preserving its taste and texture. Here are essential tips to ensure your cake remains delightful from the first slice to the last.
Serving Tips:
- Thaw Before Slicing: Remove your ice cream cake from the freezer about 10-15 minutes before you plan to serve it. Allowing the cake to thaw slightly will make slicing much easier and will also enhance the flavors, which can become muted when frozen.
- Hot Knife for Clean Cuts: Dip a sharp knife into hot water and wipe it dry before cutting into the cake. The warmth of the knife melts through the ice cream, ensuring smooth, clean slices. Repeat this step between cuts to keep the edges neat.
- Serve Immediately: Once sliced, serve the ice cream cake immediately to prevent it from melting. Ice cream cake is best enjoyed when it’s cold and creamy, not when it starts to become soupy.
- Garnish at the Last Minute: If you’re using whipped cream, chocolate chips, or any other toppings, add these just before serving. This prevents them from becoming too frozen or from sinking into the softened ice cream.
Storage Tips:
- Freeze Quickly: After serving, immediately return any uneaten portions of the ice cream cake to the freezer. This helps stop the ice cream from melting and refreezing, which can create unpleasant ice crystals and affect the texture.
- Airtight Storage: To store the leftover ice cream cake, cover it with plastic wrap and then wrap it again with aluminum foil. This double layer of protection helps prevent freezer burn and keeps the cake fresher longer.
- Store Flat and Secure: Place the wrapped cake on a flat surface in the freezer, away from the door. Frequent temperature changes from opening and closing the freezer can cause the ice cream to soften and harden repeatedly, leading to texture changes.
- Consumption Window: Ideally, enjoy your ice cream cake within a week of making it. Over time, ice cream can absorb flavors and odors from other foods stored in the freezer, which can alter its taste.
- Label and Date: If you’re preparing this cake in advance or have multiple frozen desserts, label each item with the name and the date it was frozen. This practice helps manage leftovers and ensures you enjoy them while they’re still at their best.
By following these serving and storage tips, your Chocolate Chip Cookie Dough Ice Cream Cake will maintain its delicious integrity, making every occasion it graces a little sweeter. Whether for a special celebration or a delightful treat, proper handling will make your homemade masterpiece a memorable indulgence.
1. Can I make the cookie dough ice cream cake in advance?
Yes, you can certainly prepare this cake in advance. In fact, it’s advisable to make it at least a day before you need it to ensure it has enough time to firm up in the freezer. The cake can be stored in the freezer for up to 7 days before serving. Just make sure to wrap it properly in plastic wrap and aluminum foil to protect it from freezer burn and to maintain its freshness.
2. How do I prevent the cake from sticking to the pan?
To prevent the cake from sticking, you can line the bottom of your springform pan with a circle of parchment paper. If you’re using a regular cake pan, line both the bottom and the sides with parchment paper, leaving an overhang to easily lift the cake out once it’s set. Additionally, using a non-stick spray or buttering the pan can help ensure that the cookie base doesn’t stick.
3. Is it safe to eat raw flour in the cookie dough?
Raw flour should not be consumed without being treated as it can harbor harmful bacteria like E. coli. To safely use flour in your edible cookie dough, spread it out on a baking tray and bake in a preheated oven at 350°F (177°C) for about 5 minutes. Allow the flour to cool before using it in your recipe to ensure it is safe to consume.
4. What are some variations I can try with this cake?
There are several delicious variations you can try to suit your taste preferences:
- Flavor Variations: Swap out vanilla ice cream for chocolate, strawberry, or even cookie dough ice cream for added flavor.
- Mix-In Ideas: Incorporate nuts, caramel chunks, or even pieces of brownies into the ice cream layers for extra texture and flavor.
- Topping Variations: Instead of chocolate fudge sauce, try caramel sauce, peanut butter, or a berry compote for a different twist.
- Dietary Adjustments: For a gluten-free version, use a gluten-free cookie dough and ensure all other ingredients are certified gluten-free.
By answering these common questions, you’ll be well on your way to creating a dessert that not only looks impressive but is also perfectly tailored to your preferences and safe for all your guests to enjoy.
Print
Chocolate Chip Cookie Dough Ice Cream Cake
- Prep Time: 20 minutes
- Cook Time: —
- Total Time: 4 hours 20 minutes
- Yield: 8–10 slices 1x
- Category: Dessert
- Method: No-bake
- Cuisine: American
- Diet: Vegetarian
Description
A rich, no-bake frozen dessert featuring layers of chocolate chip cookie dough and creamy ice cream, perfect for birthdays or hot summer days.
Ingredients
- 200 g chocolate chip cookie dough (store-bought or homemade)
- 500 ml vanilla ice cream, softened
- 200 g chocolate chip cookie dough ice cream, softened
- 100 g crushed chocolate chip cookies
- 50 g mini chocolate chips
- 50 ml heavy cream (optional, for ganache)
- 100 g dark chocolate (optional, for ganache)
Instructions
- Line a 20 cm springform pan with plastic wrap.
- Press cookie dough evenly into the base of the pan.
- Spread the vanilla ice cream over the cookie dough base and smooth the surface.
- Top with the cookie dough ice cream, then sprinkle crushed cookies and mini chocolate chips.
- Cover and freeze for at least 4 hours or overnight until solid.
- (Optional) Make ganache by heating cream and pouring over chopped chocolate; stir until smooth.
- Unmold the cake, remove wrap, and pour ganache over the top.
- Freeze 15 minutes more before serving. Slice with a warm knife.
Notes
- Dip knife in hot water for clean slicing.
- Use edible cookie dough to ensure food safety.
- Store tightly wrapped in freezer and consume within 3–4 days.
Nutrition
- Serving Size: 100 g
- Calories: 350 kcal
- Sugar: 30 g
- Sodium: 150 mg
- Fat: 18 g
- Saturated Fat: 10 g
- Unsaturated Fat: 6 g
- Trans Fat: 0.5 g
- Carbohydrates: 40 g
- Fiber: 1 g
- Protein: 4 g
- Cholesterol: 45 mg