
If you’re a fan of sweet treats that combine the delightful crunch of Butterfinger with the silky smoothness of caramel, then you are in for a real treat with this recipe for Butterfinger Caramel Crunch Bars. These bars offer a mouthwatering combination of flavors and textures that are sure to satisfy any sweet tooth. Let’s dive into how to make these irresistible bars that are perfect for parties, gatherings, or just a special treat at home.
Ingredients You’ll Need:
- 1 1/2 cups graham cracker crumbs
- 1/2 cup unsalted butter, melted
- 1 cup milk chocolate chips
- 1 cup caramel bits or chopped caramel
- 1 can (14 oz) sweetened condensed milk
- 1 1/2 cups crushed Butterfinger candy bars (about 3-4 bars)
Step-by-Step Instructions:

- Preheat Your Oven: Start by preheating your oven to 350°F (175°C). This ensures your oven is at the right temperature to bake the bars evenly.
- Prepare the Crust: In a medium bowl, mix together the graham cracker crumbs and melted butter until well combined. Press this mixture firmly into the bottom of a 9×13-inch baking pan to form a solid base. This crust is the foundation of your bars and provides a delightful crunch.
- Add the Chocolate Layer: Sprinkle the chocolate chips evenly over the crust. The heat from the oven will melt the chocolate, creating a rich and gooey layer.
- Layer with Caramel: Distribute the caramel bits evenly over the chocolate layer. The caramel adds a gooey sweetness that pairs wonderfully with the chocolate.
- Pour Sweetened Condensed Milk: Drizzle the sweetened condensed milk over the caramel layer. This ingredient acts as a binder for the bars and adds a creamy texture.
- Top with Butterfinger Pieces: Finally, sprinkle the crushed Butterfinger bars over the top. The Butterfinger pieces add a crunchy texture and a peanut buttery taste that makes these bars incredibly addictive.
- Bake the Bars: Place the pan in the oven and bake for about 25-30 minutes, or until the edges are lightly browned and the middle is set. This baking time ensures that every layer melds together perfectly.
- Cool and Slice: Allow the bars to cool in the pan completely before slicing into squares. This step is crucial as it lets the bars set, making them easier to cut.
- Enjoy!: Once cooled, cut into squares and serve. These bars can be stored in an airtight container at room temperature for up to a week, making them a great make-ahead dessert.
Why You’ll Love These Butterfinger Caramel Crunch Bars:
- Rich Layers: Each layer of these bars offers a different texture and flavor, making every bite exciting.
- Easy to Make: This recipe is straightforward and perfect for bakers of all skill levels.
- Crowd-Pleaser: The universally loved flavors of Butterfinger and caramel make these bars a hit at any event.
Pro Tips:
- Chill Before Cutting: For cleaner cuts, chill the bars in the refrigerator for about an hour before slicing.
- Customize Your Layers: Feel free to add nuts or different types of chocolate to personalize your bars according to your taste preferences.
Butterfinger Caramel Crunch Bars are a delicious treat that combines the best of crunchy, chewy, and sweet elements. Whether you’re making them for a special occasion or just as a treat for the family, they’re bound to be a delightful indulgence that everyone will love. Enjoy the process of making these delicious bars, and relish every bite!
Serving and Storage Tips for Butterfinger Caramel Crunch Bars
These Butterfinger Caramel Crunch Bars are not only delicious but also incredibly versatile when it comes to serving and storing. Here are some tips to help you get the most out of your homemade treats:
Serving Tips:
- Room Temperature Perfection: Serve these bars at room temperature to ensure that the caramel and chocolate are soft and gooey. If they are too cold, they might be hard to bite into, while too warm could make them overly sticky.
- Add a Garnish: For a more decorative presentation, sprinkle a little sea salt or drizzle extra melted chocolate over the top before serving. This not only enhances the look but also boosts the flavor profile.
- Pair with Beverages: Complement the sweetness of these bars with your favorite beverages. For adults, a cup of strong coffee or a glass of milk works wonderfully. For a special treat, try pairing them with a dessert wine that has nutty or caramel notes.
- Serve as a Dessert or Snack: These bars are perfect as a quick snack or as a more elaborate dessert. Cut them into smaller pieces for bite-sized treats or larger bars for a satisfying dessert portion.
Storage Tips:
- Cool Completely Before Storing: To keep the bars from becoming soggy, allow them to cool completely before storing. This step is crucial as it prevents condensation from forming inside the container.
- Refrigeration for Longevity: If you’re not planning to eat all the bars within a couple of days, store them in the refrigerator. They will keep for up to a week when refrigerated. Just make sure to wrap them in wax paper or parchment and place them in an airtight container to maintain freshness and prevent them from absorbing other flavors in the fridge.
- Freezing for Extended Storage: For long-term storage, these bars can be frozen. Wrap each bar individually in plastic wrap, then place them in a zip-top bag or airtight container. They can be frozen for up to 3 months. Thaw at room temperature for a few hours or overnight in the refrigerator before serving.
- Keeping Them Crisp: If the bars lose their crispness, pop them into a 350°F (175°C) oven for 5-10 minutes to re-crisp the crust and rejuvenate the chocolate and caramel layers. Allow to cool slightly before serving.
By following these simple serving and storage tips, you can ensure that your Butterfinger Caramel Crunch Bars are delicious from the first bite to the last. Whether you’re sharing them at a party or enjoying them as a personal treat, they’re bound to be a delightful indulgence. Enjoy your homemade creation and the smiles they bring!
1. Can I use a different type of candy bar instead of Butterfinger?
Absolutely! While Butterfinger candy bars provide a unique peanut buttery crunch that is hard to replicate, you can certainly experiment with other types of candy bars based on your preference. Some great alternatives include Snickers for a nutty and nougat texture, Reese’s Pieces for a peanut butter twist, or Heath bars for a toffee flavor. Just make sure to chop them into similar-sized pieces as you would with Butterfinger.
2. Is there a way to make these bars gluten-free?
Yes, making these bars gluten-free is quite straightforward. Substitute the graham cracker crumbs for a gluten-free alternative, which is readily available in most grocery stores. Also, ensure that the candy bars and other ingredients used are certified gluten-free to avoid any cross-contamination.
3. What if I don’t have caramel bits?
If you don’t have caramel bits, you can use regular caramel candies. Unwrap them and chop into small pieces to ensure they melt evenly and distribute nicely throughout the bars. Alternatively, you could use a thick caramel sauce. Drizzle it over the chocolate layer before adding the sweetened condensed milk and Butterfinger pieces. This can create a gooier caramel layer that is equally delicious.
4. How do I cut the bars without them falling apart?
Cutting these bars cleanly can be a challenge due to their rich and gooey layers. Here are a few tips to help:
- Make sure the bars have completely cooled before attempting to cut them. If you’re in a hurry, chilling the bars in the refrigerator for about an hour can speed up the process.
- Use a sharp knife and clean it between each cut. Running the knife under hot water and wiping it off can help make cleaner cuts through the sticky layers.
- Cut with a gentle sawing motion instead of pressing down hard, which can cause the layers to squish and stick.
Butterfinger Caramel Crunch Bars
- Prep Time: 15 minutes
- Chill Time: 2 hours
- Cook Time: 10 minutes
- Total Time: 2 hours 25 minutes
- Yield: 16 bars 1x
- Category: Dessert, No-Bake
- Method: Assembly
- Cuisine: American
Description
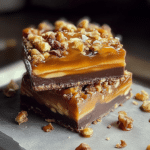
These Butterfinger Caramel Crunch Bars are a no-bake dessert masterpiece! With layers of creamy caramel, crunchy Butterfinger candy, and a chocolate topping, they’re a sweet treat perfect for parties, holidays, or anytime you crave indulgence.
Ingredients
For the Base Layer
- 1 cup graham cracker crumbs
- 1/2 cup unsalted butter, melted
- 1/4 cup granulated sugar
For the Caramel Layer
- 1 (14 oz) can sweetened condensed milk
- 1/2 cup unsalted butter
- 1/4 cup light corn syrup
- 1/2 cup packed brown sugar
For the Topping
- 1 1/2 cups crushed Butterfinger candy bars (about 6 fun-sized bars)
- 1 cup milk chocolate chips
- 1 tbsp vegetable oil or coconut oil (optional, for a smoother chocolate layer)
Instructions
1. Prepare the Base Layer
- In a medium bowl, mix the graham cracker crumbs, melted butter, and sugar until well combined.
- Press the mixture firmly into the bottom of a greased or parchment-lined 8×8-inch baking dish.
- Refrigerate while preparing the caramel layer.
2. Make the Caramel Layer
- In a medium saucepan, combine the sweetened condensed milk, butter, corn syrup, and brown sugar.
- Cook over medium heat, stirring constantly, until the mixture thickens and turns a golden caramel color (about 8–10 minutes).
- Pour the hot caramel over the chilled graham cracker base and spread evenly.
- Sprinkle 1 cup of the crushed Butterfinger candy evenly over the caramel. Return to the refrigerator to set for 30 minutes.
3. Add the Chocolate Topping
- Melt the chocolate chips with the oil in a microwave-safe bowl in 30-second intervals, stirring until smooth.
- Pour the melted chocolate over the chilled caramel layer, spreading it evenly with a spatula.
- Sprinkle the remaining crushed Butterfinger candy on top of the chocolate layer.
4. Chill and Slice
- Refrigerate the bars for at least 2 hours or until fully set.
- Lift the bars out of the pan using the parchment paper and slice into squares or rectangles with a sharp knife.
Notes
- Storage: Store in an airtight container in the refrigerator for up to a week. These bars can also be frozen for up to 2 months.
- Variation: Add chopped peanuts or pretzels to the caramel layer for extra crunch.
- Caramel Tip: Keep stirring the caramel to prevent it from sticking to the bottom of the pan and burning.