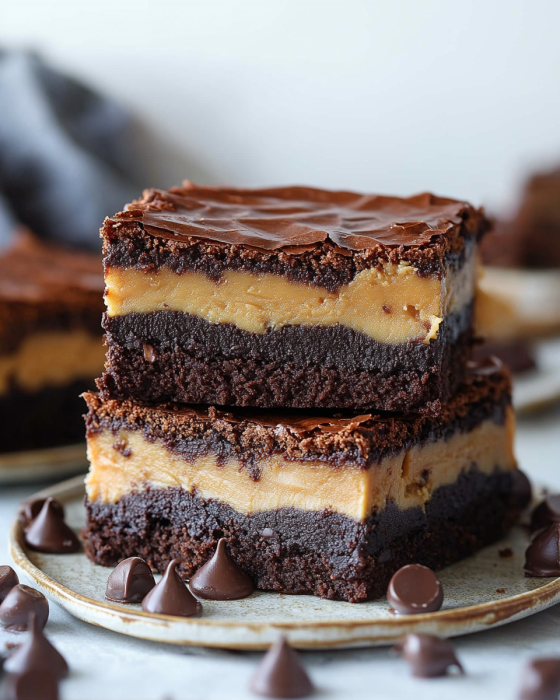
If you’re a fan of rich chocolate desserts and creamy peanut butter, then Buckeye Brownies are your next must-try treat. This delectable recipe combines the best of both worlds—fudgy brownies and smooth, peanut butter centers—creating a dessert that’s impossible to resist. Perfect for parties, potlucks, or a special treat for yourself, these brownies are a crowd-pleaser. Here’s how you can make them:
What Are Buckeye Brownies?
Buckeye Brownies are inspired by the classic Buckeye candy, which features a creamy peanut butter center coated in chocolate. In this recipe, the concept is transformed into a decadent brownie with a peanut butter layer sandwiched between rich chocolate brownie layers. It’s an irresistible fusion of flavors and textures that will leave you and your guests craving more.
Ingredients:
For the Brownie Layer:
- 1/2 cup (1 stick) unsalted butter
- 1 cup granulated sugar
- 2 large eggs
- 1 tsp vanilla extract
- 1/3 cup unsweetened cocoa powder
- 1/2 cup all-purpose flour
- 1/4 tsp salt
- 1/4 tsp baking powder
For the Peanut Butter Layer:
- 1/2 cup creamy peanut butter
- 1/2 cup powdered sugar
- 2 tbsp unsalted butter, softened
For the Chocolate Topping:
- 1 cup semisweet chocolate chips
- 1 tbsp unsalted butter
Instructions:

1. Prepare the Brownie Layer:
- Preheat Oven: Begin by preheating your oven to 350°F (175°C). Grease an 8×8-inch baking pan or line it with parchment paper.
- Melt Butter: In a medium saucepan, melt the butter over low heat. Remove from heat and stir in granulated sugar, eggs, and vanilla extract until well combined.
- Add Dry Ingredients: Stir in cocoa powder, flour, salt, and baking powder until just combined. Avoid over-mixing.
- Bake Brownies: Pour the brownie batter into the prepared pan and spread it evenly. Bake for 20-25 minutes, or until a toothpick inserted into the center comes out mostly clean. Allow the brownies to cool completely in the pan.
2. Prepare the Peanut Butter Layer:
- Mix Ingredients: In a medium bowl, combine peanut butter, powdered sugar, and softened butter. Mix until smooth and creamy.
- Spread Layer: Once the brownies are cooled, spread the peanut butter mixture evenly over the top of the brownies. Chill in the refrigerator while you prepare the chocolate topping.
3. Prepare the Chocolate Topping:
- Melt Chocolate: In a heatproof bowl over simmering water or in the microwave in 30-second intervals, melt the chocolate chips and butter together. Stir until smooth and glossy.
- Top Brownies: Pour the melted chocolate over the peanut butter layer, spreading it evenly. Return the brownies to the refrigerator and chill until the chocolate is set, about 1 hour.
4. Serve:
- Cut and Enjoy: Once the brownies are fully set, lift them out of the pan using the parchment paper (if used) and cut into squares. Serve and enjoy!
Tips for Perfect Buckeye Brownies:
- Room Temperature Ingredients: Ensure all your ingredients, especially the butter, are at room temperature for smooth mixing.
- Chill Layers: Chilling each layer helps set it properly and makes cutting easier.
- Storage: Store the brownies in an airtight container at room temperature for up to 1 week or in the refrigerator for longer freshness.
Why You’ll Love Buckeye Brownies
Buckeye Brownies offer a perfect balance of flavors and textures. The fudgy brownie base provides a rich chocolatey foundation, while the creamy peanut butter layer adds a delightful contrast. Topped with a glossy layer of chocolate, these brownies are as beautiful as they are delicious. Whether you’re baking for a special occasion or just indulging in a sweet treat, Buckeye Brownies are sure to impress.
Final Thoughts
Buckeye Brownies are an excellent choice for any chocolate and peanut butter lover. This recipe is simple to follow and results in a decadent dessert that’s perfect for sharing or enjoying solo. With a little patience and the right ingredients, you’ll have a batch of these irresistible brownies ready to satisfy your cravings. Happy baking!
Serving and Storage Tips for Buckeye Brownies
Serving Tips:
- Let Them Cool: For the best texture and flavor, ensure the brownies are completely cooled before cutting. This allows the layers to set properly and makes slicing easier.
- Cut into Squares: Use a sharp knife to cut the brownies into neat squares or bars. If the chocolate topping is too firm, you can gently warm the knife under hot water, then wipe it dry before cutting.
- Garnish (Optional): For a decorative touch, sprinkle a pinch of sea salt on top of the chocolate layer before it sets, or drizzle additional melted chocolate over the brownies for extra flair.
- Serve at Room Temperature: Buckeye Brownies taste best at room temperature. Let them sit out for about 15 minutes after removing from the refrigerator to soften slightly before serving.
Storage Tips:
- Airtight Container: Store brownies in an airtight container to keep them fresh. Place a piece of parchment paper between layers to prevent sticking and to maintain the quality of the brownies.
- Room Temperature Storage: If you plan to eat the brownies within a week, you can keep them at room temperature in a cool, dry place. They should stay fresh and delicious for up to 5-7 days.
- Refrigeration: For longer storage, keep the brownies in the refrigerator. They can last up to 2 weeks when stored properly. The cold environment helps preserve their freshness and prevents them from becoming too soft.
- Freezing: If you want to store brownies for an extended period, freezing is a great option. Wrap the brownies tightly in plastic wrap or foil, then place them in a freezer-safe bag or container. They can be frozen for up to 3 months. To thaw, let them sit at room temperature for about 1-2 hours before serving.
Reheating Tips:
- Microwave: To enjoy a warm brownie, microwave a square on a microwave-safe plate for 10-15 seconds. Be careful not to overheat, as it can make the brownies dry.
- Oven: Preheat the oven to 350°F (175°C) and place the brownies on a baking sheet for about 5-10 minutes to warm them through. This method helps maintain the brownies’ fudgy texture.
By following these serving and storage tips, you’ll ensure that your Buckeye Brownies remain delicious and enjoyable every time you indulge.
1. Can I use natural peanut butter instead of creamy peanut butter?
Yes, you can use natural peanut butter, but it might alter the texture slightly. Natural peanut butter can be more oily and may not bind as well with the powdered sugar, resulting in a slightly different consistency for the peanut butter layer. Stir it well before using and consider adding a bit more powdered sugar if needed to achieve a smoother texture.
2. How can I make Buckeye Brownies gluten-free?
To make Buckeye Brownies gluten-free, simply substitute the all-purpose flour with a gluten-free flour blend. Make sure the blend you choose is designed for baking and has a similar consistency to regular flour. Additionally, check that all other ingredients, such as the cocoa powder and chocolate chips, are labeled gluten-free.
3. Can I make these brownies ahead of time?
Absolutely! Buckeye Brownies can be made ahead of time and stored in the refrigerator or freezer. They actually taste better after a day or two as the flavors have time to meld. Just ensure they are stored in an airtight container to keep them fresh. If freezing, let them thaw at room temperature before serving.
4. How can I prevent the chocolate topping from cracking?
To prevent the chocolate topping from cracking, make sure to spread it evenly and allow it to cool slowly. If you notice any cracks forming, you can gently press them together with a spatula while the chocolate is still slightly warm. Additionally, avoid using too high a temperature when melting the chocolate, as overheating can cause it to seize and become brittle.
Print
Buckeye Brownies
- Prep Time: 20 minutes
- Chill Time: 45 minutes
- Cook Time: 25 minutes
- Total Time: 1 hour 30 minutes
- Yield: 16 brownies 1x
- Category: Dessert
- Method: No-Bake
- Cuisine: American
Description
Buckeye Brownies are a delicious fusion of fudgy chocolate brownies and the classic Buckeye candy. With a creamy peanut butter layer and a smooth chocolate topping, these brownies are a crowd-pleaser for any occasion.
Ingredients
For the Brownie Base:
- 1 box brownie mix (for a 9×13-inch pan) + ingredients listed on the package (usually eggs, oil, and water)
(or use your favorite homemade brownie recipe)
For the Peanut Butter Layer:
- 1 cup creamy peanut butter
- 1/2 cup unsalted butter, softened
- 2 cups powdered sugar
- 1 tsp vanilla extract
For the Chocolate Topping:
- 1 1/2 cups semi-sweet chocolate chips
- 1/4 cup heavy cream
- 2 tbsp unsalted butter
Instructions
-
Prepare the Brownie Base:
- Preheat your oven according to the brownie mix instructions. Grease a 9×13-inch pan.
- Prepare the brownie mix as directed on the package (or make your homemade brownie batter). Pour the batter into the prepared pan and bake as instructed.
- Once baked, let the brownies cool completely before proceeding to the next step.
-
Make the Peanut Butter Layer:
- In a mixing bowl, beat the peanut butter and softened butter together until smooth.
- Add the powdered sugar and vanilla extract, and mix until well combined and creamy.
- Spread the peanut butter mixture evenly over the cooled brownies. Place the pan in the refrigerator to chill for 15-20 minutes.
-
Prepare the Chocolate Topping:
- In a microwave-safe bowl, combine the chocolate chips, heavy cream, and butter. Microwave in 20-second intervals, stirring after each, until smooth and fully melted.
- Let the chocolate mixture cool slightly, then pour it over the peanut butter layer. Spread evenly with a spatula.
-
Set and Serve:
- Refrigerate the brownies for at least 30 minutes, or until the chocolate topping is set.
- Cut into squares and serve.
Notes
- Store leftovers in an airtight container in the refrigerator for up to 5 days.
- For a more indulgent twist, sprinkle sea salt or chopped peanuts over the chocolate topping before it sets.
