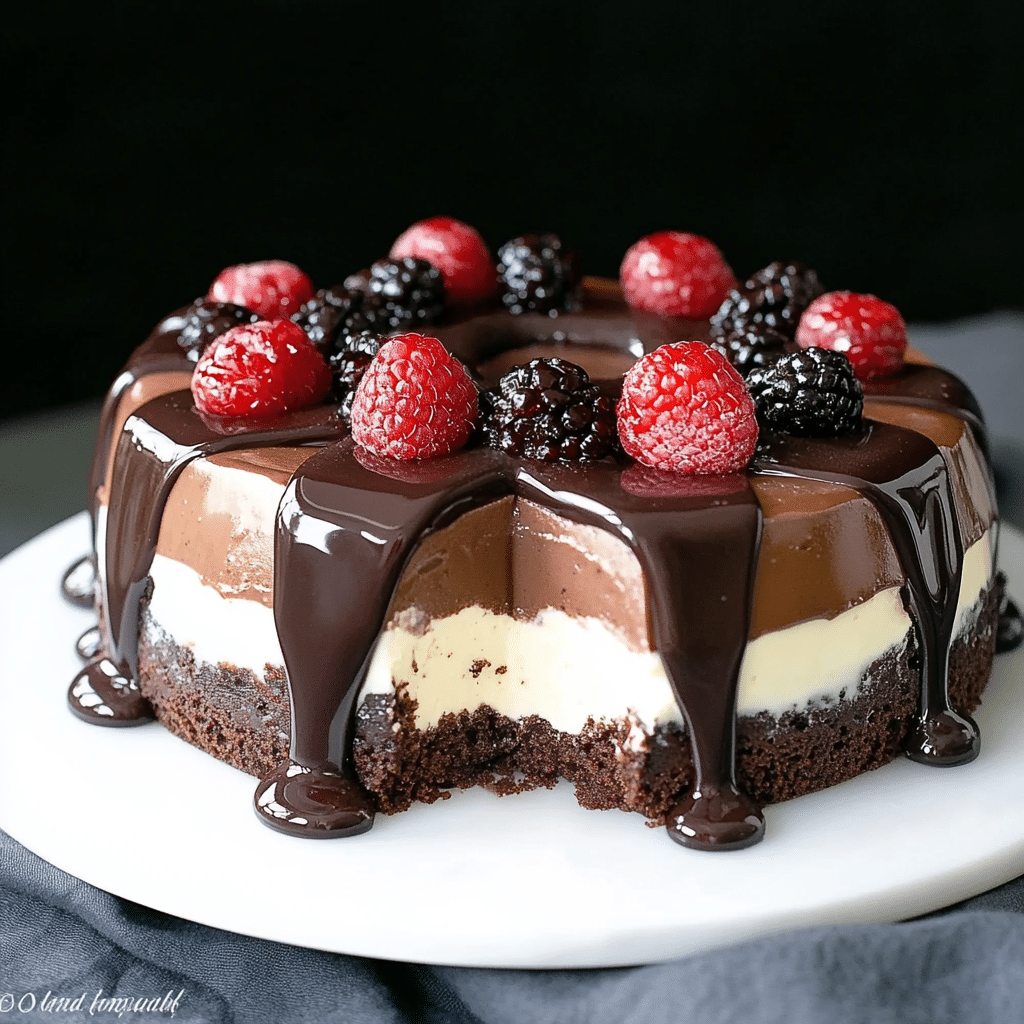
If you’re a chocolate lover looking for an easy, show-stopping dessert, this No-Bake Three Chocolate Cake is your answer. It’s rich, creamy, and perfect for special occasions or a simple indulgent treat. The best part? No need to turn on the oven! Here’s everything you need to know to make this delightful dessert.
Why You’ll Love This Recipe
- No Baking Required: Skip the hassle of baking and get straight to the deliciousness.
- Triple Chocolate Delight: Layers of milk, dark, and white chocolate make this a chocolate lover’s dream.
- Perfect for Any Occasion: Whether it’s a dinner party or a weekend treat, this cake is always a crowd-pleaser.
Ingredients
For the Base:
- 200g (7 oz) chocolate cookies or graham crackers
- 100g (3.5 oz) melted butter
For the Milk Chocolate Layer:
- 200g (7 oz) milk chocolate
- 250ml (1 cup) heavy cream
- 1 tsp vanilla extract
For the Dark Chocolate Layer:
- 200g (7 oz) dark chocolate
- 250ml (1 cup) heavy cream
For the White Chocolate Layer:
- 200g (7 oz) white chocolate
- 250ml (1 cup) heavy cream
Optional Toppings:
- Chocolate shavings
- Cocoa powder
- Fresh berries
Step-by-Step Instructions
Step 1: Prepare the Base
- Crush the cookies or graham crackers into fine crumbs using a food processor or a rolling pin.
- Mix the crumbs with the melted butter until well combined.
- Press the mixture evenly into the base of a springform pan lined with parchment paper. Refrigerate for 30 minutes to set.
Step 2: Make the Chocolate Layers
Milk Chocolate Layer:
- Melt the milk chocolate using a double boiler or microwave.
- Whip the heavy cream until soft peaks form, then gently fold in the melted chocolate and vanilla extract.
- Pour this layer over the chilled base and smooth it out with a spatula. Chill for 1 hour.
Dark Chocolate Layer:
- Repeat the same process as above, using dark chocolate.
- Pour the dark chocolate layer over the milk chocolate layer and smooth it out. Chill for another hour.
White Chocolate Layer:
- Melt the white chocolate and fold it into whipped cream.
- Spread the white chocolate layer over the dark chocolate layer, smoothing the top.
Step 3: Chill and Decorate
Refrigerate the entire cake for at least 4 hours, preferably overnight, to allow the layers to set completely. Before serving, remove the cake from the springform pan and decorate with chocolate shavings, cocoa powder, or fresh berries for a stunning finish.
Pro Tips for Success
- Use high-quality chocolate for the best flavor.
- Ensure each layer is fully set before adding the next to maintain clean, defined layers.
- Serve chilled for the best texture and taste.
Conclusion
This No-Bake Three Chocolate Cake is a dessert that looks as impressive as it tastes. With its luscious layers and rich chocolate flavor, it’s guaranteed to impress your family and friends. Whether you’re hosting a party or craving a sweet treat, this recipe is your go-to for effortless elegance.
Serving and Storage Tips for No-Bake Three Chocolate Cake
Serving Tips
- Chill Before Serving: This cake is best served chilled to maintain its creamy texture and defined layers. Remove it from the refrigerator just before slicing.
- Use a Warm Knife: To achieve clean slices, run a knife under hot water, wipe it dry, and cut each slice carefully. Repeat between cuts.
- Pairing Suggestions: Serve with a dollop of whipped cream, a drizzle of chocolate syrup, or fresh berries for an extra touch of elegance.
- Presentation Idea: Dust the top lightly with cocoa powder or powdered sugar for a professional finish.
Storage Tips
- Refrigeration: Store the cake in an airtight container or cover it tightly with plastic wrap. It will stay fresh for up to 5 days in the refrigerator.
- Freezing:
- To freeze, wrap individual slices tightly in plastic wrap and place them in an airtight container or freezer bag.
- The cake can be frozen for up to 3 months. Thaw slices in the refrigerator for several hours or overnight before serving.
- Avoid Room Temperature: Since the cake contains cream, it should not be left out for more than 2 hours.
By following these tips, you can enjoy your No-Bake Three Chocolate Cake at its freshest and most delicious, whether you serve it right away or save it for later!
1. Can I Make This Cake Ahead of Time?
Yes, absolutely! This cake is perfect for preparing in advance. You can make it up to 2 days ahead and store it in the refrigerator. The flavors develop even more with time, making it even more delicious.
2. What Can I Use Instead of a Springform Pan?
If you don’t have a springform pan, you can use a regular cake pan lined with parchment paper. Make sure to leave enough overhang so you can lift the cake out easily once it’s set.
3. Can I Use Dairy-Free Alternatives?
Yes! Substitute the heavy cream with coconut cream or a plant-based whipping cream. Use dairy-free chocolate for all three layers to make the recipe vegan-friendly.
4. How Long Does It Take for the Layers to Set?
Each layer typically needs 1 hour in the refrigerator to set properly before adding the next one. For best results, refrigerate the entire cake for at least 4 hours (or overnight) before serving.
Print
No-Bake Three Chocolate Cake Recipe
- Prep Time: 30 minutes
- Cook Time: 5 hours
- Total Time: 5 hours 30 minutes
- Yield: 8 to 10 slices 1x
- Category: Dessert
- Method: No-Bake
- Cuisine: International
Description
This no-bake three chocolate cake is a rich and indulgent dessert featuring layers of dark, milk, and white chocolate mousses on a biscuit base. Easy to make and perfect for any celebration, it’s a show-stopper dessert that doesn’t require an oven!
Ingredients
For the base:
- 200 g (7 oz) digestive biscuits or graham crackers, crushed
- 80 g (1/3 cup) unsalted butter, melted
For the chocolate layers:
- 150 g (5 oz) dark chocolate, chopped
- 150 g (5 oz) milk chocolate, chopped
- 150 g (5 oz) white chocolate, chopped
- 600 ml (2 1/2 cups) heavy cream, divided (200 ml per layer)
- 3 teaspoons gelatin powder (1 teaspoon per layer)
- 3 tablespoons water (1 tablespoon per layer)
For decoration (optional):
- Chocolate shavings or curls
- Cocoa powder
- Berries (raspberries or strawberries)
Instructions
- Prepare the base:
- Mix the crushed biscuits with the melted butter until the texture resembles wet sand.
- Press the mixture firmly into the bottom of a 9-inch (23 cm) springform pan to create an even base. Chill in the refrigerator while preparing the chocolate layers.
- Make the dark chocolate layer:
- Sprinkle 1 teaspoon of gelatin over 1 tablespoon of water in a small bowl. Let it bloom for 5 minutes.
- Heat 200 ml of heavy cream in a saucepan until it’s warm (do not boil). Remove from heat, add the bloomed gelatin, and stir until dissolved.
- Melt the dark chocolate in a microwave or over a double boiler. Slowly whisk the warm cream into the chocolate until smooth.
- Pour the dark chocolate mixture over the chilled biscuit base. Smooth the top and refrigerate for 30 minutes.
- Repeat for the milk and white chocolate layers:
- Follow the same process as the dark chocolate layer, using the milk chocolate for the second layer and the white chocolate for the third layer. Allow each layer to set in the refrigerator for at least 30 minutes before adding the next.
- Chill and serve:
- Once all layers are set, refrigerate the cake for at least 4 hours, or overnight for best results.
- Before serving, carefully remove the cake from the springform pan and transfer it to a serving plate.
- Decorate (optional):
- Top the cake with chocolate shavings, cocoa powder, or fresh berries for a decorative touch.
Notes
- For a vegetarian version, substitute the gelatin with agar-agar (adjust quantity as needed).
- To make slicing easier, dip a knife in hot water and wipe it dry before cutting.
- Store the cake in the refrigerator for up to 3 days.

